Priorite Shards are discoverable collectibles found around Koboh which Cal can trade at Domo’s shop for new cosmetic styles. There are 100 Priorite Shards scattered around the planet so there’s plenty to collect as you explore. If you’d rather gather up some Priorite Shards sooner rather than later, all of the Rambler’s Reach Outpost locations are convenient since it’s centric to much of the story in Star Wars Jedi: Survivor.
All Rambler’s Reach Outpost Priorite Shard locations in Jedi: Survivor
There are 10 Priorite Shards locations that we know of around Rambler’s Reach Outpost. You can get some of these early on in the game, but others will take certain abilities to access. We’ve labeled all 10 on the map below and have included some descriptions for how to obtain each.
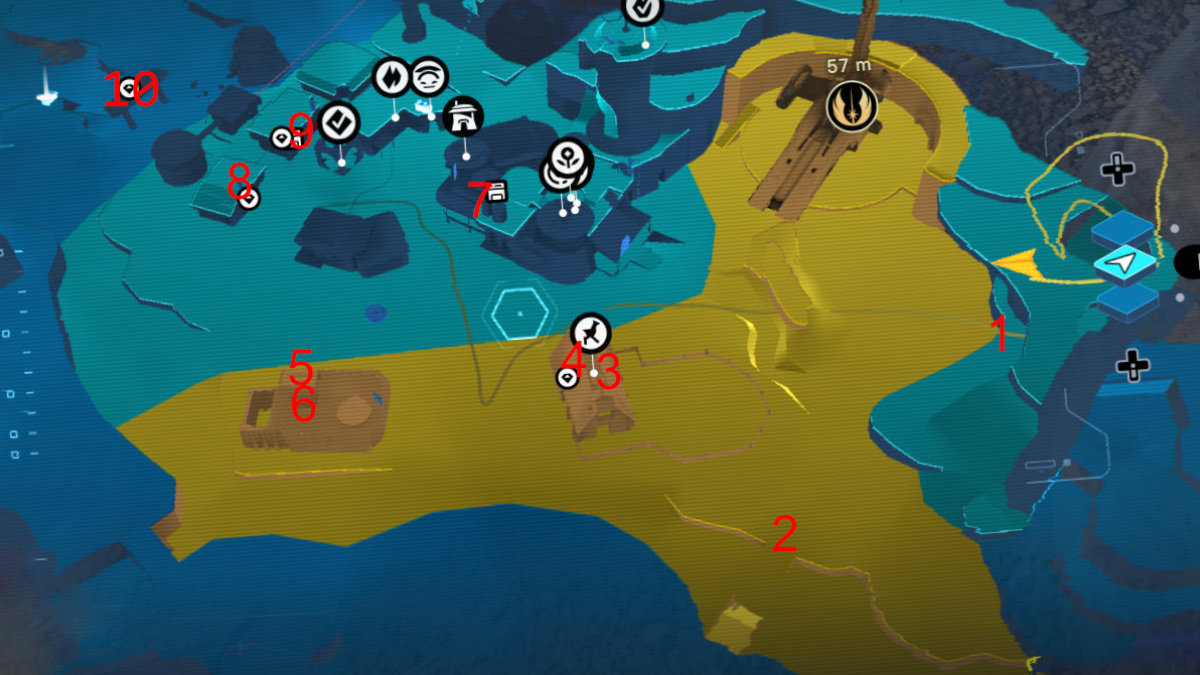
Image by PC Invasion
- You can get this Priorite Shard from the Scavenger droid over by the caves past the ship landing pad. This droid will not instantly dig into the ground, but will instead flea into the tunnels. Chase it down and destroy it with your lightsaber to drop the Priorite Shard. Watch out for the creatures lurking in the cave.
- There’s another Scavenger droid by the broken-down bridge at the river. It too will flea once you get close, but you can chase it down and destroy it easily enough.
- There are two Priorite Shards at the stable and the first is quick and easy to get. Just mount one of the Nekko and use it as a launch platform to get to the second floor opening. The Priorite Shard is on one of the floorboards. You can also get a second treasure in there by dropping down into a walled-off section on the first floor.
- The second location at the stables must be unlocked as a reward. Go find a pink or albino Nekko around Koboh and return it to the stables. Make sure to actually store it in one of the stables. Go to a resting point after doing this to reload the level and then return to the stables to find a small pile of rocks you can interact with to retrieve the Priorite Shard.
- You’ll need to have the “Tame Relter” ability to use one of the glider animals for this next collectible. There’s a Priorite Shard on the roof of the tower of the barred-up building by the river. There’s a climbable tower with a Relter next to Pyloon’s Saloon which is the easiest way to reach the tower roof.
- That same barred-up building also has some tunnels below. Access the building by dropping down from the roof into the walled courtyard in the back. You can also use a Nekko to jump over it. You’ll need Merrin’s Barrier Dash charm to pass through the ray shield and access the tunnels. Watch out for the creatures while you’re down there.
- Enter Pyloon’s Saloon and hang a right to enter the restrooms. You’re now a Jedi janitor, because this next Priorite Shard is clogged in one of the toilets. Examine the toilet to retrieve it, for better or worse.
- The next two are interlinked in two adjacent buildings and you won’t be able to access these until you get the charge gun ability for BD-1 later in the story. You’ll also need to talk to the nearby residents of Rambler’s Reach Outpost to receive a Rumor related to the Jawas. Help the Jawas and a group will appear in Rambler’s Reach and remove some of the boards on the buildings. You can then use the charge gun to activate the electricity on the conduits and power the doors on each building.
- Move the power couplers to each door lever to enable access for the different buildings and get this second Priorite Shard.
- This last one is easy to get and over by the town entrance on the arch. There’s a horned skull which you can Force Pull down. The Priorite Shard will fall out.
That’s all of the Rambler’s Reach Outpost Priorite Shard locations we’ve discovered to date in Jedi: Survivor. There are plenty more of course, so check back for more guides at other locations. We also have guides for all 18 Bounty Puck locations, how to solve the Chamber of Reason, and how to get all the beard and hair options.
Star Wars Jedi: Survivor is available on Steam, the Epic Games Store, and the EA app for PC.