Last Wish Boss Fight #2: Shuro Chi
Loadout
- Kinetic – it generally does not matter
- Energy – Ikelos Shotgun
- Power – Sleeper Simulant or Whisper of the Worm
Classes
- At least one Hunter as Nightstalker with Orpheus Rig
- At least one Warlock as Dawnblade using Well of Radiance and Lunafaction Boots
- Titans should preferably choose Sunbreaker for Melting Point and wear Synthoceps
Recommended Power Level: 541+
Shuro Chi is a heavily-timed encounter. You’ll need to consistently clear mobs on the way to her. Nightstalker tethers help immensely to make lots of orbs while the rest of your team consistently pop their supers for add clearing. You have four minutes to get to the next floor, otherwise, the “Song of Shuro Chi” will wipe your team.
Once you reach Shuro Chi’s spot, three players need to pick up one crystal each and hop on their platforms. Then, they need to shoot the player to their right which forms a triangle around Shuro Chi. This will break her shield but this also needs to be done fast because players will slowly lose their health.
Once her shield is broken, your team needs to do enough damage to take out one-sixth of her health bar so that she moves to the next area. Your best option is for the Warlock to drop a Well of Radiance and just go to town using shotguns to her face.
She will also cast an instant-wipe spell which you can cancel by picking up a Relic known as the “Eye of Riven.” It drops from a unique Taken mob in the area. The player who picks it up must use its super attack to stun the boss before she can wipe the team.
When Shuro Chi goes immune, follow her to the next area and kill the mobs along the way. Repeat the same process as before except this time a different player needs to pick up the Eye of Riven Relic.
The Puzzle Room
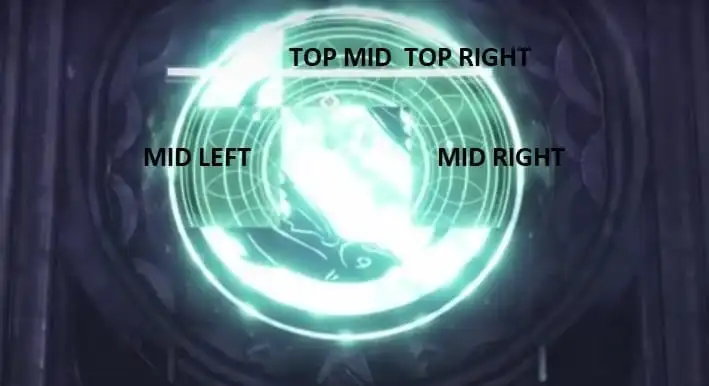
In the puzzle room look at the left-hand side wall first as you enter. You’ll see a symbol that has missing pieces. On the ground are nine plates. Four players must step on the corresponding symbols for the pieces that are missing in order to form the image. In the example above we need players to step on the top mid, top right, mid left, and mid right plates. When you see that the correct code has been entered, that means you’ve completed the first puzzle.
Next, look to the front-center of the room to see the next puzzle. Players need to activate the corresponding plates once more. Remember though that the order of the plates is dependent on the direction you are facing. The third and final puzzle will be at the right-hand side of the wall.
Take note that players cannot step on the same plate twice. Otherwise, that plate will turn red. You’ll need to communicate with your teammates for someone else to step on it or swap with you.
Lastly, mobs will continue to spawn as you are doing this so have your two remaining players on add duty. Once you’ve completed the left, front, and right side wall puzzles, platforms will start appearing which will allow you to jump to the next floor. Be careful as these platforms can flip you over and you’ll need to jump up once again.
The 2nd and 3rd Floors
Once you get to the second floor just rinse and repeat. Clear mobs, break the boss’ shield, damage her and stun, and then go to her next spot. After that just complete the second puzzle room.
For the third floor, it’s still the same except towards the end mobs will continuously spawn once you get to Shuro Chi’s spot. Simply tether those spawning enemies, stand inside the Well of Radiance, and keep shooting her until she’s down.
Problems
- Players who are wearing the Nightfall score emblems will sometimes get bugged out from shooting the crystals.
- During the second spot on the first floor, the boss might suddenly go immune even though the bar of her health isn’t taken down yet. This seems to be a connection issue so just keep shooting at her until you see that health bar drop.
- Some Taken spawn points end up bugging out Nightstalker tethers so try to fire them only once the mobs have appeared.