
How to defeat Lesmes and Infanta in Blasphemous 2
Unsure on how to defeat Lesmes and Infanta in Blasphemous 2? Check out our guide on tips for dealing with the game's most devious duo.

If there’s one thing that I, and most fans of action RPGs, have come to fear in recent years, it’s duo boss fights. These games are typically built around one-on-one engagements, so throwing two powerful, complex enemies against the player at once can feel intimidating at best, and unfair at worst. Blasphemous 2 tries this trick early on in its main quest, pitting you against Lesmes, Incorrupt Sacristan and Sleeping Infanta in one drawn-out brawl. This pair serve as the gatekeepers for the second half of the game, and they perform their duties admirably, forming one of the biggest difficulty spikes that Blasphemous 2 has to offer. If you’re having trouble, and want to learn how to defeat Lesmes and Infanta in Blasphemous 2, then read on for my comprehensive guide.
How to bring down Lesmes and Infanta in Blasphemous 2
Boss Location
You’ll encounter Lesmes and Infanta in the Crown of Towers area, right at the top of the zone. This will more than likely be the last of the three early-game bosses you take on, after Orospina and Radames, which means that you’ll have access to all three of the game’s core weapons by this point. As we covered in our weapons guide, all three are viable for every boss in the game, this one included. That said, I used Sarmiento and Centella for this fight, and I recommend that you do too. Its fast attacks are ideal for exploiting the narrow openings you’ll be afforded here, and it’s relatively easy to reach and maintain its additional lightning damage in this fight as well.
Phase 1: Lesmes, Incorrupt Sacristan
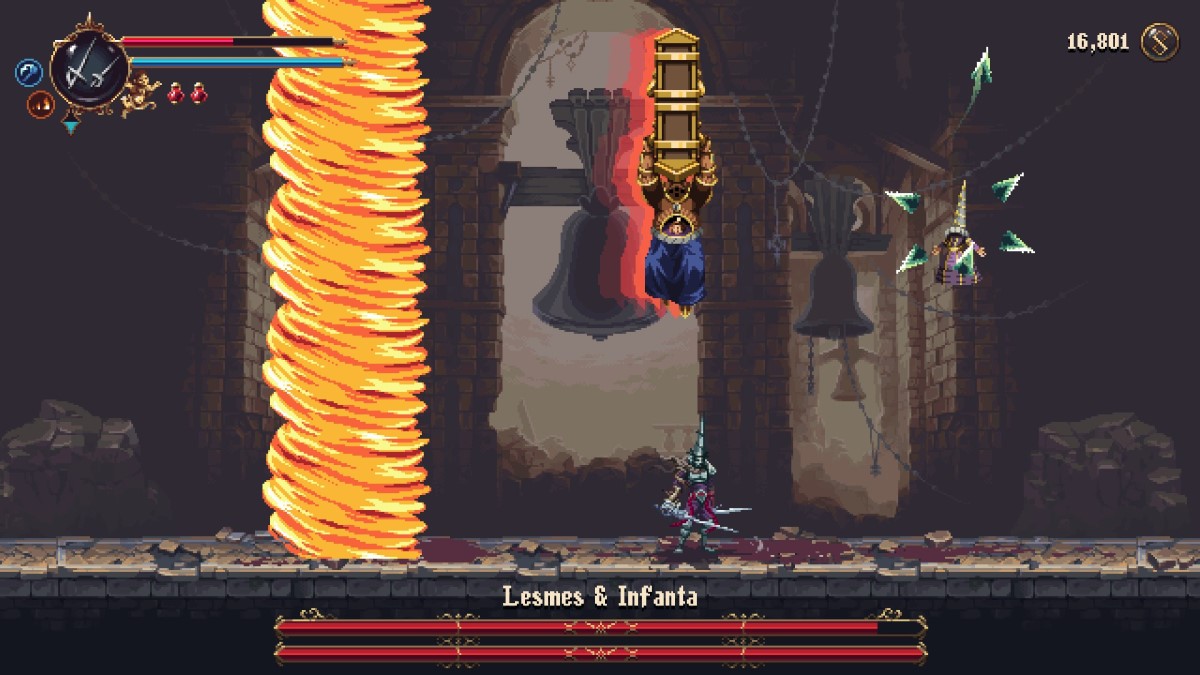
The fight begins with a solo fight against Lesmes, Incorrupt Sacristan. He’s a fairly slow opponent who uses fire-based attacks to control the arena, meaning positioning is key to bringing him down. You’ll also need to be aware of the windows for getting damage in, since there are more of them than you may think in between his onslaught of attacks. Here’s a full list of his offensive options:
- Coffin Punch – From a standing position, Lesmes will pull his arm back and deliver a horizontal punch in your direction. You can easily avoid this attack by jumping over Lesmes, but sliding through him is an option too.
- Fire Pillars – Lesmes slams his coffin into the ground and summons a series of fire pillars at different locations in the arena. These run from the bottom to the top of the screen. Their positions are telegraphed in advance by smaller versions of the pillars appearing first, giving you time to move into a safe position. Try and find a spot near Lesmes so you can get some hits in while this attack unfolds.
- Fire Slam – Lesmes floats in the air, moving to a location near you before slamming down and creating a fire pillar where he lands. He then repeats this process several times. The best way to avoid this attack is to keep moving, since he’ll always be a few steps behind you, and to stick to the middle of the arena, since that prevents him boxing you into a corner with successive pillars.
- Fire Wheel – Lesmes transforms into a coffin and floats in the air, with a circle of fireballs orbiting him. He then moves across the arena to your position. You should jump to avoid the fireballs at first, then once he stops moving, you can just stand directly under him and you’re safe. You can also deal damage to Lesmes in this state, so get some hits in when you can. After some time has passed, Lesmes will draw the fireballs in then explode for AOE damage. When you see the fireballs being drawn in, you can slide away from Lesmes to avoid any damage here.
Once you get used to reacting to each of his moves and positioning yourself in a safe spot, Lesmes isn’t too tricky to defeat. He also has fairly low health for a boss fight: something I found strange my first time through the game, until I realized a second phase was coming.
Phase 2: Sleeping Infanta
After defeating Lesmes, his coffin will fall to the ground, and the Sleeping Infanta will slowly begin to emerge. This is a cool introduction to the second stage of the fight, but it’s also a huge punish window as well: You can constantly attack Infanta for the duration of its emerge animation, with no risk of taking damage in return. Always keep this in mind when attempting this phase, since it can let you start the battle with around a quarter of Infanta’s health already gone. Once you get into things fully, Infanta has the following moves:
- Spike Shield – Infanta surrounds itself with a ring of lightning-infused spikes. These damage you if you touch them, which effectively increases the size of Infanta’s hurtbox. Infanta will fire these spikes at you at regular intervals, and they’ll home in on you to an extent. Usually you can jump over these, but sometimes sliding is safer if you’re not 100% sure you can clear one.
- Spike Barrage – Infanta fires all of its remaining spikes at once, and they all home in on you. Dodging this attack is similar to dodging Infanta’s regular projectiles, but jumping is much less viable since you’ll usually collide with another spike even if you clear the first few. The best method I found for avoiding damage here was to wait until most of the spikes had been fired, then slide towards Infanta.
- Spike Charge – The spikes around Infanta start spinning, and it dashes along the ground at you. This attack is easiest to dodge by jumping over it, and there’s a long enough wind up that you’ll always see it coming, with plenty of time to react. Sliding through Infanta is also an option here, albeit a trickier one to execute.
Overall, Infanta is a much easier fight than Lesmes. Its attacks deal less damage, and take up less space, making them easier to avoid if you stay alert. Like Lesmes, Infanta also has very low health, especially when you factor in the extra damage you can deal during the transition into phase 2. Don’t get too cocky though: once you take down Infanta, the real boss fight begins.
Phase 3: Lesmes and Infanta
In this phase, you’ll take on both Lesmes and Infanta, with their full movesets from their original one-on-one fights, at once. After surviving two full boss fights before this, I was feeling pretty tired by this point, but this is where you’ll really need to step up your game if you want to succeed.
Dodging the duo’s attacks is the same as it was originally, but now you need to factor in what the other boss may be doing at any given time as well. For the most part, Lesmes will play exactly the same as before while Infanta keeps a safe distance and fires off spikes every few seconds. Your best bet for dealing with this is to focus on fighting Lesmes as you did in phase 1, with one eye constantly on Infanta so you can see its spikes coming and avoid them. Treat this as a repeat of phase 1 with an extra stage hazard, and focus purely on wearing down Lesmes’ health.
You can even play recklessly when his health is low just to get him out of the way, since the fight becomes much, much easier once he’s gone. In my successful attempt on this boss, I got on a roll with Sarmiento and Centella’s lightning infusion ability, and managed to deal with Lesmes fairly early on, which worked a lot better than the attempts where I tried to fight both at once and balance my damage across each of them. Once he’s down, the rest of the fight will be a straightforward battle against Infanta, where you can easily prevail if you take your time and get in damage where it’s safe. Refer back to the details of Infanta’s moveset above to get you ready for this stage of the battle.
Rewards
After the duo is defeated, you’ll receive 2,000 Tears of Atonement, 1 Mark of Martyrdom, and the last of the three Regrets that you’ve been searching for. With this, the upper sections of the City of the Blessed Name, and the later sections of the game as a whole, will now be accessible to you.
So there you have it: a full guide on how to defeat Lesmes and Infanta in Blasphemous 2. For my money, it’s one of the hardest bosses in the main game, second only to a couple of late-game monstrosities. Claiming victory here is a test of endurance and patience, but once you manage it, the second half of Blasphemous 2 will be open to you, with all of the wonders and terrors it contains.