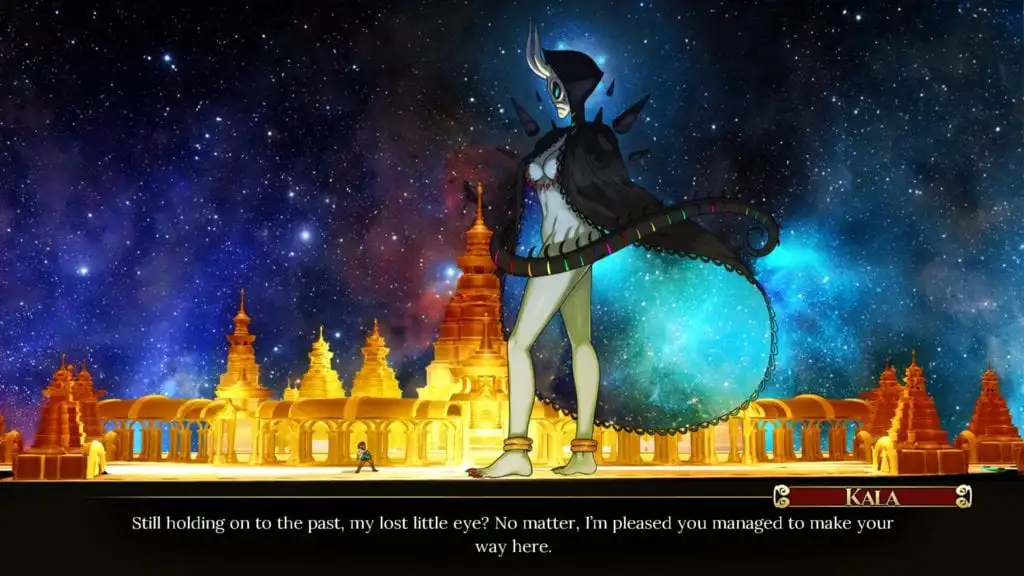
In Indivisible, the second fight against Kala is considerably trickier than the first one. She has a lot of health bars to chew through, and if you don’t do the right thing at the end, you’ll have to go through a dozen more to get it right. If you’re struggling with the final boss, here’s how to get through without issue.
Indivisible: facing down Kala
One of the most notable things about this fight is that you’re supposed to attack Kala repeatedly as Ajna alone. The most tempting way to do this is to use Ajna’s Iddhi-based air dash, but that’s not a good idea. Ajna’s health is used up whenever you do that, so you’re going to want to stick with her upward air strike using the equivalent of the Y or Triangle button. This strike is perfect because the damage is good and it hits her multiple times.
But it’s not as simple as just wailing on her. Indivisible‘s final boss frequently summons rows of fists to pummel you, which can really eat up Ajna’s health. The best solution is to just figure out the timing and perfect block them, but this can be tricky in mid-air. If you’d rather not put the practice in, simply hit Kala as much as you can and then drop to the ground and hold block whenever the fists appear. Ajna will take less damage while blocking.

Heal up
Once you do enough damage, Kala will inhale everything and you’ll need to mash buttons to fill up your Iddhi bar to escape, which will take off one of Kala’s health bars after the first instance of this. But this also gives you a quick way to heal back to full health each round. Simply have Razmi in your party for this fight. At the beginning of each party combat round, use Razmi’s 1-Iddhi bar focus special to heal your party. You have seven Iddhi bars at your disposal at this point, so feel free to use as much as you need to heal completely.
Once you get all of Kala’s health bars down, she’ll declare that she has control over everything and you can’t escape. If you fail to act in time, Kala will basically make you start the fight over again. But it’s very easy to dodge this. Indivisible even tells you if you don’t happen to think of it in time on your first go-around.
Once she starts going berserk, just go into Ajna’s inner realm like you always do and you’ll be able to proceed on to the next part of the fight. But this is where things get much harder. After this, Ajna will go head-to-head with Kala, which is one of the most difficult parts of the game. It’ll possibly take you some memorization, but here’s how to handle this part of the final boss.

Get busy dodgin’
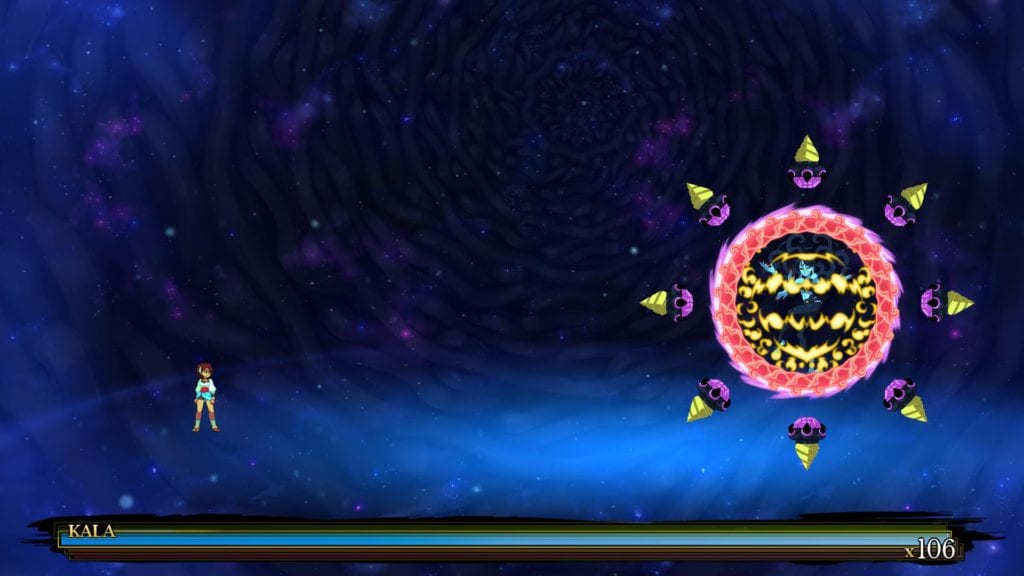
This fight starts with Ajna approaching a black egg. This dialogue part can be skipped, so you won’t need to sit through the talking every time you try this. Kala does the same moves in the exact same order during this sequence. At first, Kala shoots several small objects at you. Time perfect blocks out, if you can.
Then she summons four stingray enemies. Pay attention to the order in which they appear; this is the order you need to dodge them in. This part is easy. Just jump over the ones that launch from the bottom and stay on the ground when the higher ones move. The second and third ones are the ones you’ll need to jump over. Then she fires a single projectile at you, which you can either block or perfect block.
The next part of the final boss is trickier. She starts firing these pink discs. She alternates between ones fired directly at you and ones that home in on you. Once you know how to dodge these, they’re not a big deal. Ajna can slide under all of the direct ones. As for the homing ones, they can’t hit you while you’re moving. So slide under the direct ones and then walk for a bit, and then slide under the next one.

And dodge some more
After this, Kala summons two sharp pieces of ice. The first one is easy enough to dodge. Just line yourself up with where the sharp points aren’t and they won’t hit you. Immediately after this, move a bit to the right and jump. You need to be in the air to not get hit by these.
Once this part is through, there’s another fairly easy one. Kala summons red lasers down to hit you. The first wave of this can’t hit you if you’re all the way on the left side of the screen. So move all the way to the left at the start of this. For the next salvo, walk right, but not quite to the middle of the screen. Then she’ll unleash her third salvo, which will just require you to walk back to the left.
After this, she charges up a big ol’ spirit bomb. Just wait for this to get close and then mash the block button. This should perfect guard the whole attack. Otherwise, you can take a ton of damage. If you fail to properly block this attack, you’ll just die straight out.
Speaking of blocking
This next part of the final boss takes place in the regular combat style. But you can’t hit Kala. This entire fight is based around you blocking her attacks so that she uses all of her energy. Once she flashes red, get ready to mash. A couple of seconds later, she goes all Kenshiro and starts wailing on you with giant fists. Mashing the block button should perfect block all of these.
After this, she flashes red again but this time hits you with single attacks. Just watch the fists and hit the block button once they get close to you and you should be able to perfectly block them. But it’s not over yet, Snake. After that, Kala uses the last of her energy to shoot a death laser at you. Just like the spirit bomb from before, if you don’t block this, you’re toast.
The timing on this is most easily relayed through gold rings. Before Kala fires at you, there are three gold energy rings that she pulls towards herself. After the third one, you’re going to want to wait a second and then start mashing block. If you did it right, congrats! You just beat Indivisible!
Come back to PC Invasion for more guides on how to conquer Indivisible!