Pathfinder: Wrath of the Righteous Nameless Ruins Enigma puzzle guide – Main area
Let’s talk about the Nameless Ruins Enigma puzzles in Pathfinder: Wrath of the Righteous.
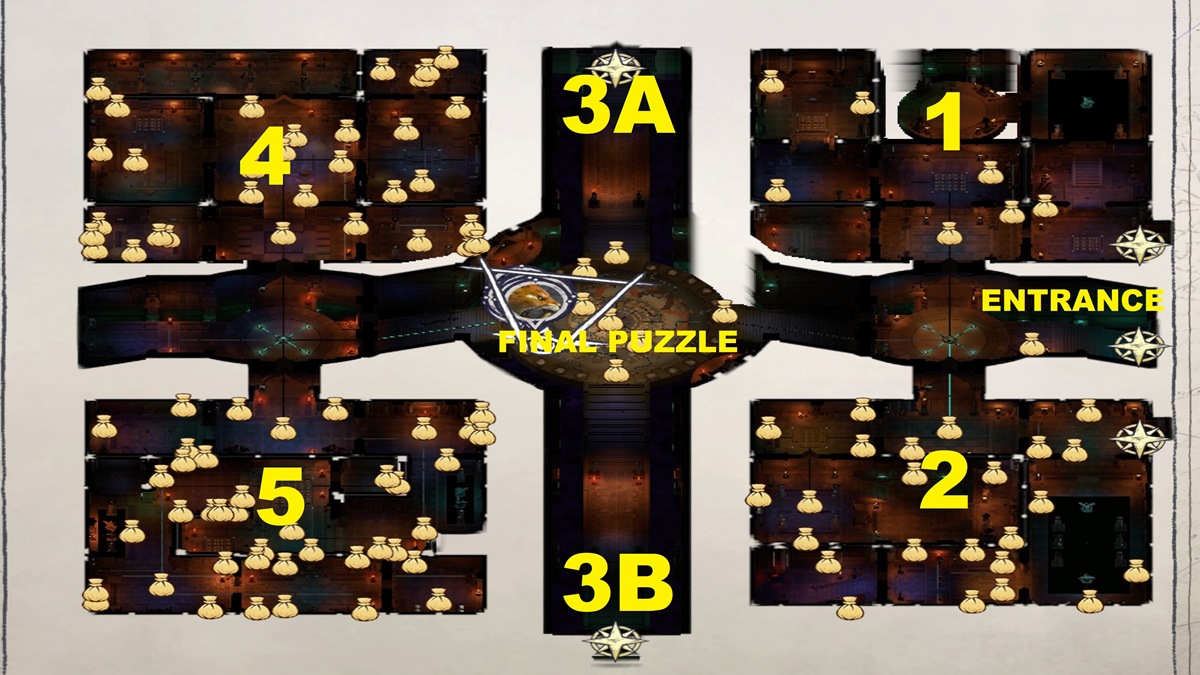
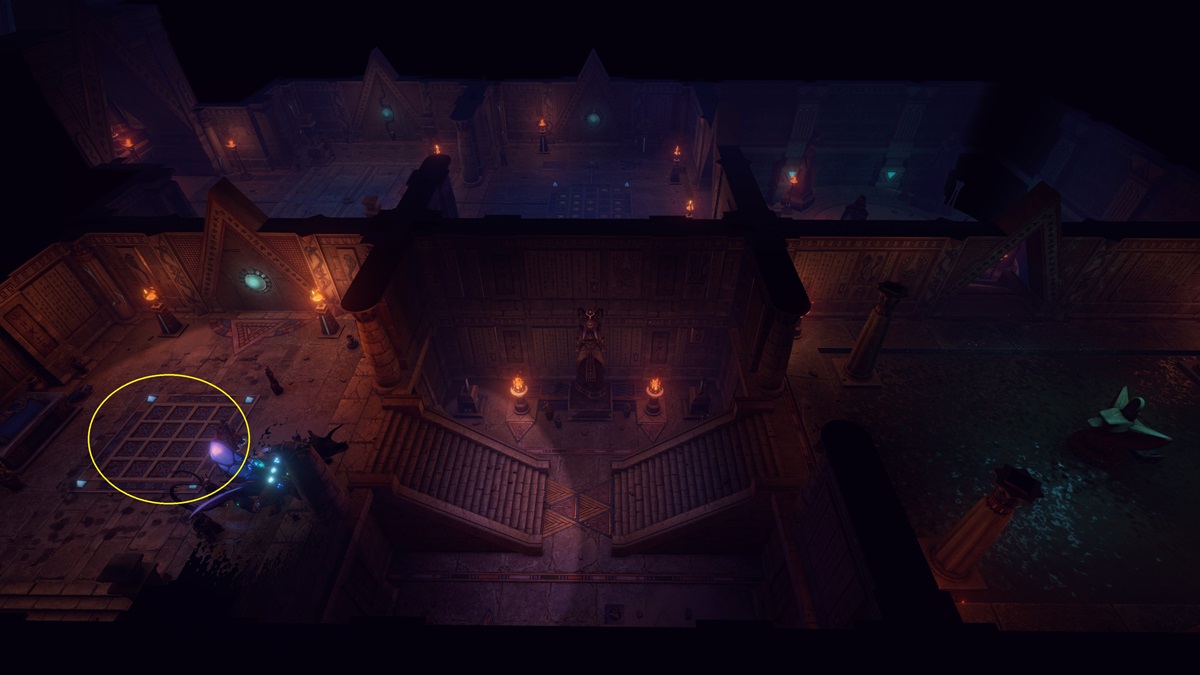
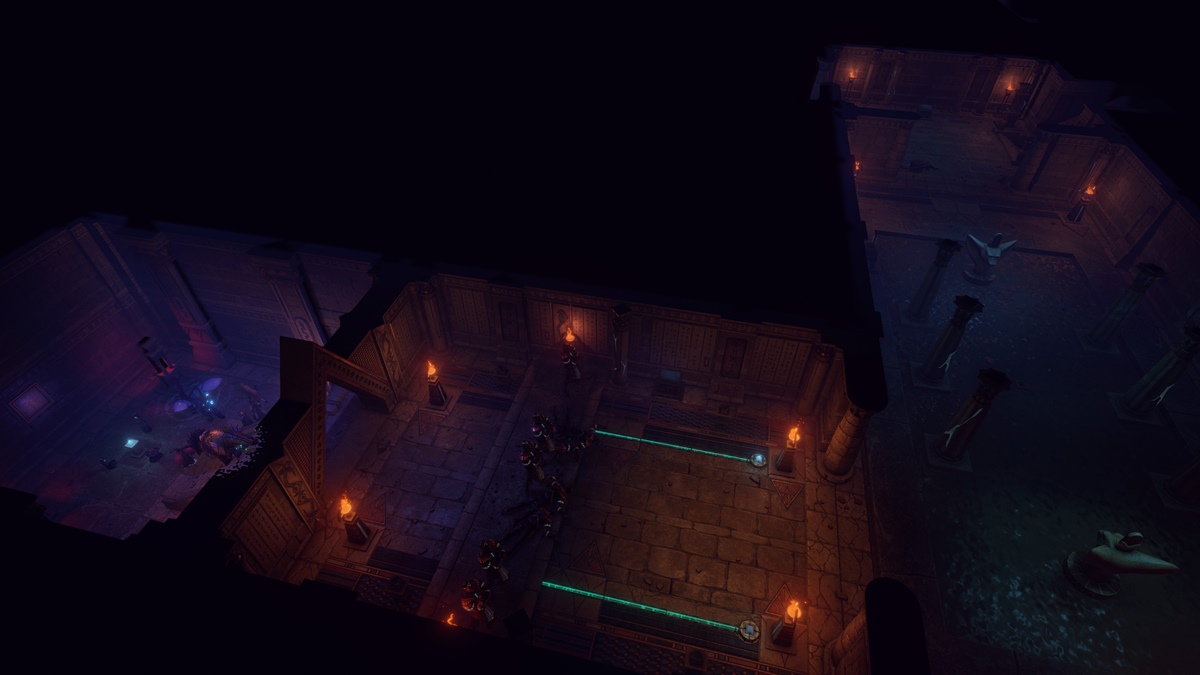
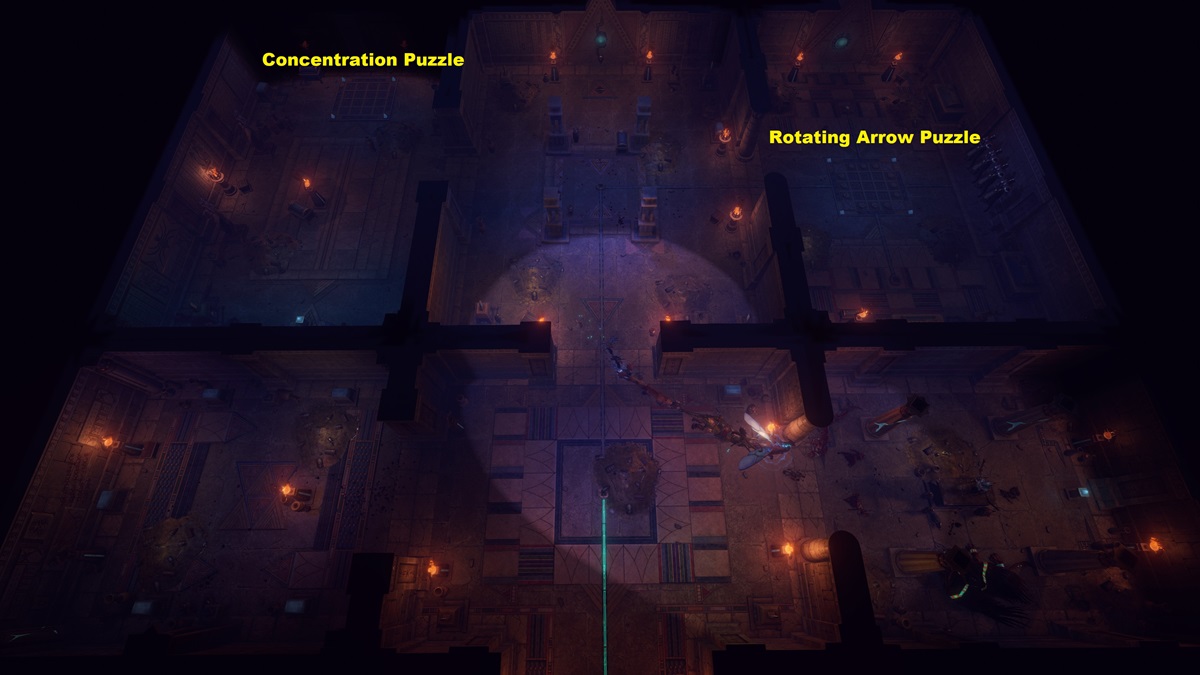
But, first, let’s have a look at the dungeon map. Each section is numbered accordingly based on when you’re expected to head there. This is due to the number of Blue Binding Sources you have used to power the Magic Springs and, subsequently, any puzzles that do require them. Moreover, these crystals can be reacquired after you’re done with a puzzle or room. What you do need to avoid is placing them prematurely in the central wheel puzzles (i.e., massive, circular devices in the center of each major area).
Screenshot by PC Invasion
Section 1 (Northeast)
- Upon entering the Nameless Ruins Enigma in Pathfinder: Wrath of the Righteous, you’ll see the first central wheel. It’s going to need four crystals just to get powered up, so ignore it for now.
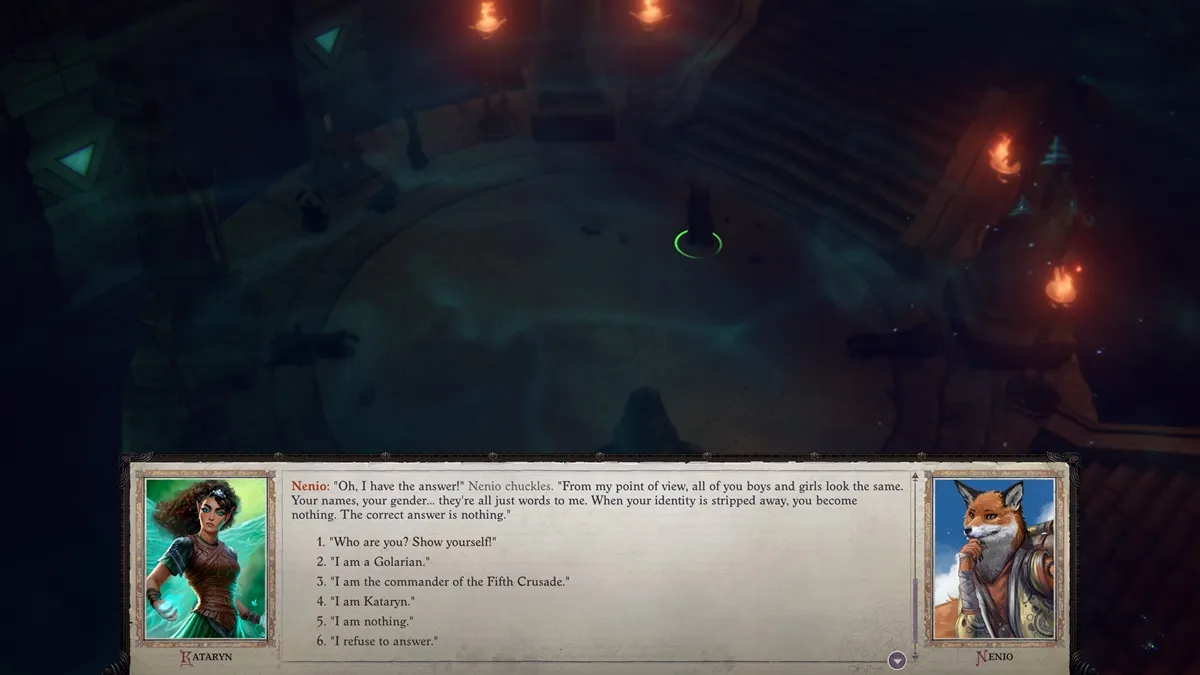
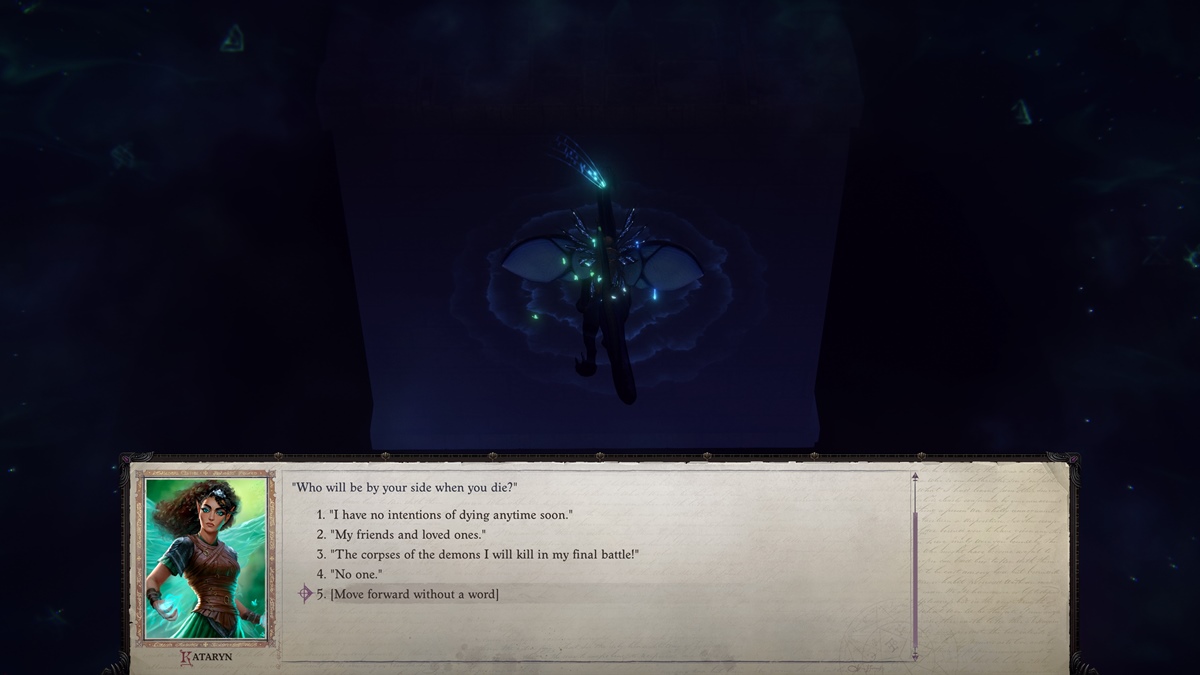
- Head to the northernmost portion (i.e., the one with a circular platform). A statue will ask a question and Nenio gives you a hint. Answer with: “I am nothing.”
-
- Screenshots by PC Invasion

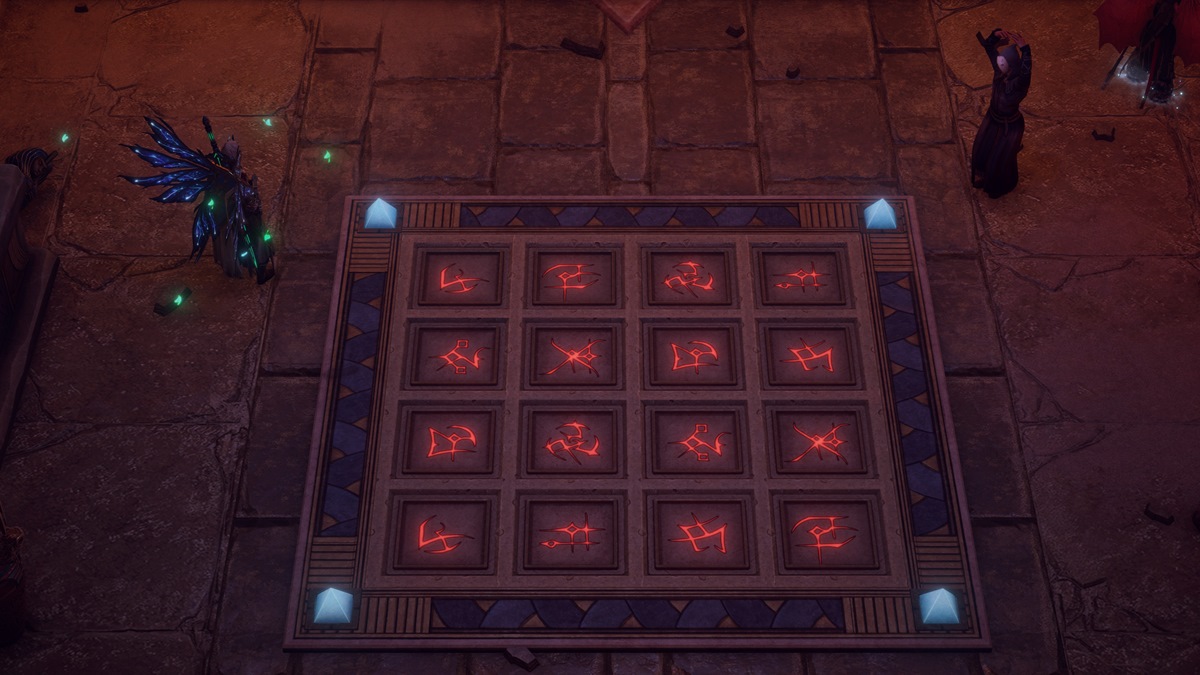
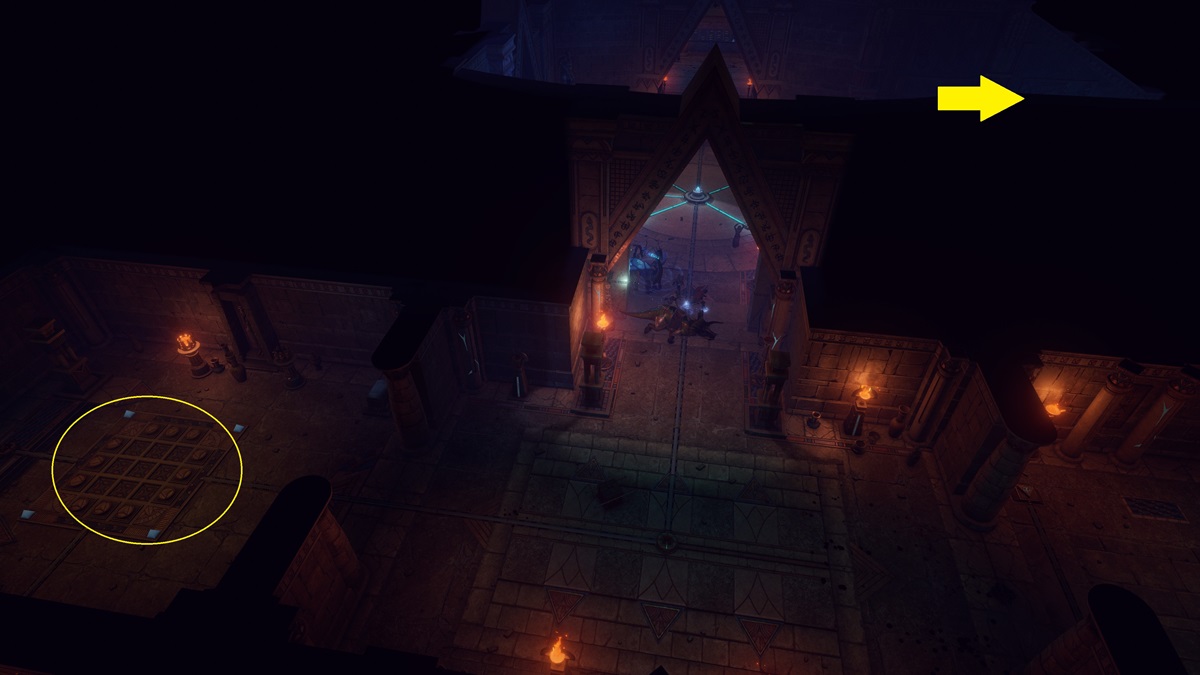
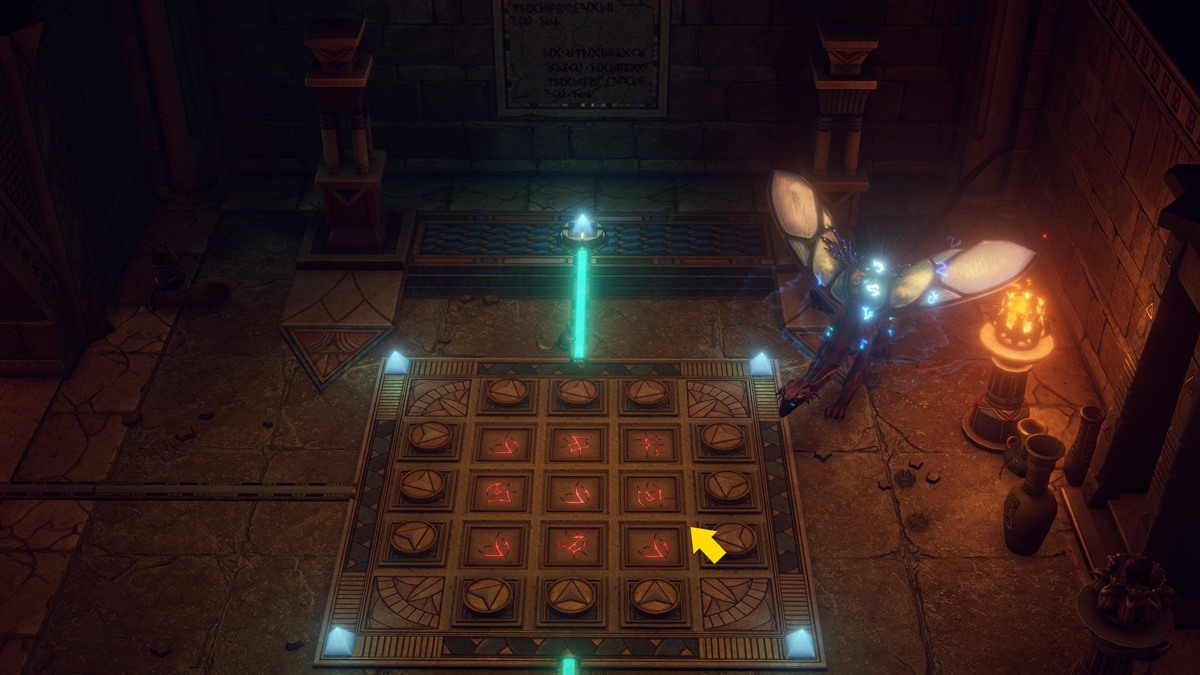
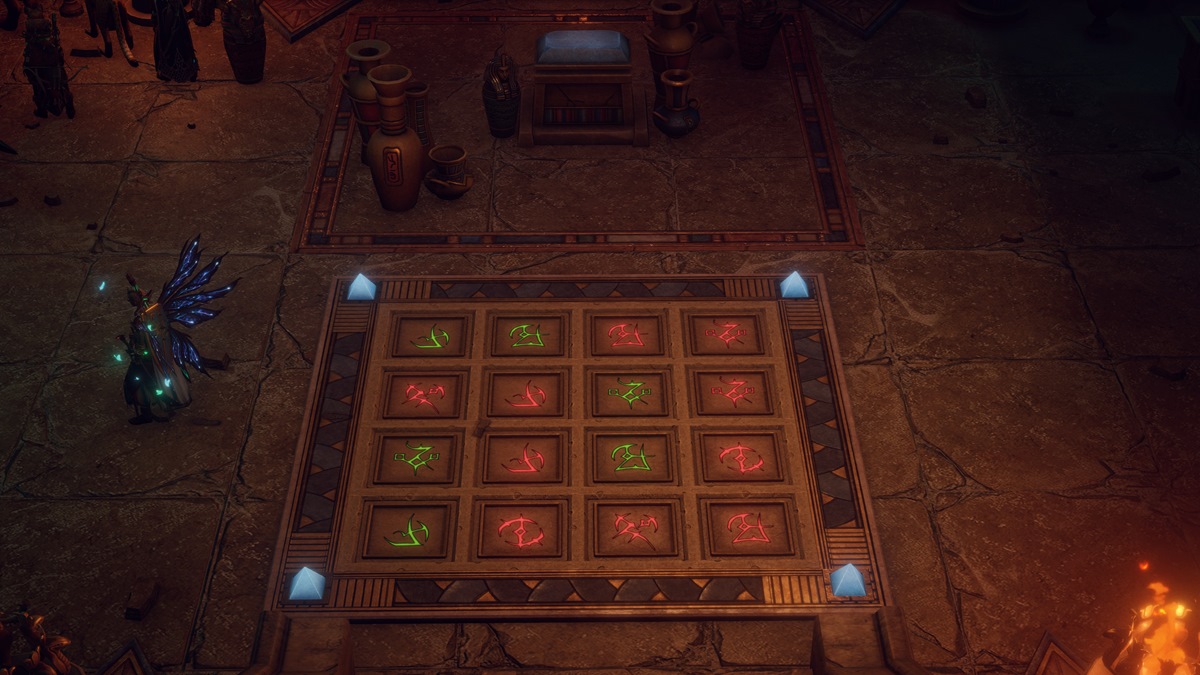
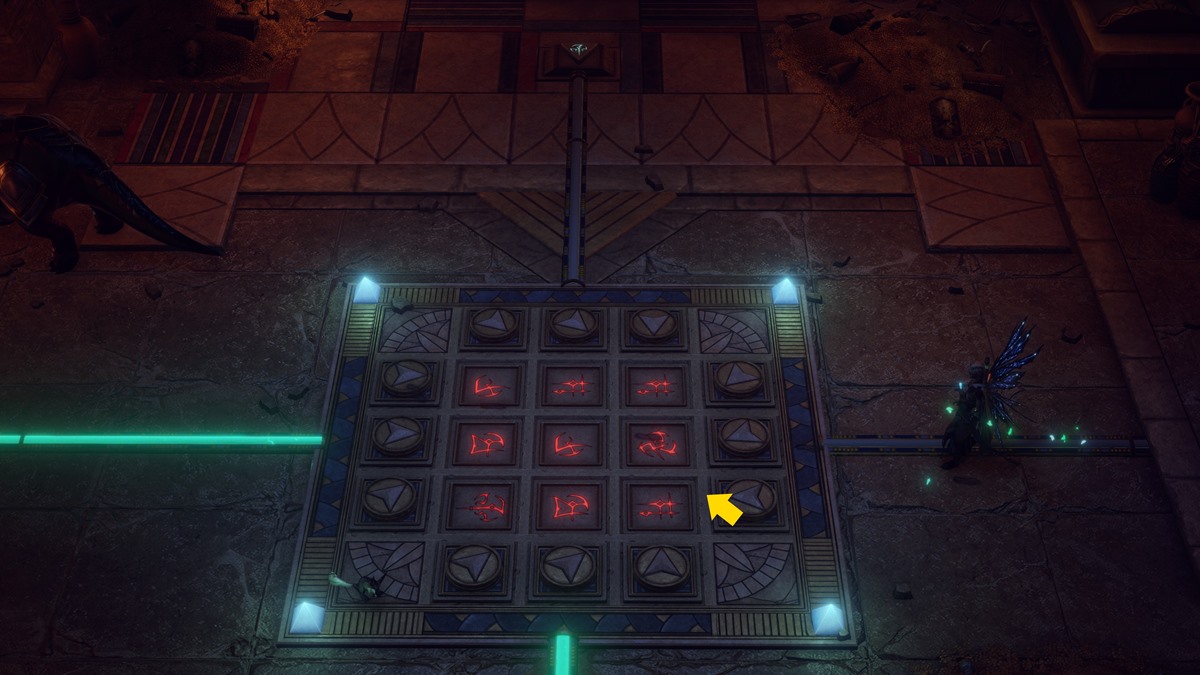
- Follow the loop past the snake statues spewing exhaustion. You’ll stumble upon your first Concentration Puzzle. The goal here is to click on two symbols that match. However, if you click on the wrong one, the whole thing resets. You can refer to the solution in the image below (note that the camera is facing the doorway).
- The door across the hall will open, letting you pick up a crystal.
Screenshot by PC Invasion
- Exit to the lower portion of the Enigma, whereupon you’ll find yourself in a large chamber filled with sand… and mummies. Your goal here is to grab all three Blue Binding Sources from the altars. The problem is that the mummies will continue to spawn, so you’re better off making a run for it while picking them off as you go along. If you get bogged down, it can be a hassle.
- As you reach the central part, you can eliminate the caster mummy to prevent the respawns.
Screenshot by PC Invasion
Section 2A (Southeast)
- Upon exiting the underground, you’ll be in the southeast section of the Enigma. There’s a crystal in the nearby room with the snake exhaustion statues.
- In the far corner room, place one of the crystals and be ready to fight the golems. Grab the new crystal and reacquire the one that you just used.
- Go back to the previous hall (i.e., the one with the exit to the underground) and place a crystal to remove the barrier. This lets you return to the central wheel from earlier.
-
- Screenshots by PC Invasion

- Do note that this area also happens to have the first Rotating Arrow puzzle in the Nameless Ruins Enigma in Pathfinder: Wrath of the Righteous. This type of puzzle requires you to replace the symbols with numbers, whereupon the arrows are moved so that they match the equation.
- For now, you won’t be able to do anything with it since you still need an extra crystal, but keep this spot in mind. We’ve also included the solution in the image below (note that the bottom arrow in the right-hand row should be pointing diagonally upward).
Screenshot by PC Invasion
Section 2B (Northeast)
- Back at the central wheel, place four of the crystals to power up the mechanism. You may then click the central switch to rotate the light so that the energy is pointing to a particular direction. Doing so opens doors and sends power to a linked puzzle.
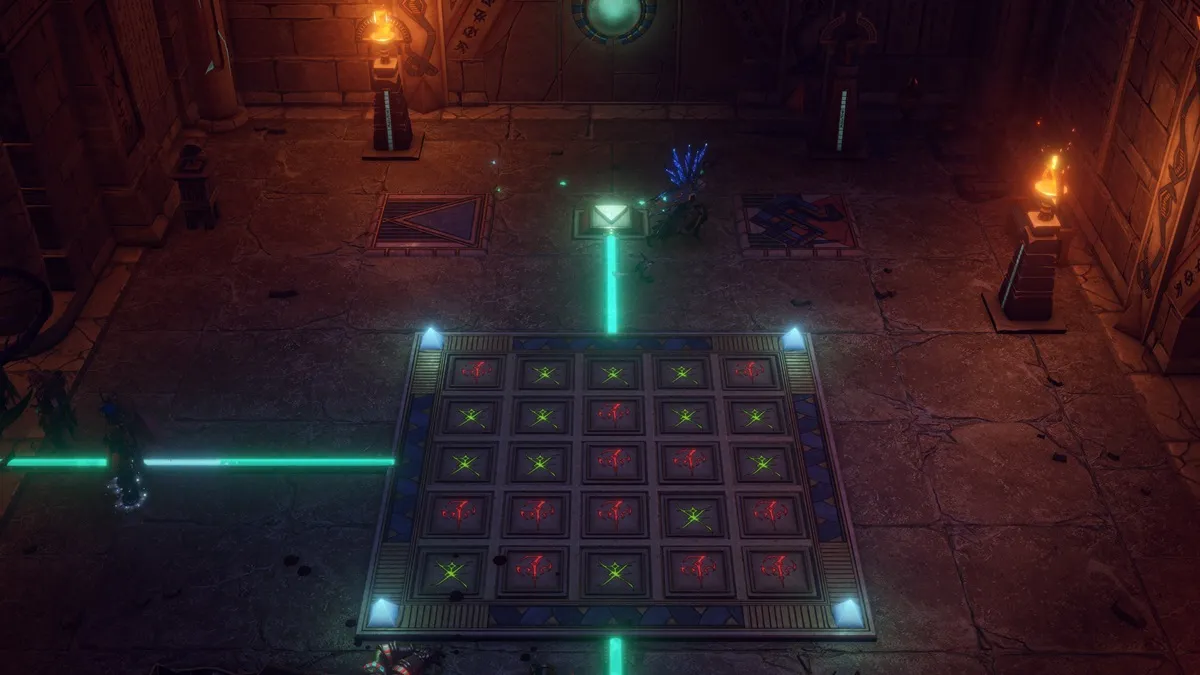
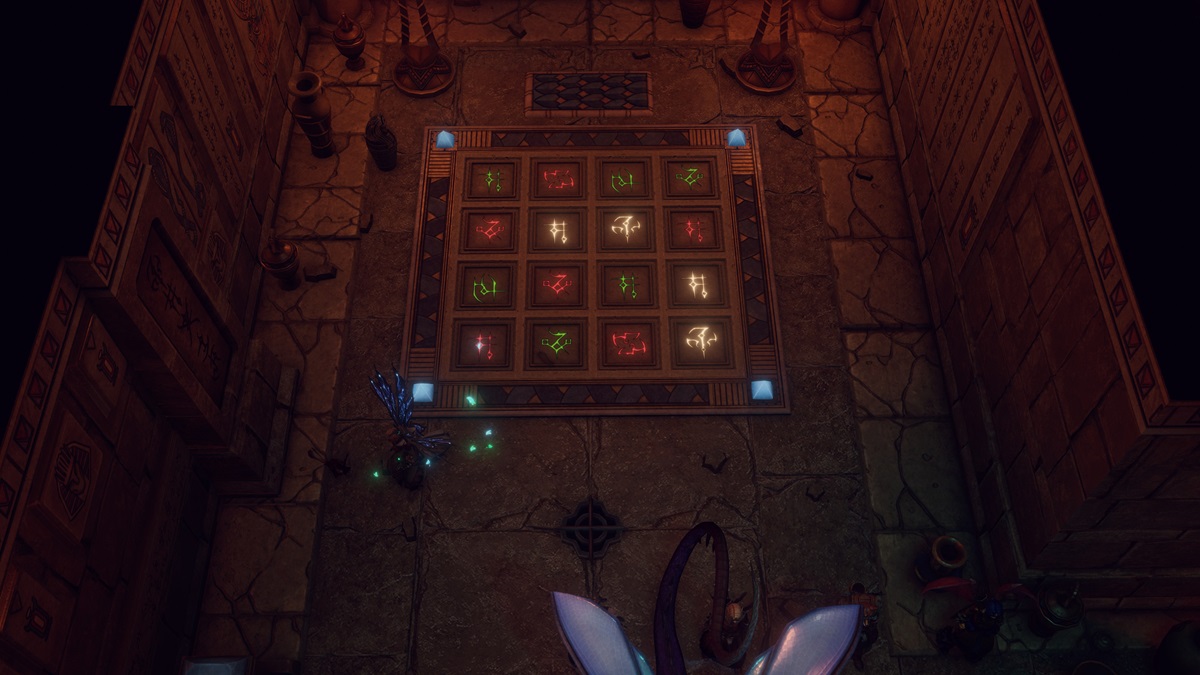
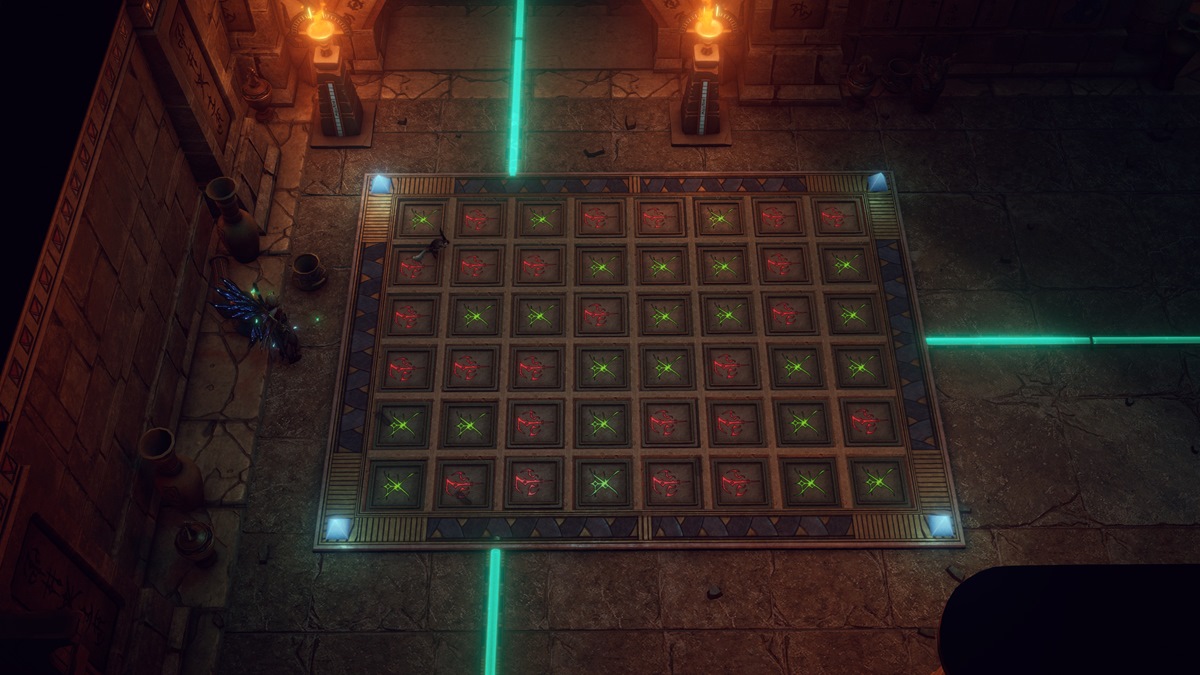
- Rotate it to the north (i.e., to the direction of the “I am nothing” statue). The puzzle that you ignored earlier can be solved now. This is called a Red-Green Linear Puzzle. The idea is to click on the blocks so that each line has no more than X of the same color. You can see the solution in the image below (left image).
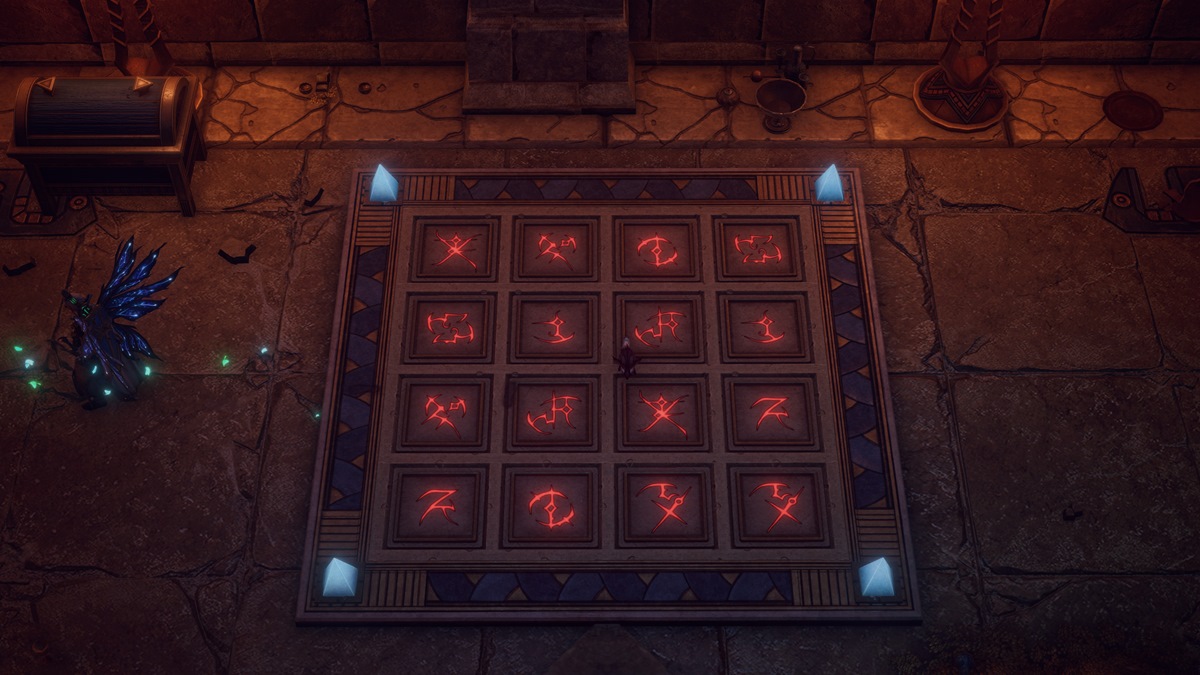
- There’s also yet another Concentration Puzzle here behind the fake wall, which yields a chest (right image).
-
- Screenshots by PC Invasion

Section 3 (Center)
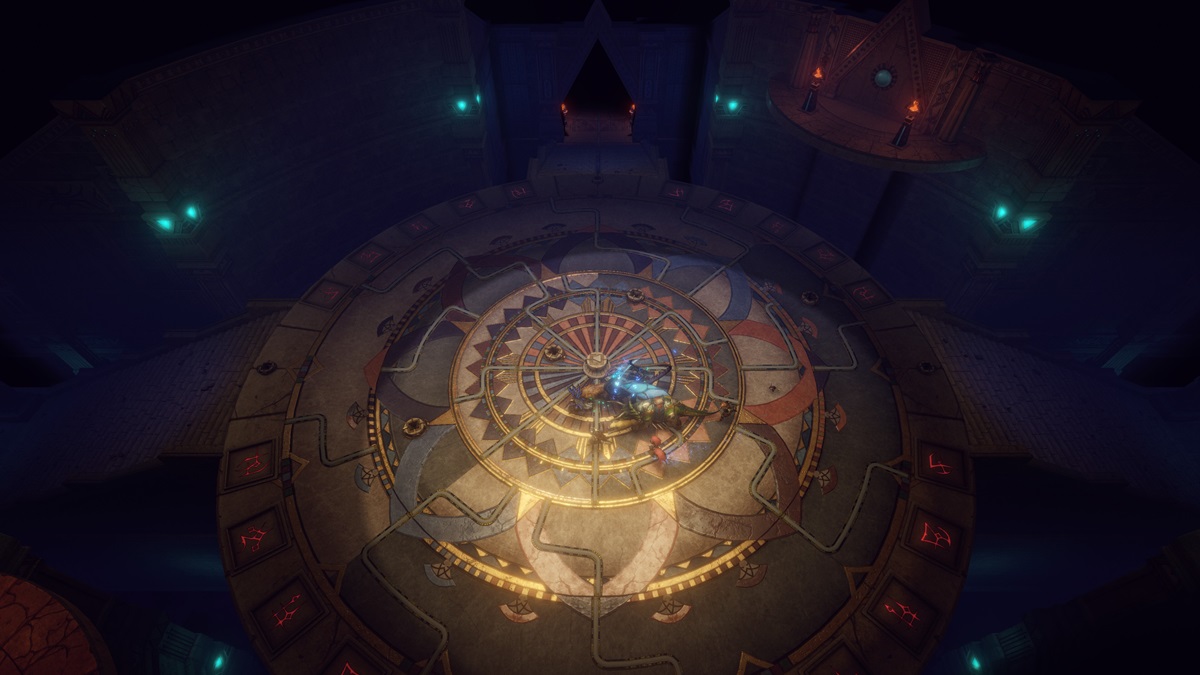
The mechanism from earlier will also allow you to open the door to the next area. Here, you’ll see a gigantic wheel puzzle (basically the last thing you need to solve in this dungeon). There are two passages to the north and south.
Screenshot by PC Invasion
North: Forbidden Chamber
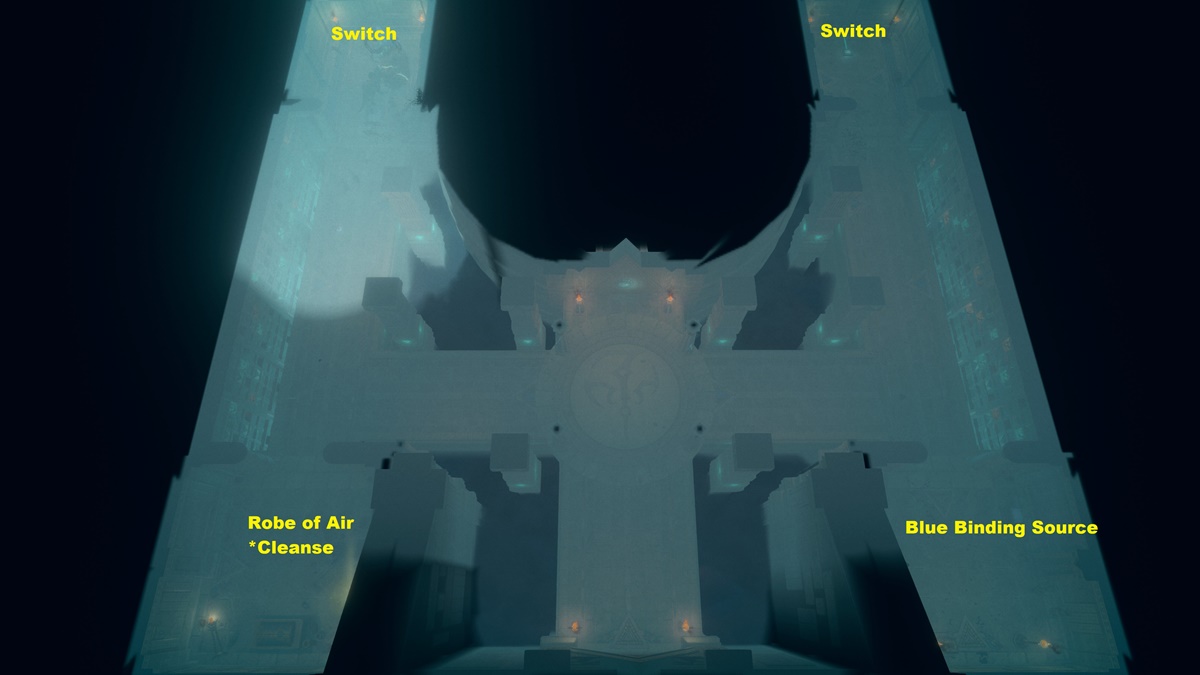
- In the rooms to the south, get the Blue Binding Source, Robe of Air, and cleanse the light to remove Corruption.
- Interact with the switches in the two rooms to the north, which will spawn more mobs.
- This will open the main alcove, which has more enemies. You can pick up a Green Binding Source and Quicken Metamagic Rod here.
- Note that the Green Binding Sources are special crystals used for the final puzzle, not on the regular ones you encounter throughout the Nameless Ruins Enigma dungeon in Pathfinder: Wrath of the Righteous.
-

- Screenshots by PC Invasion
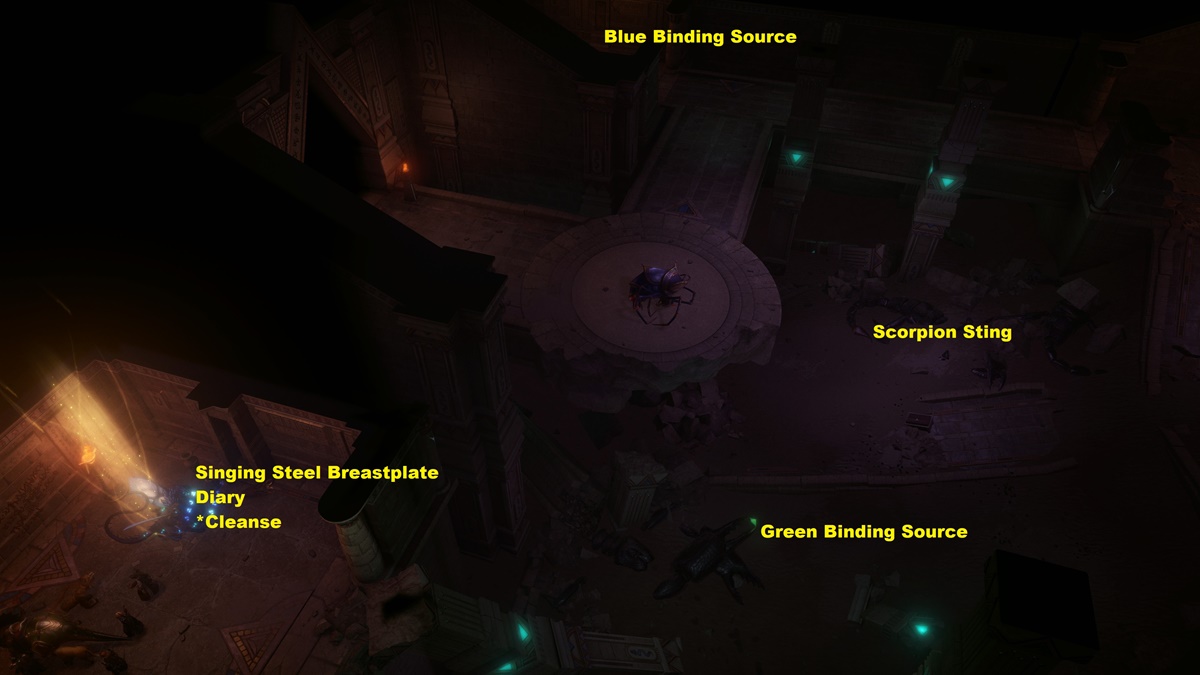
South: Ruined Passages
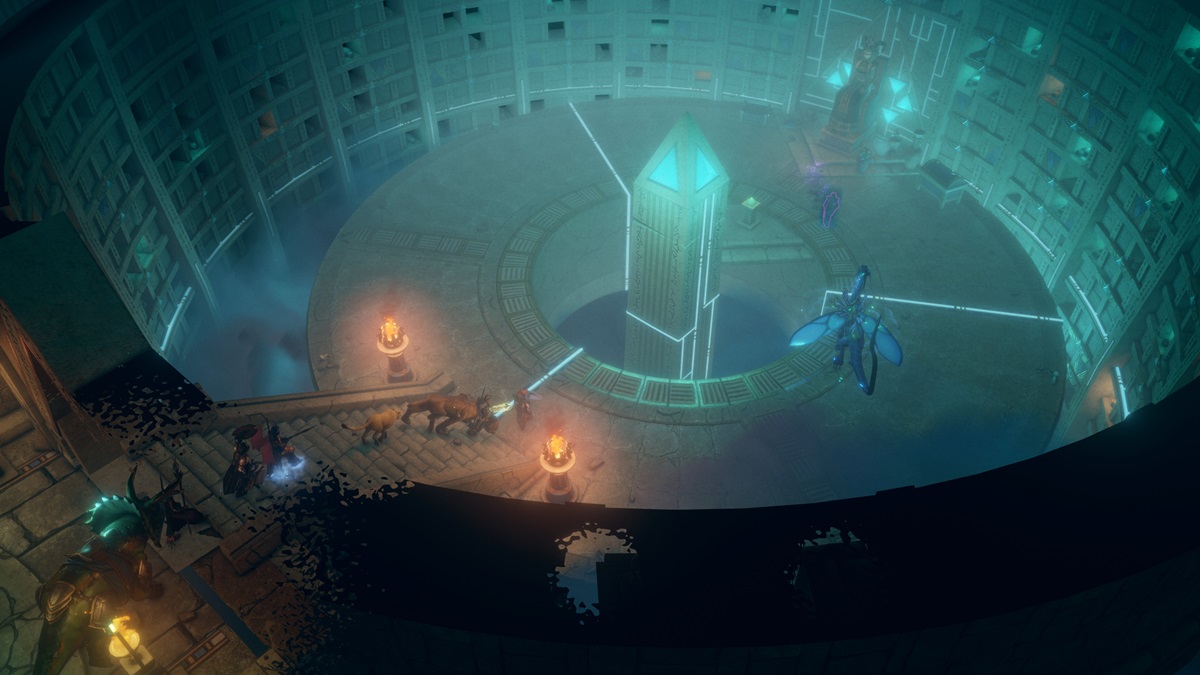
- As you move to the south of the central area, you’ll notice that there’s a gaping chasm. The voice will speak in your mind several times. You can get the “Grain of Sand” achievement here if (a) you picked the Legend Mythic Path or (b) you avoid responding to every question (i.e., say nothing).
- In the next area, you’ll want to grab the Blue Binding Source in the small upper room. Then, make your way down to the portion that’s buried in sand, watching out for various critters and mobs that show up.
- You can get the Scorpion Sting from the dead scorpion by passing a Strength check. Likewise, take the Green Binding Source from the other creature’s corpse.
- Finally, climb up the fallen pillar for additional goodies.
-
- Screenshots by PC Invasion

Section 4 (Northwest)
Next up, you’ll make your way to the northwest part of the Nameless Ruins Enigma dungeon in Pathfinder: Wrath of the Righteous. There’s another wheel mechanism here, as well as two mist-covered doors.

Screenshot by PC Invasion
The Prayer
- Place four crystals in the device and rotate it to the direction of the golems. Take them out and grab a new crystal.
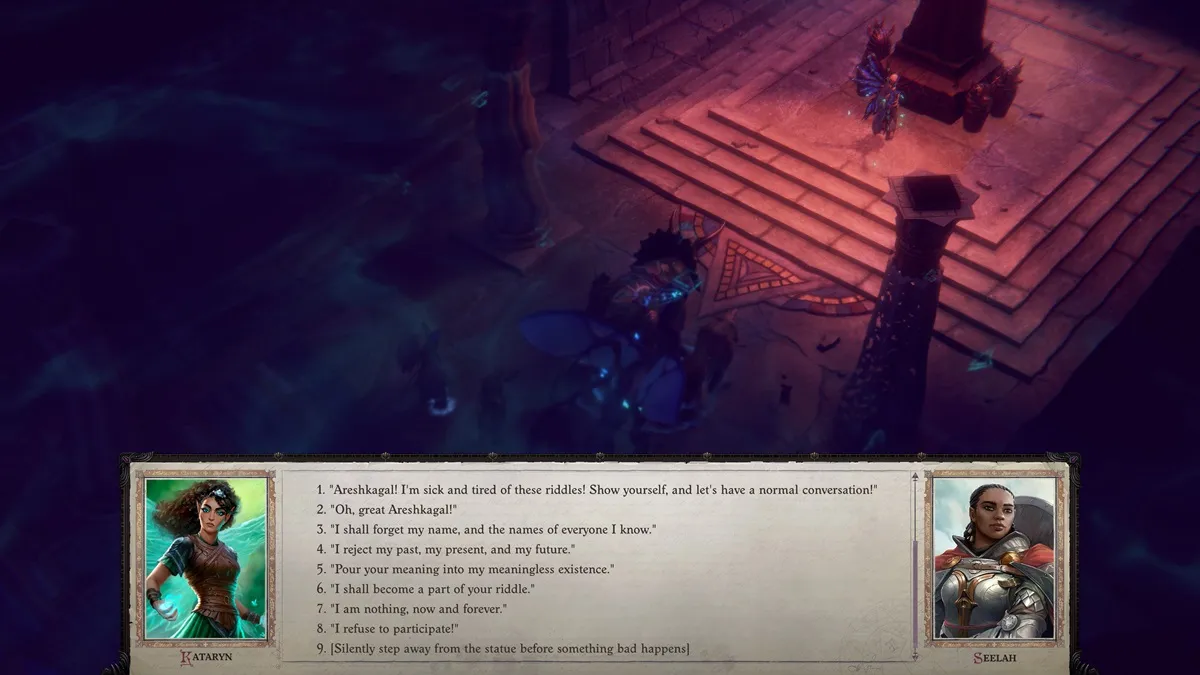
- Rotate the energy once more so it hits the northern mist door. Pass through it and be ready for a puzzle. The Strangers here will recite a prayer to Areshkagal, which you need to memorize. At the end of this hallway, you’ll be asked to respond with every single line in the correct order:
- “I reject my past, present, and future.”
- “I shall forget my name and the names of everyone I know.”
- “Oh, great Areshkagal.”
- “I shall become part of your riddle.”
- “Pour your meaning into my meaningless existence.”
- “I am nothing, now and forever.”
-
- Screenshots by PC Invasion
Puzzle Area
- When you find yourself back in the main area, you’ll notice a bunch of rooms have appeared. There are a couple of puzzles here, as well as several crystals. Try to avoid interacting with any of the treasure coins as you might get debuffed.
- Place Blue Binding Stones in the Magic Springs that you see, leading up to the northwest room with the Rotating Arrow Puzzle. The solution is below (left image). Again, note that one arrow in the image should face diagonally upward.
- There’s another Concentration Puzzle here where you need to match symbols. The solution can be seen below (right image). This unlocks a door to a small nook with another Green Binding Source.
-

- Screenshots by PC Invasion
Section 5 (Southwest)
Now, take note of all the crystals you have. Make sure that you’ve been reacquiring everything that you placed in the Magic Springs (not those in the central wheels). The reason for this is that the southwest section requires you to connect the energy source via multiple Magic Springs. You should have enough for the energy to reach the Large Red-Green Linear Puzzle, but not enough to fully connect it to the back of the area.

Screenshot by PC Invasion
- The first task that you need to do here is the Red-Green-White Contentration Puzzle (which has a trap next to it). The solution to match the symbols is below. The small nook next to the large puzzle should open, letting you claim a blue crystal.
- Next up, check the fake wall nearby for another blue crystal.
Screenshot by PC Invasion
- You ought to have enough to connect the beam from the entrance to the Large Red-Green Linear Puzzle. You can see the solution in the image below.
- Then, head all the way to the back where you can grab a Blue Binding Source and a Green Binding Source. The shelf also has an Elven Notes document for the Storyteller. Do be forewarned that picking up the crystals here will cause traps to start firing from the walls.
Screenshot by PC Invasion
- Place that last blue crystal on the Magic Spring, fully connecting the energy all the way to the back. This lets you press the switch to unlock a room with some items.
- When you’re finished, make sure to grab all the crystals you’ve used. By this point, you should have seven Blue Binding Sources and four Green Binding Sources.
That about does it for the main area riddles and brain teasers. Let’s go to the next part of our Pathfinder: Wrath of the Righteous Nameless Ruins Enigma puzzle guide to discuss the last set of tasks and the boss.
Screenshot by PC Invasion