Sakuna: Of Rice and Ruin has some awfully robust farming mechanics. The game does an okay job of walking you through them but it doesn’t mind throwing you into the deep end. Therefore, I’m going to break down the nuts and bolts of the way farming works and what it accomplishes.
The main thing to note is that growing rice is the only permanent way to make Sakuna stronger. Due to this, it’s important to plan out your moves accordingly. The first step doesn’t actually show up until later in the game, but it’s still important. This step takes your rice seeds prior to placing them in the seedling box and puts them in a bucket of water. You then have to choose how much mud you want to pour into the bucket. The more mud you pour, the higher the quality of the rice will be. But that will make the yield smaller, so you’ll want to decide on whether you want to have more rice or if you’d like to have higher potentials for stat boosts.
Once you’ve selected your mud amount, you then mix the mud into the water so that the lower quality rice rises from the bottom of the bucket. Just like with the mud, the more you mix, the higher the quality of the rice will be, and the smaller the yield. Personally, I prefer to have higher quality rice, as I like stat increases more than having greater quantities of rice to eat. After this is done, the seedlings will be placed in the seedling box and you’ll need to wait for them to grow a bit before they can be planted.
Spacing is important
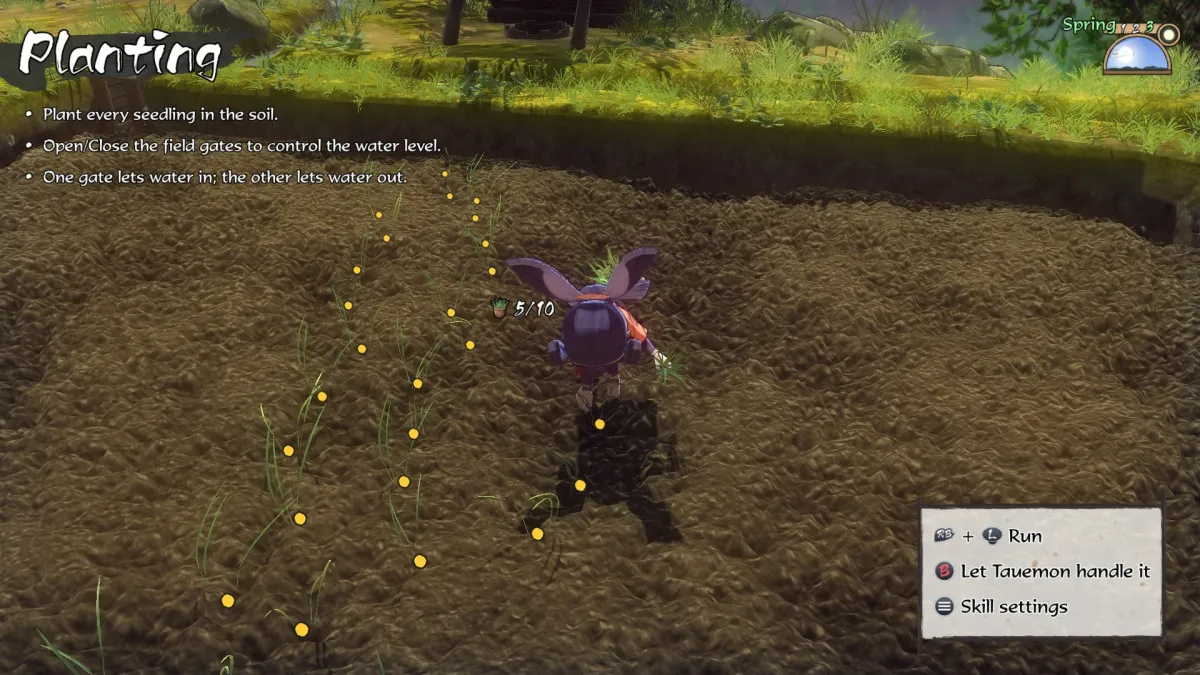
Once they’re large enough, you’ll carry the seedlings to your field and plant them individually. Almost all aspects of farming can be delegated to another character, but the results won’t be as satisfactory and you’re going to want the edge in stats. Every move you make while farming levels up your farming skills, which makes farming easier and less time-consuming. Before planting, you’ll need to clear the field of rocks and till the entire thing. The more you till, the harder it’ll be for weeds to take root. You want to till as much of the field as well as you can and a skill that doesn’t take long to unlock shows you exactly what you’ve got remaining.
For planting, you gain a skill that arranges your field into a grid and shows how far apart to place the rice stalks. But you don’t get this immediately, so, at first, place them close together but not right up next to each other. After each planting session, Sakuna: Of Rice and Ruin tells you how your spacing is, so you’ll get a feel for it after a bit. Weeds grow regularly if you’re not using a certain amount of pesticides, so you’ll want to check your field for weeds and pull them every morning, as they’ll damage your crop otherwise.
Once the stalks are all planted, you’re going to need to monitor the water levels and fertilize them. Stalks go through multiple phases, including offshoots and sprouting stages. When the plants are short, you’ll want to raise the water gate and let in water that comes up to Sakuna’s ankle. You can tell this easily due to the garments she wears on her calves. For offshoots, just have the water rise to the bottom of this and you should be good to go. Once they sprout, however, they need more water. I raise it up to the top of the garment for these.
What the crap?
As for fertilizer, you’ll make it by carrying fecal matter from the outhouse to the fertilizer pit. Yes, you read that correctly. You need to select base ingredients to start with. For offshoots, you want leaf fertilizer, but sprouts need kernel. Just use five of a fertilizer type to get to 100% fertilizer type and that should be good. Then add additional components. Rotten food is the most plentiful and is a good choice, although it increases the number of pests you’ll have to contend with.
These components tell you exactly which stats they strengthen and you want to get the numbers as high as you can, as they’ll increase your stats later on. But be careful not to use so much of your inventory that you start running out for future batches. Fertilizer takes several hours to age and you should only spread it in the morning, It also only lasts for ten hours, so you’ll want the rice to absorb its nutrients while the sun is out. If you’re watering crops correctly and applying fertilizer every day, you can have the crop be done growing by the end of Summer. The game says to dehydrate your crop in mid-Summer, though, so I remove all the water on Summer 2. I don’t know if this actually helps.
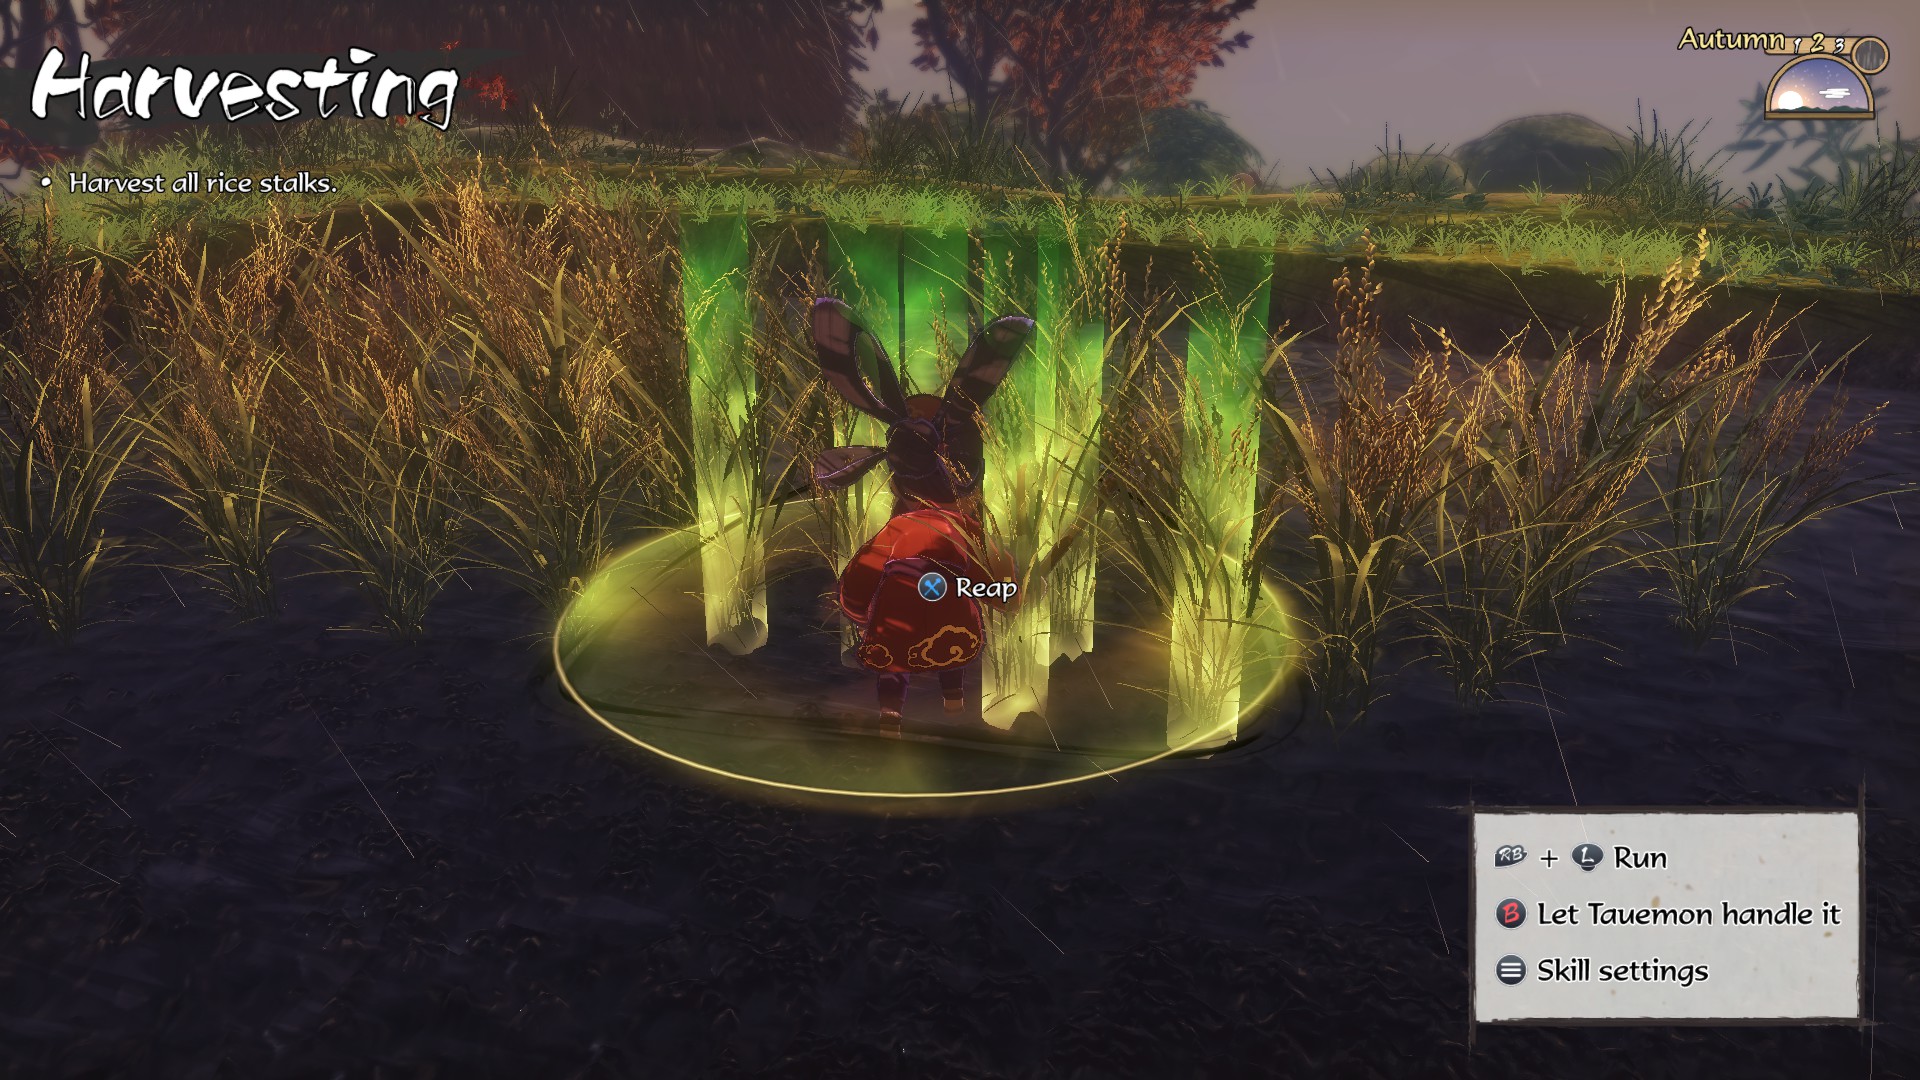
After that, you reap the harvest with a sickle, which is exactly as it sounds. Once you’ve done this, you’ll have piles of cut stalks to lay on drying racks. Make sure and drain any water before you leave the stalks to dry, as leaving them in a wet field will leave them soaked. It rains often in Sakuna: Of Rice and Ruin, so talk to the samurai dude standing in front of the storehouse to get the weather forecast. If it’s about to rain the next day, offer an amber tribute and stop the rain so that the stalks can dry unimpeded. Make sure that, no matter what, you move the stalks into the storehouse before winter, as you’ll pay dearly if you forget.

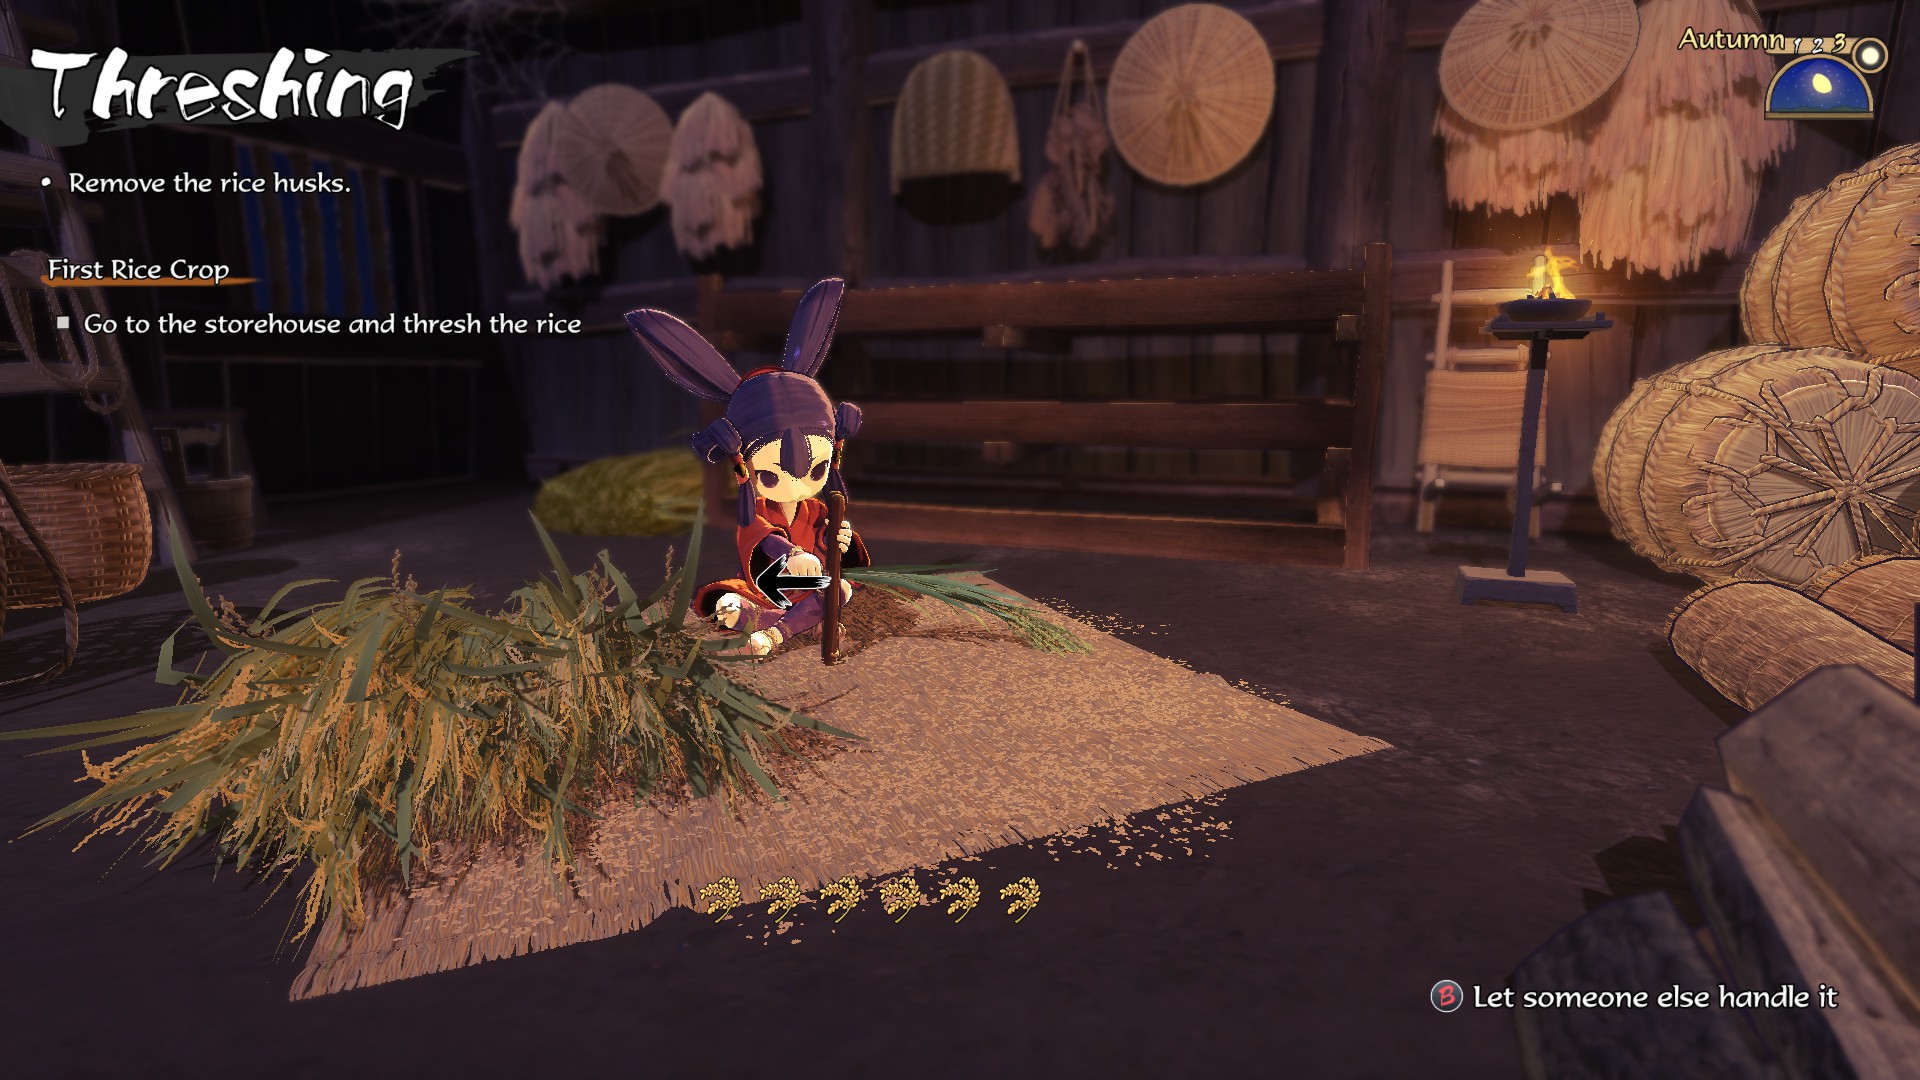
A time to hull
One of the most tedious parts of the harvest in Sakuna: Of Rice and Ruin awaits now. You’ll thresh the stalks, which just needs to be done and has no bearing on quality, and then decide how much you want to hull them. The more you hull the rice, the whiter it becomes. The whiter the rice is, the larger the stat gains are. The less you hull it, the browner it is. This dictates whether you have more brown or white rice. Brown rice is infinitely superior for eating, as the buffs it grants are much higher. But your stat gains won’t be as high if you stop hulling early. Hulling all the way takes several extra minutes, so do what’s best for your playstyle.
That’s it for this farming guide for Sakuna: Of Rice and Ruin. It’s a tough job, but some goddess has to do it.