
Modern Warfare Zombies (MWZ) Extraction guide: How to deploy to Dr. Jansen’s coordinates
Here's a step-by-step guide on how to complete the Extraction mission in Modern Warfare Zombies.
Bring your best guns and Acquisitions because Extraction is the toughest mission in Modern Warfare Zombies. I’ve completed it and I’ll guide you through it, step-by-step.
How to deploy to Dr. Jansen’s coordinates in Modern Warfare Zombies
Though I did finish the Extraction mission in MWZ solo, it is a lot easier with a squad. If you do complete it solo, make sure to bring a Self-Revive and some of the best Perk-a-Colas like Jugger-Nog, Quick Revive, and Speed Cola. You need to at least have uncommon rarity weapons and Pack-a-Punch level one.
Related: How to get 3-Plate Armor Vest and Large Rucksack in Modern Warfare Zombies (MWZ)

After entering the Exclusion Zone like normal, you need to wait a few minutes. The exfil spots only appear on the map after a few minutes, and this is the case for the special Dr. Jansen exfil. Once all the exfil spots have populated on the map, open your tac-map and find the exfil with a star. This is how you deploy to Dr. Jansen’s coordinates.

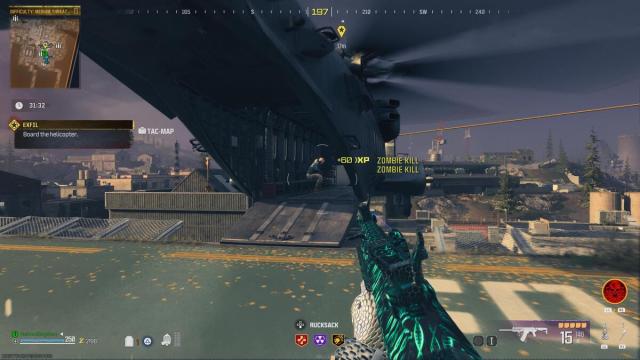
Get to the special exfil site, call in the helicopter, and get on. After you’ve been carried out of the regular Modern Warfare Zombies match, you’ll see a loading screen for the Dr. Jansen mission. Wait until that is complete and then you’ll launch into a new map. Stay on the helicopter until it reaches the back of the map and then get off and get to it.
How to get to the communications tower in Modern Warfare Zombies

Now that you are in the special Dr. Jansen mission, the first thing you need to do is access the communications tower to determine Dr. Jansen’s location. Open your tac-map and ping it; it’s in the middle of the map. Before you head out, grab the Ammo Mod Circuit Board on the vent on the roof. This will come in handy later.

There are zombies and mercenaries everywhere. My advice for this entire mission is to focus on eliminating the mercenaries first because they can take you down very quickly when you are caught off guard. Unless you have zombies on you, keep your distance and eliminate the mercenaries first.
Related: Best easter eggs in Modern Warfare Zombies (MWZ)
Push your way forward. Once you reach the building with the communications tower on top, the first Loot Cache inside is a Mimic, so watch out. Blast it away with a shotgun or AR and keep it pushing. Watch your back for zombies and mercenaries and then watch the corners as you make your way up the stairs.
As long as you proceed with caution, you’ll make it to the communications tower on the roof. But, before you interact with it, make sure to eliminate the sniper in the tower. After all of that, you can interact with the communications tower.
How to find Dr. Jansen in Modern Warfare Zombies

You’ve now pinpointed Dr. Jansen’s location which is at the north end of the map, but her exact location is still a mystery. I recommend proceeding forward on the left as there are fewer zombies and mercenaries on this side.
Get to the top of the building and clear out the mercenaries and zombies fighting in the middle of the battlefield. With that done, you’ll find Dr. Jansen in a building on the northernmost part of the map on ground level near the docks. Look for the blue dot to appear on your mini-map once you get close.

After finding Dr. Jansen, you need to defend the area. The zombies and soldiers ignore Dr. Jansen and her lab, so I recommend finding high ground and defending yourself during this part. This is the part of the mission with the highest concentration of zombies and soldiers, so prepare yourself.
If you go into the warehouse like I did, be prepared to fight another Mimic. Also, mercenaries drop from helicopters on the room and west side of the docks. Clear them all out before proceeding. Even after the progression bar hits 100%, I recommend eliminating as many enemies as you can see.
How to exfil with Dr. Jansen in Modern Warfare Zombies

When the area is clear, go down to Dr. Jansen’s lab. From here on out, you need to escort Dr. Jansen to the helicopter pad which is on the roof. I cleared out the majority of the enemies and found that Dr. Jansen could handle herself and make it to the helicopter pad on her own. This gives you time to go to the top and insert the Ammo Mod Circuit Board you discovered earlier into the Deadbolt Turret. If you missed the one at the beginning, I found one inside the building under the helipad.


If you use the Deadbolt Turret the rest of the mission turns into easy mode. Deadbolt Turrets are ridiculously OP; all you need to do is sit back and wait for the helicopter to show up. Once the helicopter arrives, jump into it with Dr. Jansen and you’ll be lifted out of there.
And that’s it! You’ve completed the Extraction mission in MWZ and all of Act 1. You get treated with a special cutscene and then you immediately unlock Act 2 missions.