Badges are essential items that can help you in game modes like MyTeam and MyCareer. However, the ability to unlock badges is very confusing and requires that you focus on specific attributes for your player. In addition, some badges have multiple attribute requirements, which convolutes the process even more. To simplify this, we have created a guide that discusses how badges work and all NBA 2K24 badge requirements broken down into easy-to-digest categories.
What are NBA 2K24 badge requirements?
Image: 2K Sports
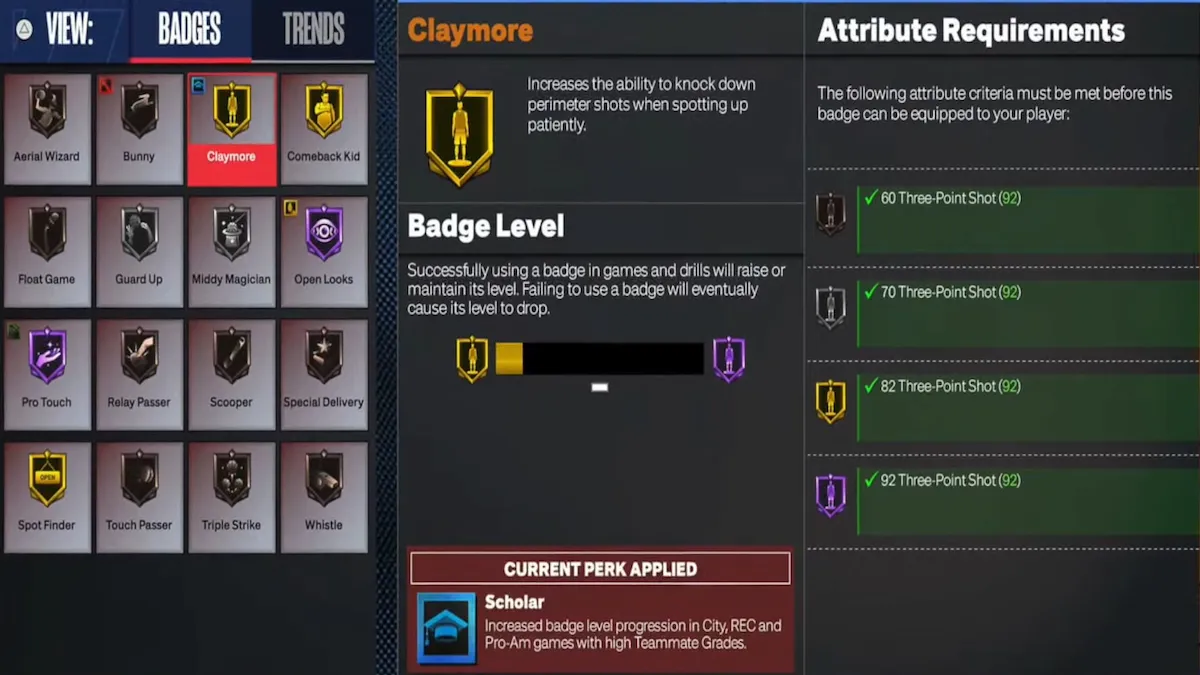
To unlock certain tiers of badges in NBA 2k24, you need to reach a specific attribute level. The chart below shows the exact attribute level required to unlock each badge. Note that multiple attributes can unlock some badges, but you only need to reach the threshold for one of those attributes. There are five total NBA 2K24 badge categories, which we have broken down individually so you can easily find the specific badge category you are looking for.
Click on the link below to be taken to a specific Badge category:
If a badge name is highlighted in bold, the associated attribute is required to unlock that badge.
If a badge name isn’t highlighted in bold, you can use any of the attributes listed in the table to unlock that badge.
If a badge name has both highlighted and non-highlighted entries then the attribute by the bolded name is required, and at least one of the non-highlighted attributes is also required to unlock that badge.
All Shooting Badge requirements in NBA 2K24
Here are all Shooting Badge requirements in NBA 2K24:
| Badge | Attribute | Bronze | Silver | Gold | HoF | Min Height | Max Height |
| Agent 3 | Three-Point | 76 | 86 | 94 | 98 | 5’7 | 6’11 |
| Blinders | Three-Point | 70 | 79 | 90 | 97 | 5’7 | 7’3 |
| Blinders | Mid-Range | 70 | 83 | 89 | 97 | 5’7 | 7’3 |
| Catch and Shoot | Three-Point | 63 | 74 | 85 | 95 | 5’7 | 7’3 |
| Catch and Shoot | Mid-Range | 60 | 70 | 82 | 93 | 5’7 | 7’3 |
| Claymore | Three-Point | 60 | 70 | 82 | 92 | 5’7 | 7’3 |
| Comeback Kid | Three-Point | 56 | 68 | 79 | 89 | 5’7 | 7’3 |
| Comeback Kid | Mid-Range | 53 | 64 | 75 | 86 | 5’7 | 7’3 |
| Corner Specialist | Three-Point | 65 | 76 | 85 | 94 | 5’7 | 7’3 |
| Deadeye | Three-Point | 75 | 84 | 92 | 99 | 5’7 | 7’3 |
| Deadeye | Mid-Range | 75 | 84 | 90 | 98 | 5’7 | 7’3 |
| Free Points | Free Throw | 71 | 80 | 90 | 99 | 5’7 | 7’3 |
| Green Machine | Three-Point | 64 | 78 | 89 | 95 | 5’7 | 7’3 |
| Green Machine | Mid-Range | 61 | 76 | 88 | 95 | 5’7 | 7’3 |
| Guard Up | Three-Point | 60 | 74 | 87 | 94 | 5’7 | 7’3 |
| Guard Up | Mid-Range | 59 | 71 | 82 | 91 | 5’7 | 7’3 |
| Limitless Range | Three-Point | 85 | 92 | 96 | 99 | 5’7 | 7’3 |
| Middy Magician | Mid-Range | 59 | 72 | 84 | 92 | 5’7 | 7’3 |
| Open Looks | Three-Point | 58 | 75 | 88 | 93 | 5’7 | 7’3 |
| Open Looks | Mid-Range | 54 | 72 | 86 | 90 | 5’7 | 7’3 |
| Post Fade Phenom | Post Control | 59 | 65 | 75 | 85 | 5’7 | 7’3 |
| Post Fade Phenom | Close Shot | 65 | 77 | 86 | 93 | 5’7 | 7’3 |
| Post Fade Phenom | Mid-Range | 61 | 71 | 79 | 86 | 5’7 | 7’3 |
| Slippery Off Ball | Acceleration | 57 | 71 | 84 | 92 | 5’7 | 6’9 |
| Space Creator | Three-Point | 65 | 78 | 87 | 94 | 5’7 | 6’11 |
| Space Creator | Mid-Range | 64 | 76 | 88 | 96 | 5’7 | 6’11 |
| Spot Finder | Acceleration | 45 | 68 | 80 | 93 | 5’7 | 7’3 |
| Spot Finder | Close Shot | 55 | 70 | 80 | 91 | 5’7 | 7’3 |
| Spot Finder | Three-Point | 60 | 75 | 86 | 93 | 5’7 | 7’3 |
| Spot Finder | Mid-Range | 55 | 69 | 79 | 90 | 5’7 | 7’3 |
All Playmaking Badge requirements in NBA 2K24
Here are all Playmaking badge requirements in NBA 2K24:
| Badge | Attribute | Bronze | Silver | Gold | HoF | Min Height | Max Height |
| Ankle Breaker | Ball Handle | 62 | 75 | 85 | 93 | 5’7 | 6’9 |
| Bail Out | Pass Accuracy | 87 | 91 | 95 | 99 | 5’7 | 6’10 |
| Blow-By | Ball Handle | 67 | 84 | 92 | 97 | 5’7 | 6’11 |
| Blow-By | Speed With Ball | 62 | 75 | 83 | 89 | 5’7 | 6’11 |
| Blow-By | Acceleration | 61 | 73 | 83 | 90 | 5’7 | 6’11 |
| Break Starter | Pass Accuracy | 68 | 75 | 86 | 92 | 5’7 | 7’3 |
| Dimer | Pass Accuracy | 56 | 73 | 89 | 96 | 5’7 | 7’3 |
| Handles For Days | Ball Handle | 69 | 80 | 91 | 95 | 5’7 | 7’0 |
| Handles For Days | Stamina | 90 | 93 | 96 | 99 | 5’7 | 7’0 |
| Hyperdrive | Speed With Ball | 69 | 75 | 83 | 91 | 5’7 | 6’10 |
| Hyperdrive | Speed | 72 | 80 | 82 | 90 | 5’7 | 6’10 |
| Killer Combos | Ball Handle | 75 | 87 | 93 | 98 | 5’7 | 6’10 |
| Needle Threader | Pass Accuracy | 77 | 84 | 91 | 98 | 5’7 | 7’3 |
| Physical Handles | Ball Handle | 60 | 66 | 73 | 80 | 5’7 | 6’10 |
| Physical Handles | Strength | 60 | 63 | 73 | 83 | 5’7 | 6’10 |
| Post Playmaker | Pass Accuracy | 57 | 74 | 83 | 90 | 6’6 | 7’3 |
| Post Playmaker | Post Control | 55 | 67 | 79 | 88 | 6’6 | 7’3 |
| Post Playmaker | Offensive Rebound | 58 | 69 | 78 | 88 | 6’6 | 7’3 |
| Relay Passer | Pass Accuracy | 60 | 76 | 89 | 95 | 5’7 | 7’3 |
| Special Delivery | Pass Accuracy | 69 | 75 | 83 | 91 | 5’7 | 7’3 |
| Speed Booster | Ball Handle | 76 | 81 | 92 | 95 | 5’7 | 6’9 |
| Speed Booster | Speed with Ball | 72 | 75 | 83 | 91 | 5’7 | 6’9 |
| Speed Booster | Speed | 75 | 81 | 86 | 92 | 5’7 | 6’9 |
| Speed Booster | Acceleration | 79 | 83 | 87 | 93 | 5’7 | 6’9 |
| Touch Passer | Pass Accuracy | 74 | 82 | 90 | 95 | 5’7 | 7’3 |
| Triple Strike | Ball Handle | 57 | 68 | 80 | 90 | 5’7 | 6’11 |
| Triple Strike | Speed with Ball | 41 | 66 | 77 | 89 | 5’7 | 6’11 |
| Triple Strike | Acceleration | 42 | 65 | 75 | 85 | 5’7 | 6’11 |
| Unpluckable | Ball Handle | 70 | 80 | 92 | 98 | 5’7 | 7’3 |
| Unpluckable | Post Control | 70 | 80 | 92 | 0 | 5’7 | 7’3 |
All Finishing Badge requirements in NBA 2K24
Here are all Finishing Badge requirements in NBA 2K24:
| Badge | Attribute | Bronze | Silver | Gold | HoF | Min Height | Max Height |
| Acrobat | Driving Layup | 64 | 76 | 84 | 90 | 5’7 | 6’11 |
| Aerial Wizard | Vertical | 58 | 67 | 72 | 84 | 5’7 | 7’3 |
| Aerial Wizard | Driving Layup | 57 | 69 | 78 | 87 | 5’7 | 7’3 |
| Aerial Wizard | Driving Dunk | 64 | 75 | 84 | 95 | 5’7 | 7’3 |
| Aerial Wizard | Standing Dunk | 60 | 72 | 84 | 92 | 5’7 | 7’3 |
| Backdown Punisher | Post Control | 57 | 67 | 79 | 89 | 6’4 | 7’3 |
| Backdown Punisher | Strength | 70 | 79 | 86 | 95 | 6’4 | 7’3 |
| Big Driver | Ball Handle | 55 | 62 | 65 | 69 | 6’10 | 7’3 |
| Big Driver | Speed with Ball | 40 | 48 | 55 | 65 | 6’10 | 7’3 |
| Big Driver | Acceleration | 40 | 48 | 55 | 60 | 6’10 | 7’3 |
| Bulldozer | Strength | 74 | 84 | 92 | 96 | 6’5 | 7’3 |
| Bunny | Driving Layup | 62 | 72 | 84 | 94 | 5’7 | 7’3 |
| Bunny | Driving Dunk | 68 | 77 | 86 | 93 | 5’7 | 7’3 |
| Dream Shake | Post Control | 63 | 70 | 81 | 90 | 5’7 | 7’3 |
| Dream Shake | Close Shot | 57 | 64 | 75 | 88 | 5’7 | 7’3 |
| Dream Shake | Mid-Range | 59 | 67 | 77 | 84 | 5’7 | 7’3 |
| Dropstepper | Post Control | 64 | 75 | 84 | 95 | 5’7 | 7’3 |
| Fast Twitch | Close Shot | 71 | 81 | 90 | 98 | 5’7 | 7’3 |
| Fast Twitch | Standing Dunk | 73 | 83 | 92 | 99 | 5’7 | 7’3 |
| Fearless Finisher | Strength | 55 | 60 | 65 | 67 | 5’7 | 7’3 |
| Fearless Finisher | Close Shot | 68 | 77 | 86 | 95 | 5’7 | 7’3 |
| Fearless Finisher | Driving Layup | 70 | 80 | 87 | 96 | 5’7 | 7’3 |
| Float Game | Driving Layup | 60 | 68 | 77 | 88 | 5’7 | 7’3 |
| Giant Slayer | Close Shot | 55 | 62 | 75 | 88 | 5’7 | 7’0 |
| Giant Slayer | Driving Layup | 59 | 65 | 74 | 85 | 5’7 | 7’0 |
| Hook Specialist | Close Shot | 60 | 71 | 83 | 92 | 5’7 | 7’3 |
| Hook Specialist | Post Control | 50 | 62 | 74 | 86 | 5’7 | 7’3 |
| Masher | Close Shot | 68 | 77 | 84 | 94 | 5’7 | 7’3 |
| Post Spin Technician | Post Control | 60 | 72 | 81 | 90 | 5’7 | 7’3 |
| Posterizer | Driving Dunk | 73 | 86 | 93 | 99 | 5’7 | 7’3 |
| Posterizer | Vertical | 70 | 75 | 80 | 85 | 5’7 | 7’3 |
| Precision Dunker | Driving Dunk | 71 | 83 | 90 | 97 | 5’7 | 7’3 |
| Precision Dunker | Standing Dunk | 71 | 81 | 90 | 96 | 5’7 | 7’3 |
| Pro Touch | Close Shot | 51 | 60 | 70 | 80 | 5’7 | 7’3 |
| Pro Touch | Driving Layup | 51 | 60 | 70 | 80 | 5’7 | 7’3 |
| Rise Up | Standing Dunk | 72 | 81 | 90 | 98 | 6’4 | 7’3 |
| Rise Up | Vertical | 60 | 63 | 67 | 70 | 6’4 | 7’3 |
| Scooper | Driving Layup | 61 | 68 | 77 | 84 | 5’7 | 7’3 |
| Slithery | Driving Layup | 68 | 80 | 91 | 97 | 5’7 | 7’3 |
| Slithery | Driving Dunk | 70 | 82 | 93 | 94 | 5’7 | 7’3 |
| Spin Cycle | Driving Layup | 55 | 64 | 70 | 82 | 5’7 | 7’3 |
| Spin Cycle | Driving Dunk | 56 | 69 | 75 | 85 | 5’7 | 7’3 |
| Two Step | Driving Layup | 60 | 68 | 74 | 83 | 5’7 | 7’3 |
| Two Step | Driving Dunk | 63 | 70 | 78 | 86 | 5’7 | 7’3 |
| Whistle | Close Short | 73 | 84 | 92 | 99 | 5’7 | 7’3 |
| Whistle | Driving Layup | 74 | 85 | 95 | 99 | 5’7 | 7’3 |
| Whistle | Driving Dunk | 75 | 86 | 95 | 99 | 5’7 | 7’3 |
| Whistle | Three-Point | 77 | 86 | 94 | 99 | 5’7 | 7’3 |
| Whistle | Mid-Range | 73 | 85 | 93 | 99 | 5’7 | 7’3 |
All Defense and Rebound Badge requirements in NBA 2K24
Here are all Defense and Rebound badge requirements in NBA 2K24:
| Badge | Attribute | Bronze | Silver | Gold | HoF | Min Height | Max Height |
| 94 Feet | Perimeter Defense | 76 | 81 | 88 | 93 | 5’7 | 6’8 |
| 94 Feet | Stamina | 87 | 90 | 95 | 99 | 5’7 | 6’8 |
| Anchor | Interior Defense | 61 | 72 | 77 | 85 | 6’7 | 7’3 |
| Anchor | Block | 77 | 87 | 92 | 99 | 6’7 | 7’3 |
| Ankle Braces | Perimeter Defense | 64 | 78 | 89 | 94 | 5’7 | 6’11 |
| Boxout Beast | Strength | 70 | 72 | 84 | 90 | 6’3 | 7’3 |
| Boxout Beast | Offensive Rebound | 59 | 77 | 85 | 93 | 6’3 | 7’3 |
| Boxout Beast | Defensive Rebound | 60 | 77 | 85 | 93 | 6’3 | 7’3 |
| Brick Wall | Strength | 72 | 83 | 90 | 99 | 6’6 | 7’3 |
| Challenger | Perimeter Defense | 71 | 82 | 87 | 94 | 5’7 | 7’3 |
| Chase Down Artist | Block | 68 | 78 | 87 | 94 | 6’3 | 7’3 |
| Chase Down Artist | Speed | 50 | 60 | 66 | 71 | 6’3 | 7’3 |
| Chase Down Artist | Vertical | 60 | 74 | 80 | 83 | 6’3 | 7’3 |
| Clamps | Perimeter Defense | 75 | 85 | 93 | 99 | 5’7 | 6’9 |
| Clamps | Strength | 45 | 50 | 55 | 60 | 5’7 | 6’9 |
| Fast Feet | Perimeter Defense | 72 | 83 | 92 | 97 | 5’7 | 6’9 |
| Fast Feet | Acceleration | 70 | 73 | 77 | 82 | 5’7 | 6’9 |
| Glove | Steal | 72 | 85 | 91 | 99 | 5’7 | 7’0 |
| Interceptor | Steal | 60 | 81 | 89 | 95 | 5’7 | 7’3 |
| Immovable Enforcer | Strength | 71 | 82 | 90 | 95 | 6’5 | 7’3 |
| Off-Ball Pest | Perimeter Defense | 58 | 68 | 80 | 90 | 5’7 | 7’3 |
| Pick Dodger | Perimeter Defense | 74 | 84 | 91 | 98 | 5’7 | 6’10 |
| Pogo Stick | Vertical | 60 | 68 | 75 | 83 | 6’4 | 7’3 |
| Pogo Stick | Block | 79 | 85 | 93 | 97 | 6’4 | 7’3 |
| Pogo Stick | Offensive Rebound | 78 | 81 | 91 | 97 | 6’4 | 7’3 |
| Pogo Stick | Defensive Rebound | 78 | 81 | 91 | 97 | 6’4 | 7’3 |
| Post Lockdown | Interior Defense | 74 | 82 | 88 | 96 | 6’6 | 7’3 |
| Post Lockdown | Strength | 70 | 78 | 84 | 89 | 6’6 | 7’3 |
| Rebound Chaser | Offensive Rebound | 60 | 83 | 92 | 99 | 5’7 | 7’3 |
| Rebound Chaser | Defensive Rebound | 60 | 83 | 92 | 99 | 5’7 | 7’3 |
| Right Stick Ripper | Steal | 70 | 84 | 90 | 96 | 5’7 | 7’0 |
| Work Horse | Stamina | 89 | 92 | 95 | 99 | 5’7 | 7’3 |
| Work Horse | Interior Defense | 65 | 72 | 82 | 93 | 5’7 | 7’3 |
| Work Horse | Perimeter Defense | 72 | 79 | 86 | 94 | 5’7 | 7’3 |
Author’s Note: I wrote this guide while playing NBA 2K24 on PlayStation 5.


Published: Sep 8, 2023 02:15 pm