
If you haven’t noticed in Wuthering Waves many puzzles aren’t explained well. The Fabled Magnetic Cube Mechanics mission is one of them. If you’re stuck, this guide will show how to complete all parts of the Fabled Magnetic Cube Mechanics side quest in Wuthering Waves.
Wuthering Waves: How to complete all parts of the Fabled Magnetic Cube Mechanics side quest
Similar to “A True Champion” quest, locating the cube mechanics has parts to it. They might be hard to complete as Wuthering Waves gives no hints. Many side quests in Wuthering Waves have puzzles incorporated, however, some are harder than others.
For each part, I’ll break down this guide into sections. It’ll be easier to follow along.
Fabled Magnetic Cube Mechanics part 1
Puzzle 1
To trigger this side quest, make your way to Tiger’s Maw Mine. Once you reach it, look for an NPC with the Rambling and Wandering Engineer. He should be near the bottom in front of a steel door. When you interact with him, you’ll have to talk to Mizhi who’s nearby. There should be a prompt showing you the location.
All parts are divided into three parts for three different puzzles. You have to attack the cubes in the direction you are facing to move them.
When the first box appears, hit it so it goes to the right. In the second spot, move it downwards and then left. Next, hit it upwards so it goes close to the starting position. Hit it one more time going left. Finally, give it one last smack downwards.
Once that’s done, go back to Mizhi and talk to him.

Puzzle 2
This next puzzle is in the same spot, but the box has moved to the bottom right by some barriers. When you see it, go behind the cube and hit it upwards twice. Once you’ve put the cube in the uppermost slot, hit it to the left and then downward.
Again, when you’ve completed it, talk to Mizhi, and get ready for another puzzle.
Puzzle 3
The last puzzle in this part is slightly harder, you have to get rid of obstacles.
Between where the cube spawns and the second slot, there will be a box for you to break. When that’s done, move the cube to the right. In the second slot, hit it so it goes down. When you’re in this third spot, have the cube move left to the next slot.
Now, there’s going to be a barrier that can be moved. The controls for the barrier are right under the slot where the cube is. Just break the box covering it, and you can now move the barrier. With the wall gone, keep moving the cube left. When it’s in the last slot, head to the barrier control, and move the barrier to its original position.
After, hit the cube once going down and then right.
With that being done, talk to Mihzhi, and he’ll tell you that you need to wait.
Fabled Magnetic Cube Mechanics part 2
To activate the second part, you need to wait 24 hours. However, it means you have to wait 24 hours in real life, and speeding up in-game time won’t work.
Once you come back the next day, the second part of this quest will appear in Tiger’s Maw Mine. The first puzzle will be under a fast-travel point. When you reach the platform, look for the sole NPC Qingshu.
Puzzle 1
Before moving the first cube, look for a Toggle status that will activate a slot. Once you do, head back to the cube and hit it downwards. Move the cube immediately to the left, and then head back to the Toggle status. Once you turn off the slot, hit the cub so it goes up, and then hit it again to have it go right. Hit one more time downwards. Lastly, swing at it from the right, making it go in the final spot.
To finish up the first part, when it’s done, Qingshin will be ecstatic about a discovery which will lead into the second part.
Puzzle 2
Where the cube spawns for the second puzzle, interact with the Toggle status to activate the slot beside the cube. After that’s done, hit the cube to the right, and then downwards. When the cube is in the third spot, use the Toggle status again to activate a slot.
Once that’s done, hit the cube making it go all the way right. Next, go up. If you put the cube in the top right slot, hit it so it goes left. After that, you complete the second puzzle by hitting upwards one last time.
Puzzle 3
At the starting point, turn off the Toggle status. Once that’s done, have the box go right. Head back to the Toggle status and turn it on. You’ll be moving a wall out of the way. Go back to the cube, and hit it left.
Next, interact with the Toggle status to put everything back to normal. After that, hit the cube right and then go down. Navigate to the Toggle status again, and interact with it so the wall is moved, and the slot in front of the cube is gone. Hit once upwards, and one more time going left.
You’ve now completed puzzle number three.
To end part 2 of this quest line, go to the mine that’s outlined on your map. Here, you’ll need to find Mizhi by fighting enemies. Once that’s done, you should find Mizhi lying on the ground badly injured.
Fabled Magnetic Cube Mechanics part 3
For this last part, you’re also going to have to wait 24 hours to activate. When you come back the next day, head to Tiger’s Maw Mine, and look for both Qingshu and Mizhi. To make things easier, it’s at the same place as part two. Just go to the waypoint and glide down for it.
Puzzle 1
The cube of the first puzzle is on the bottom right. Hit it right to a slot with a white ring around it. When it enters the slot, it’ll be teleported to the slot above with another white ring. After it gets teleported to the next slot, move it to the left. In the slot above where the cube is, there will be another slot with a blue ring. Have the cube go into that slot, and it’ll be teleported into the second slot with a blue ring on the far right. When it reaches this new spot, move the cube down one slot.

Now, for the final push, break down the boxes between two slots with blue rings. Move the cube back up one slot so it gets teleported back to the other slot with the blue ring. Once it’s in this location, hit it upwards. The first puzzle should be completed after that.
Talk to Mizhi and get ready for the second part.
Puzzle 2
As you reach the bottom of the puzzle where the cube is, hit it upwards towards a slot with a white ring. It should get teleported with another white-ringed slot on the left. Interact with the Toggle statue in the middle to turn on a slot between the two ringed ones. When that’s done, go to the cube, move it to the right slot, and then back again. This should teleport it back to the first white ring slot. After hitting the cube right again, it’s now on a slot with blue rings. It should teleport itself to the next slot with a blue ring below.
This last part might seem confusing. Go to the Toggle statue, and turn on the slot under it. When that’s done, hit the cube to the left and then back to the right, so its final position should be the blue ring slot. As you already know, it’ll get teleported to the blue-ringed slot above. When it does, hit it up so it goes to the endpoint.
Head back to Mizhi and interact with him. Now we’re in the final stretch.
Puzzle 3
This last puzzle will require a little bit of backtracking.
Before approaching the cube in the middle, interact with the Toggle statue. After, hit the cube so it goes to the right, and then downwards. Like the one above, the white-ringed slot will teleport the cube to the slot beside it. From there, hit it downwards to the blue-ringed slot. This will make it teleport to the far left side of the area.
Head back to the Toggle Statue, and turn on the slot between the two ringed ones. Send the cube to the right, and the back to the left again. If this is done right, the box will be teleported to the blue-ringed slot on the right. After, kick it up so the white-ringed slot teleports it. In the slot beside, move it upwards so it’s near the end-point. Hit the cube one more time going left. Go to the Toggle statue and turn on the slot above the endpoint. Lastly, hit the cube right, and down, it should end up in the final spot.
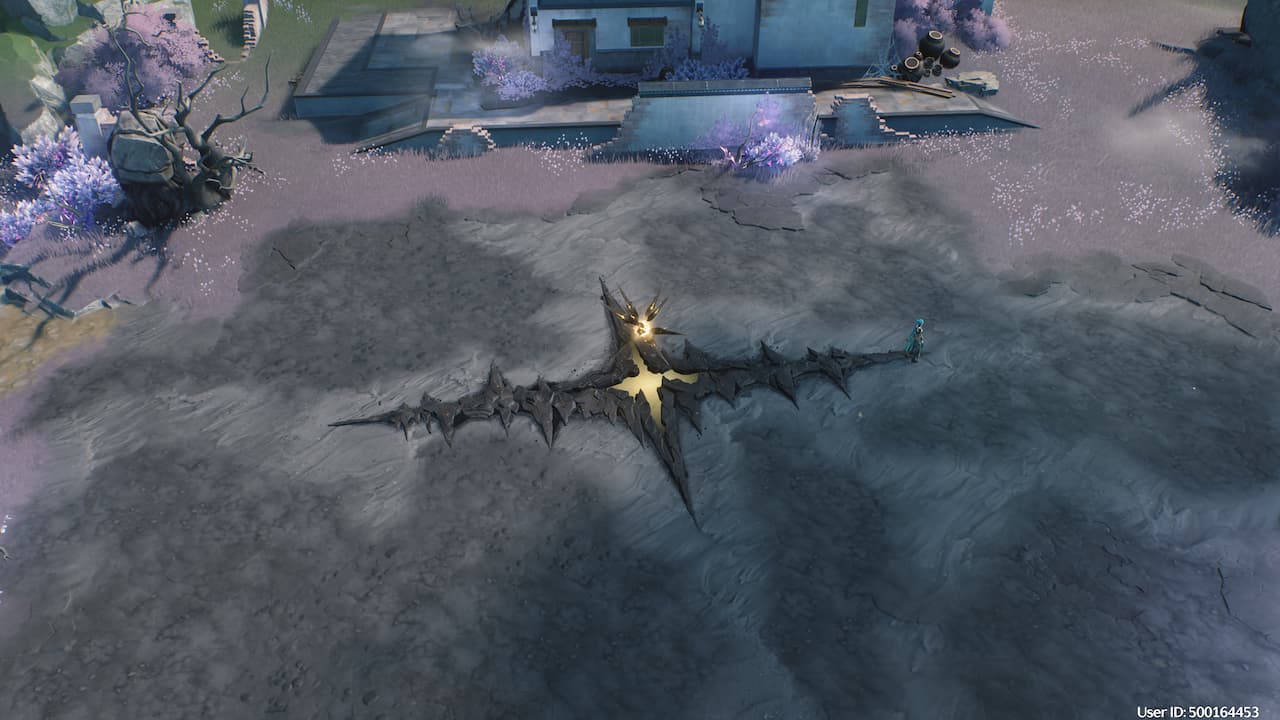
When all is said and done, you’ll see a beacon on your minimap showing you the quest reward which is a chest.
After you complete the Magnetic Cube Mechanics, try the Alloy Smelt event in Wuthering Waves. It seems to be easier.


Published: Jun 10, 2024 06:56 pm