
Encounter #3: Insurrection Prime (Phase 2) – Boss Fight
Well done, Guardian, you’ve reached the final encounter for Scourge of the Past. This one pits you against “Metal Gear” itself — Insurrection Prime. Looks like it’s time to prove that your Light is the weapon that can surpass Metal Gear.
The goal of this boss fight is to destroy Insurrection Prime’s shield panels and then use a tank to break its shield. It will open up its central core which allows for massive damage. This is also like a final test to see what you’ve learned from the entire raid. You’ve got the following mechanics to consider:
- Berserkers
- Maps
- Correct Orb Placements
- Tanks
- Charges/Auras and Tethered Connections
- And, of course, getting around with your sparrows
- You also have a limited time to do all the mechanics to stun the boss and begin a DPS phase, otherwise, it will fully charge its weapon to wipe you.
You should divide your team based on roles:
- Player #1 – Map Guy = the player responsible for staying inside the spawn building and looking at the map to direct other teammates; ideally a Warlock for survivability
- Player #2 – Roamer/Sniper = the player responsible for going around the map to take out most of Insurrection Prime’s shield panels as well as any snipers that might have a line of sight on your teammates
- The remaining four players will comprise the two Runner Teams. Just like the City Encounter, these players will kill Berserkers, pick up orbs one at a time to deposit them, as well as assist if they’re not assigned to pick up yet.
- All players should have Whisper of the Worm for the DPS phase and to help destroy some of the boss’ shield panels.
Role #1: The Map Guy Or Gal
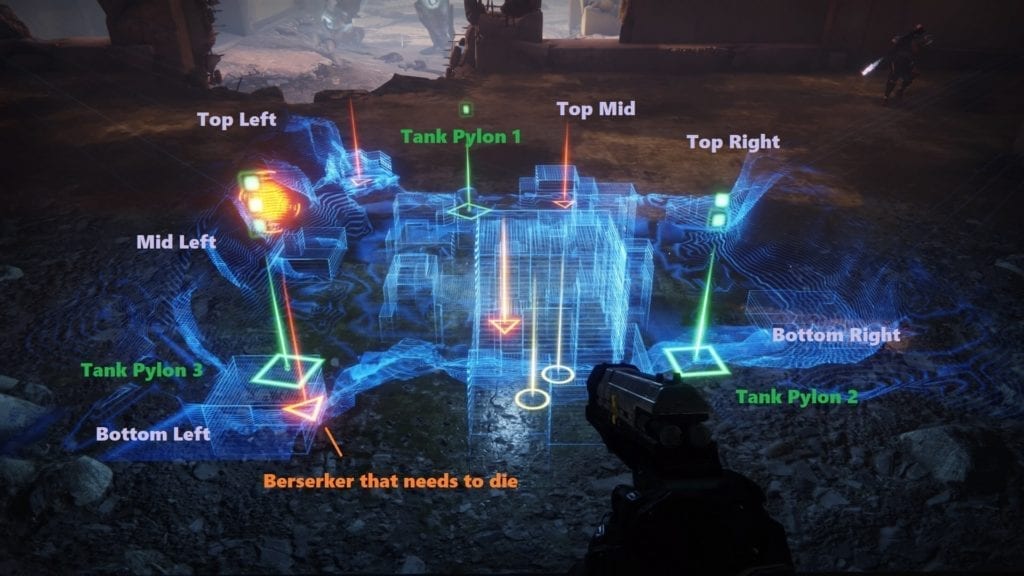
The map for the Insurrection Prime boss fight.
Your task is to stay in the spawn building and look at the map to direct your teammates. You’ll see the red triangle with a glowing circle which means it’s the Berserker that needs to get killed. Once a teammate has picked up the orb, you’ll see where that person needs to go. The same goes for the second player to pick up the second orb moments later.
The six buildings with the Berserkers are normally called:
- top left
- mid left
- bottom left
- top mid
- top right
- bottom right
The three pylons/tank spawn points (same as the ones used in the previous phase) are normally called:
- #1 or top mid
- #2 or bottom right
- #3 or bottom left
Oh, and don’t forget that you’ll also need to contend with dregs and servitors that spawn near your area. Not to mention, snipers from rooftops might also snipe you. Even Insurrection Prime itself might target you every now and then.
Role #2: The Roamer/Sniper
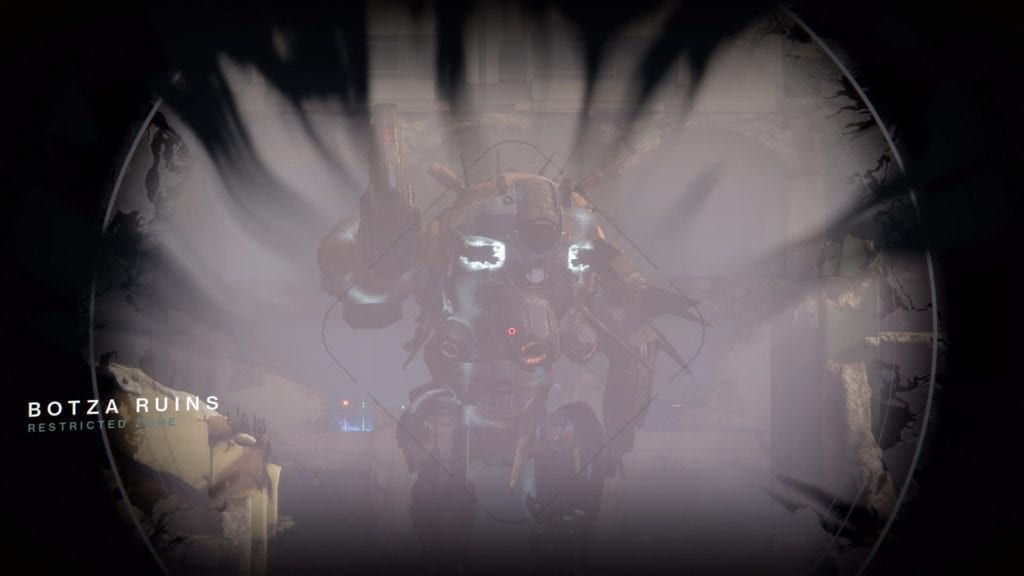
Insurrection Prime’s shield panels: These are the two at the back which can easily get sniped. The others are in the various body parts outlined below.
As the Roamer, you can stay all the way at the northern edge of the map and hide behind some rocks. You can pick off most of the boss’ shield panels this way. Alternatively, you can also stay on the rooftops to get an even better line-of-sight.
Your job is mostly just to make sure that all of Insurrection Primes’ shield panels are down as soon as possible. This will allow the tank to eventually break its shield and stun it later on. You’ll also want to kill snipers that might be pestering your teammates.
Here are the shield panels you’ll need to destroy (you’ll know that all of them have been destroyed once Insurrection Prime loses its translucent glow):
- two on the back
- two on the kneecaps
- one on the left “armpit” (side)
- one on the right shoulder plate
Your other teammates such as your Map Caller and the Runner Team (that’s not designated to pick up an orb yet) should also help you in taking out the hard-to-spot shield panels given that Insurrection Prime turns in random directions often.
Finally, your team should be aware of Insurrection Prime’s attacks since they can be interrupted. He has explosive canisters/batteries that glow red depending on the attack. Destroying these interrupt the attack and slightly extend the timer before the wipe mechanic:
- under the left arm – when it’s in the air and firing the Annihilation Blast
- under the right arm – when it’s firing a continuous stream of purple blasts
- back/jetpack – when it’s firing mortars/artillery
Runner Teams (The Remaining Four Players)
The Runners work like they did before during the City Encounter. They get directed to a specific building where a Berserker needs to get killed. It’ll drop the orbs needed to spawn the tanks. Remember to pick up one orb at a time so the player assigned to maps can make a clear callout where each person needs to go.
Once Runner Team #1 has planted their orbs in the correct spots, the map caller will say the location of the next Berserker for Runner Team #2. And, of course, Runner Team #2 will need to plant theirs in the correct spots. Don’t forget, planting at the wrong pylon will kill you and wipe the team.
Once all four orbs have been planted, tanks will spawn in the plates that had two charges. If a runner is close by, just get on that tank and get ready to shoot the boss.
Important Note: Insurrection Prime moves around the map fairly often. The team needs to shoot the boss to lure it back to the center and ensure that it’s facing your spawn area. If it’s turned around, or you don’t have an angle, then you’re screwed out of a decent DPS phase.
If the boss is looking at the “spawn building,” then you can safely shoot it to stun. Otherwise, you’ll want to head out as a team to find a good spot. In any case, blasting it with the tank will cause it to get stunned and begin the DPS phase.
The DPS Phase: Snipers Go Pew Pew Or The Alphabet Of ACP
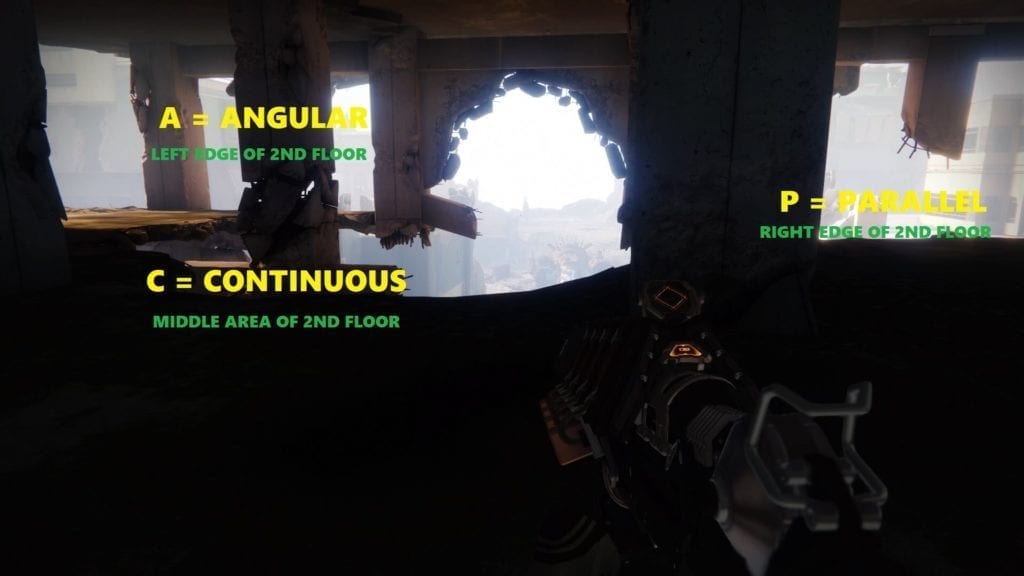
The DPS spots on the second floor of the spawn building. Go to the correct spots if you have that buff to boost damage when another teammate (with the same buff) is next to you.
Once Insurrection Prime is stunned, it will show its core (like a servitor attached to its chest). Shooting it will allow you to do damage. Eventually, the boss will emit pulse waves and you’ll need to start moving. That’s because you’ll have to stand with a teammate with the matching buff. These are the three buffs you need to watch out for in the lower left corner of your HUD (we shorten them as A, C, and P):
- Angular
- Continuous
- Parallel
Like in Phase 1, if you stand next to a teammate with the wrong buff, you’ll see a glowing tether that will slowly kill you while still suffering a DPS loss. However, if you stand next to a teammate with the correct buff, it will actually do double to triple the damage of your shots! Refer to the image above of how we set up our DPS spots with buffs.
That’s how the “ACP Strat” works — with the left side of your DPS area reserved for the Angular buff; the middle/back area for the Continuous buff; and the right side area for the Parallel buff. That also means players need to move around immediately once the pulses happen to maximize DPS.
For reference, I was at 638 PL when I killed the boss yesterday. This was my damage per Whisper of the Worm shot (with box breathing):
- Incorrect Buff/No Pulse yet – 54,000
- Incorrect Buff while standing on Well of Radiance – 77,000
- Correct Buff while standing on Well of Radiance – 212,000
No doubt about it, you’ll definitely need to jump around to the correct spots to gain a massive DPS increase. Correctly using the ACP mechanic can mean the difference between a two-phase kill or one that might need three or four. It can even mean one-phasing the boss like this example from pro player Indica:
Once the DPS phase has ended, you’ll simply need to re-do all the steps as before. Keep calm, play it safe, and you’ll get your kill eventually, Guardian. As for me, I didn’t get any noteworthy rewards (besides an emblem) and the Threat Level shotgun. It’s like the Ikelos SG but for the primary slot. Too bad it’s not fully masterworked.
Alternative Strategy: “Static Warlocks” Mode
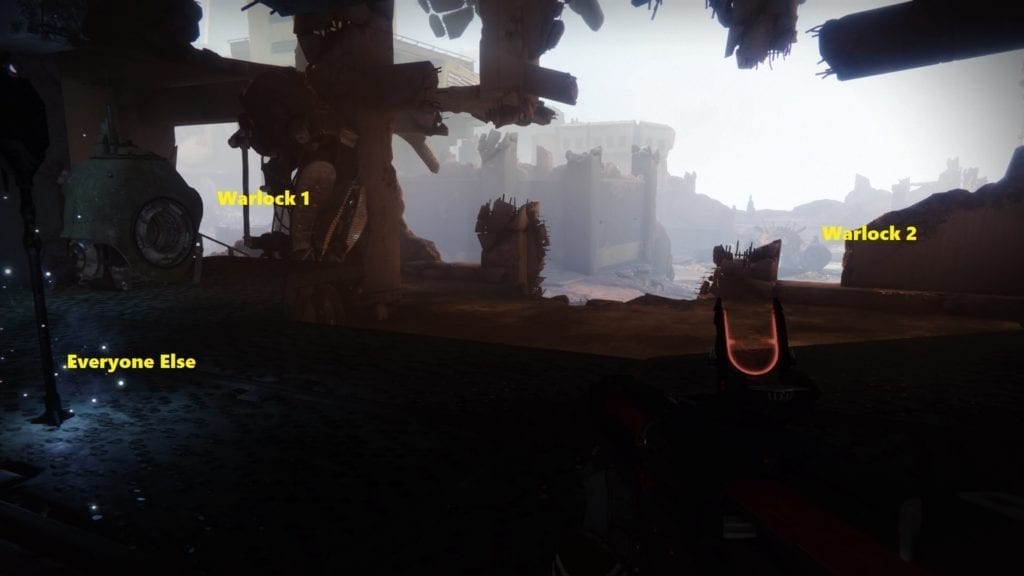
An alternative strategy which you can use if the regular ACP tactic with everyone moving around isn’t working out well for you.
The idea here is to have two Warlocks on the left and right sides. They are your anchors and will not move from their spots unless there’s one unique instance (explained below). The entire team stays in the middle area.
The Warlocks will call out their buffs one at a time and the remaining players just move to those spots underneath their Well of Radiance. This ensures maximum uptime for a majority of players instead of everyone moving around to adjust.
The only exception to this rule is when both Warlocks have the same buff. One other designated player will just call out what buff they have and will move to the right side (along with anyone who matches their buff). Refer to the image below for two examples.
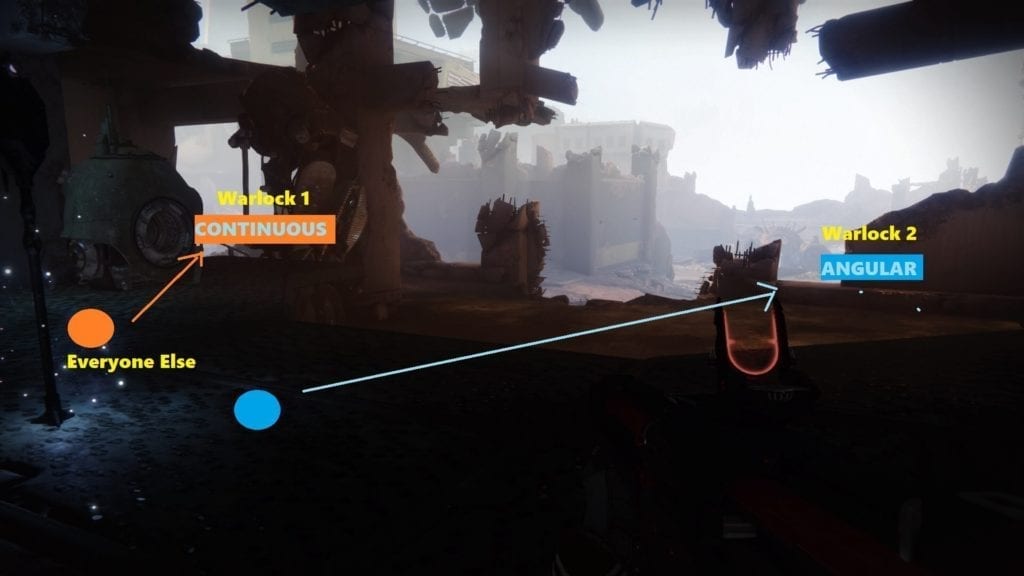
Example #1: The Warlocks have different buffs. After they call it out (ie. “Left Continuous,” “Right Angular”), the players with the matching buffs just head to their spots.
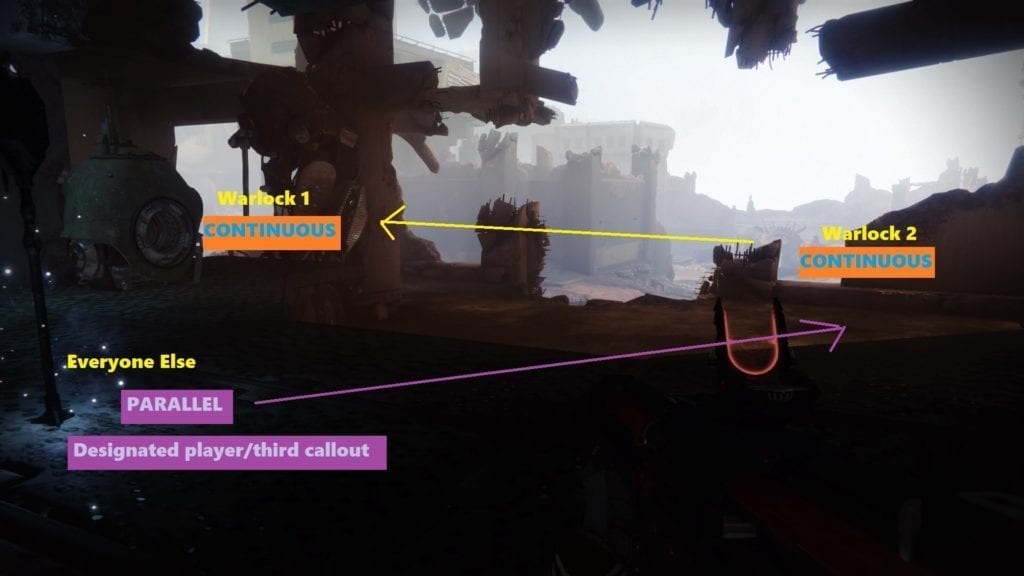
Example #2: The Warlocks have similar buffs. The Warlock on the right side automatically heads to the left. A designated player makes the third callout and moves to the vacated right side along with someone else with a matching buff.
- When the second pulse happens, the two Warlocks just need to call out their buffs again and it’s the non-Warlocks that need to adjust.
- If in case the first pulse ended with two Warlocks on the left, then the second Warlock will always assume they’re going back to the right side if they have different buffs for the second pulse.
- If they have the same buffs again for the second pulse, then the designated player will just need to do another callout for
- the right side again.
Doing the above guarantees that you’ll always have players who consistently DPS (with their Well of Radiance active) instead of everyone jumping around. In my previous runs, when the LFG teams struggled with “Regular ACP,” I introduced this “Static Warlocks” strat and everything went smoothly. It was possible for teams of 630s to take out 75 percent of Insurrection Prime’s health bar in one DPS phase without fail.
If all the above seems complicated, or you’ve already done this legit and you want to make things faster. You can always opt to cheese the boss fight by having one player blow themselves up while holding the Berserker’s orb. This starts the DPS phase immediately and you can wail away on the boss.
Whatever strategy you use, we hope this guide was able to help you out. We’ll keep updating it when we know more information and secrets.


Published: Dec 9, 2018 01:27 am