
The Salvation’s Edge Raid finally brings Guardians face to face with the Witness for the final showdown in Destiny 2, but getting to the Witness requires completing a series of encounters throughout the Raid first. Salvation’s Edge is one of the coolest Destiny 2 Raids Bungie has ever created, but the mechanics take some getting used to for new players.
Thankfully, Salvation’s Edge is a fairly straightforward raid once you get the hang of things, and there are a lot of repeated mechanics from The Final Shape campaign so you should be at least somewhat prepared before going in. There’s a lot of loot on offer — including an all-new Exotic weapon — so here’s what you need to know about Salvation’s Edge in Destiny 2 The Final Shape.
- How to Start Salvation’s Edge
- Substratum Encounter Guide
- Herald of Finality Encounter Guide
- Repository Encounter Guide
- Verity Encounter Guide
- The Witness Encounter Guide
- How to Get the Euphony Exotic
How to Start the Salvation’s Edge Raid in Destiny 2
To start the Salvation’s Edge Raid in Destiny 2, you must first complete The Final Shape campaign on any difficulty. You also need to complete the Wild Card post-campaign Exotic Quest to obtain the Still Hunt Exotic Sniper Rifle before you can start the Raid as well. After completing both prerequisites, you can find Salvation’s Edge on the Director map in the Pale Heart of the Traveler. It has a recommended Power level of 1965. If you need more help, we have a full guide on how to start the Salvation’s Edge Raid.
How to Complete the Substratum Encounter in Destiny 2
After the initial platforming section, you’ll arrive at the Substratum with the objective of gaining access to the monolith. This isn’t a boss encounter. Instead, it’s a puzzle with a very strict timer that requires your fireteam to split up and activate pads throughout the arena to gain a special buff required to progress. Here’s a helpful map of the encounter created by an anonymous contributor on the Destiny Raid Secrets subreddit.
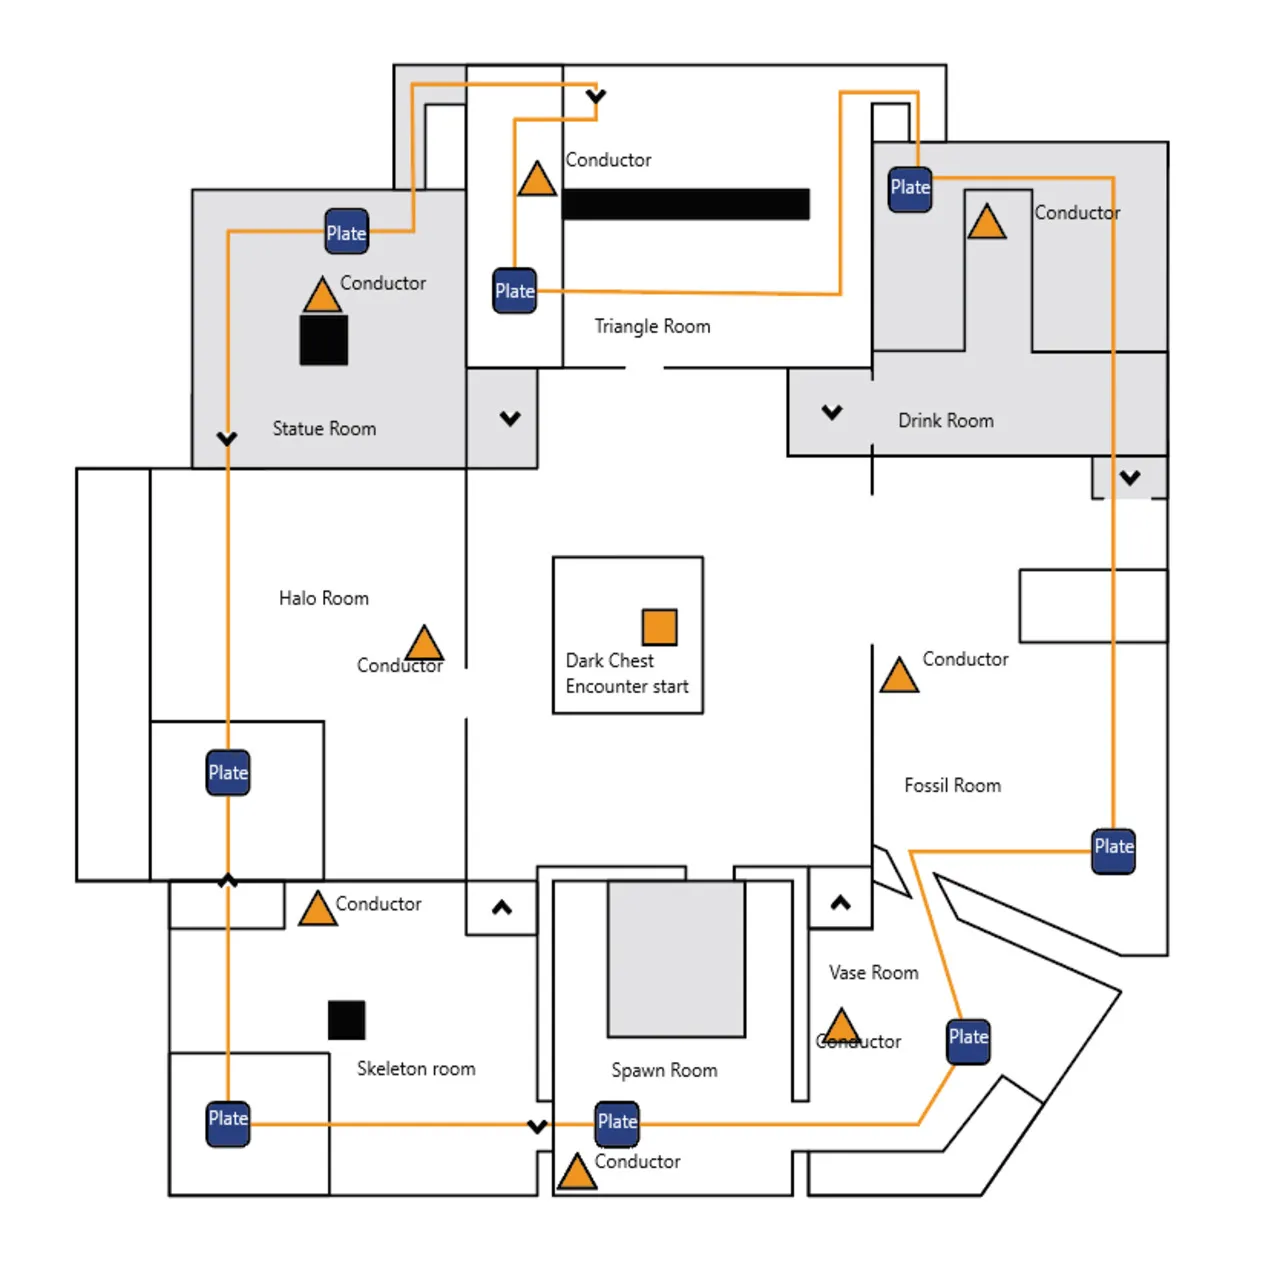
To begin the encounter, grab the Resonance and interact with the glowing orange box in the center of the room to deposit it. To complete the encounter, you need to gain Resonance and deposit that buff into this box three times before the “Final Shape Looming” timer reaches zero and your group instantly wipes.

Once the encounter begins, a bunch of Vex will spawn and your team will be swarmed by explosive Supplicants. Split the group into teams of three and pursue the Vex. In each of the rooms, there will be a Hydra and Minotaur. Killing these enemies will open doors for each group so they can progress further.
After taking them down, a Tormentor will appear in the center of the arena near the Resonance box. Defeat the Tormentor and more rooms will open up. Repeat the process and kill the Vex, but be prepared for a Champion to appear this time. Defeat the Champion and another Tormentor will appear in the center of the arena.
Once you kill the Threshold Sentinel Tormentor, you’ll receive a notification that says, “Energy flows into the architecture.” More Vex will spawn. Follow them into their respective rooms, clear the area, and you’ll find a glowing orange plate. Step onto the plate and it will send a pulse along the orange wires on the floor to another plate. Coordinate with your fireteam to ping-pong the charges back and forth between the plates.

As you move the charge between plates, small triangles will appear throughout the arena. You need to collect no more than three of these triangles to gain stacks of Pyramidal Resonance, so coordinate with your fireteam to decide who’s going to grab them. As you charge the plates and grab triangles, you’ll come across black monoliths. Shoot them to reveal a glowing golden weak point. The more stacks of Pyramidal Resonance you have, the more damage you’ll do to the pillar. Breaking the pillar will give you a new Resonance buff that you can take to the center of the arena to deposit into the box.

After you shoot the final totem, you’ll see notifications saying, “The resonant conductor sparks to life” and “You are beckoned toward the center.” Return to the middle of the arena and defeat the Subjugator to activate the box. Deposit all stacks of Resonance. Repeat this entire process three times to complete the encounter and proceed with the raid.
How to Defeat the Herald of Finality in Destiny 2
The second Salvation’s Edge encounter pits you against the Herald of the Finality, the first real boss fight of the raid. This boss battle involves many of the same mechanics from the previous Substratum encounter, just with a few twists. To start the encounter, shoot the Taken blight in the center of the arena.
Split your group into three teams of two and send each pair to a different totem. One is in the middle, one is on the left side, and the last is on the right side. Each area has two plates, so each player is responsible for one of them. It’s the same ping-pong mechanic as the previous encounter, only now both Resonance triangles and Resonance orbs will spawn.

Three players will get a buff called Call to Reckoning. To determine which Resonance shape you need to collect, the players with Call for Reckoning need to go to the center of the arena with the boss. Look around for Taken blights and destroy them to make the boss vulnerable, then shoot him in the head for a critical shot that gives you a buff called Stolen Favor, which will reveal the correct shape for your totem.

Once you learn the correct shape, use the plates to spawn Resonance buffs, collect the right shape, and then shoot the totems like last time. Each side also has a large enemy called the Trammel of Conflict (Phalanx, Wizard, or Ogre) to deal with. Focus on these enemies and do not let them stand on the plates and reach the totem or the entire team will wipe.
After all three totems are charged, a Resonance box will spawn in the back of the arena. Once everyone deposits their Resonance into the box, the damage phase will begin. Rinse and repeat until the Herald of Finality is slain to complete this encounter.
How to Carve a Path in Destiny 2 Salvation’s Edge
The third encounter in the Salvation’s Edge raid requires you to carve a path through the Repository you continue toward the Witness, and there are even more plates and pads waiting for you in this room. Ads will constantly spawn during this encounter, so stay on your toes and help your fireteam so they don’t get overwhelmed.

A Tormentor named Threshold Sentinel will appear at the start of the encounter, and it’s a good idea to kill it quickly so your group can focus on mechanics. The plate mechanic is the main focus of this encounter again, only there are now triangles, orbs, and cubes for Resonance. Ping pong the charges between each plate and shoot the totems to get Resonance, then deposit the Resonance in the box at the back of the arena to access the next part of the encounter.
After you climb up to the second room, just repeat the process again. Watch out for the Tormentor and the Witness‘ attacks, ping-pong the plates, and bank your Resonance. There’s a lot of platforming in this room, so watch your step. Once you bank your Resonance, you can proceed to the final part of this encounter.

The third and final section of this encounter involves a lot of platforming and jumping, so try not to fall and ruin things for your group. There are three totems to activate and three yellow bar Tormentors to deal with. Now that you have the ping-pong mechanic mastered by this point, you can focus on platforming and surviving the Tormentors. After activating all three totems and banking Resonance, a Champion will spawn as the final roadblock. Take it out to complete the encounter.
How to Solve the Verity Puzzle in Destiny 2 Salvation’s Edge
The Verity puzzle encounter is one of the toughest in Salvation’s Edge, and streamers were stumped for hours during the World First race when they first reached it. When you arrive, you’ll see a bunch of tall white statues of Guardians. They’re actually you and your fireteam! One of them has a glowing yellow base. Interact with this statue to start the encounter.
Your group will be split up into a team of three that stays in the main room and three solo players that are teleported into their own rooms. The players in the solo rooms will see three statues, one for each of the solo players. One of the solo players should call out the order of the shapes held by the statues from left to right (e.g. circle, square, triangle) because the trio in the main room will need that information.
Each of the solo players should look for the statue of themselves and note which shape it is holding. The main goal of the solo players for this phase is to trade shapes with each other so that the shapes on the wall match the shape held by their statues. For example, if you’re a solo player and your statue is holding a triangle, you want two triangles on the wall as well.
To trade symbols, you can kill the Splintered Curator Knights, grab their shapes, and deposit them into the statues. It’s very important that you do not pick up more than one shape at a time, otherwise they will combine into a 3D object (this is important for later). Also, don’t grab your own shape. Just kill the knights and drop their shapes into the matching statue. For example, you should deposit a triangle into the statue holding a triangle.
After you trade enough shapes with the other solo players, each solo player should have two shapes on their walls that match the shape held by their statue. At this point, your next goal is to trade shapes again so that each solo player has one of each shape (one on the statue, two on the wall). To do so, kill the Splinted Curators and pick up your shape from the statue. Deposit it into one of the other statues and then do the same for the third statue. This will make your shape disappear from the statues in the other rooms, and each solo player will end up with only one statue holding their shape.
The Witness will notice your actions as you keep trading shapes, and he’ll periodically kill some of the solo players. The trio of players in the main room can revive dead solo players by finding their Ghost in the main room and then bringing it to the statue of the dead player near the entrance of the room. Ghosts should be deposited in order from left to right, otherwise the depositing player will be killed. The depositing player will also be killed if they bring the Ghost to the wrong Guardian statue.
While all this is going on, the trio of players in the main room need to Dissect statues and swap shapes between them. Each statue in the main room is holding a 3D object comprised of two shapes. Dissecting two statues in a row will swap the shapes between those statues and change their 3D objects, so coordinate with your group to determine which order you want to Dissect. For example, cone=triangle+circle and cube=square+square. If you Dissect a triangle from the cone and a square from the cube, you’ll swap them and the statues will now have a cylinder (square+circle) and pyramid (square+triangle) instead.
Ultimately, the goal of the trio of players in the main room is to Dissect statues so that they end up holding 3D objects made out of shapes not held by the statues of the solo players in their solo rooms. For example, if the statue of a solo player in a solo room is holding a triangle, then the corresponding statue in the main room should be holding a cylinder (square+circle). This is why a solo player needs to call out the shapes of their statues in order from left to right, so the main room team knows which 3D objects to create.
Once the statues are holding the correct 3D objects, the solo players can exit their solo rooms and return to the main room by killing Knights and collecting both shapes to gain a 3D shape aura. This buff lets you run through the glass wall at the back of the room so you can regroup with everyone in the main room.

Finally, once the entire fireteam is back in the main room, the Witness will freeze and kill five players. The surviving player has to resurrect everyone else by grabbing their Ghosts and depositing them at the corresponding statues from left to right. Once everyone is alive again, three new players will be taken away to solo rooms. Complete three full cycles like this and you’ll complete the Verity encounter.
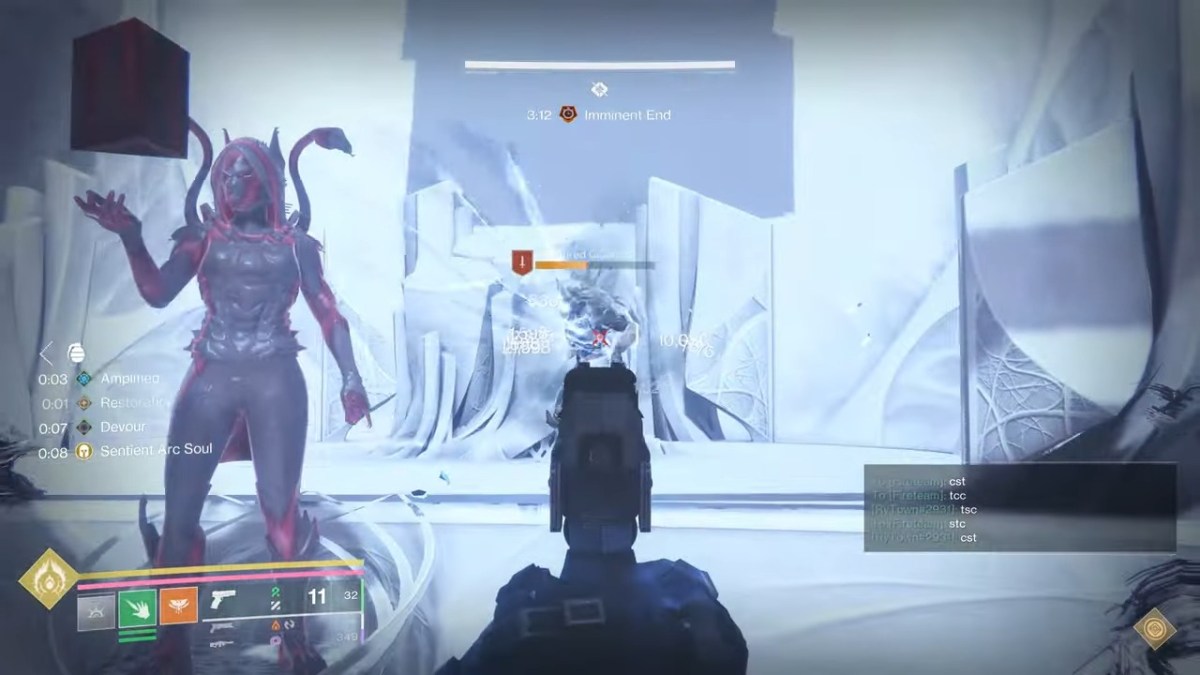
How to Defeat the Witness in Destiny 2 Salvation’s Edge
It all comes down to this. In the Zenith encounter of Salvation’s Edge, you and your fireteam will face off against the Witness. This encounter is actually fairly straightforward, especially compared to what came before it.
The entire encounter revolves around shooting the Witness’ hands while you have the correct Resonance shape buff. This will get you a buff called Glyphbreaker that lets you destroy the glowing buttons on the Witness’ body, enabling the DPS phase. Just like the rest of the encounters in this raid, there’s a Final Shape timer that will wipe you when it reaches zero.
When the encounter begins, a bunch of the Witness’ arms will appear on each side of the arena. They repeatedly perform attacks with glowing telegraphed damage zones on the ground. Stepping into one of these telegraph zones will give you a Resonance buff. The circular zone will give you Spherical Resonance, the triangular zone will give you Pyramidal Resonance, and the beams from the horizontal arms grant you Hexahedron Resonance.
Standing in the glowing zones lets you shoot the wrists of the arms to reveal a colored wristband adorned with shapes. If you have Resonance that matches the shape on the wristband, you can shoot and destroy them. The yellow wristband requires Spherical Resonance, the red wristband requires Hexahedron Resonance, and the green wristband requires Pyramidal Resonance. Once you’ve obtained the correct Resonance buff, step into the glowing telegraph zones for the corresponding arm and shoot the bracelet to break it.
Breaking a wristband will grant you a special buff called Glyphbreaker, which is the key to activating the DPS phase. With the Glyphbreaker buff, you can enter the well of light in the center of the arena and destroy one of the glowing buttons on the Witness’ body. Breaking one of these glyphs will spawn a pair of Subjugators, so be ready. You can break multiple glyphs at a time if you’re fast enough, too.

Periodically throughout the encounter, you’ll see a notification that reads “The Witness tests you.” This will spawn a bunch of totems in front of the Witness. If you don’t do this mechanic correctly, you’ll be killed. Depending on which wristband you last broke to gain the Glyphbreaker buff, you need to destroy the totems to create the shape of the corresponding Resonance.
For example, if you used Pyramidal Resonance to destroy a wristband last, you’d need to shoot and destroy the totems to leave behind a triangle. Spherical Resonance requires you to create a diamond, and Hexaderon Resonance requires you to make a square. Do not destroy the totems that create your shape. Shoot the totems that are not a part of your shape.
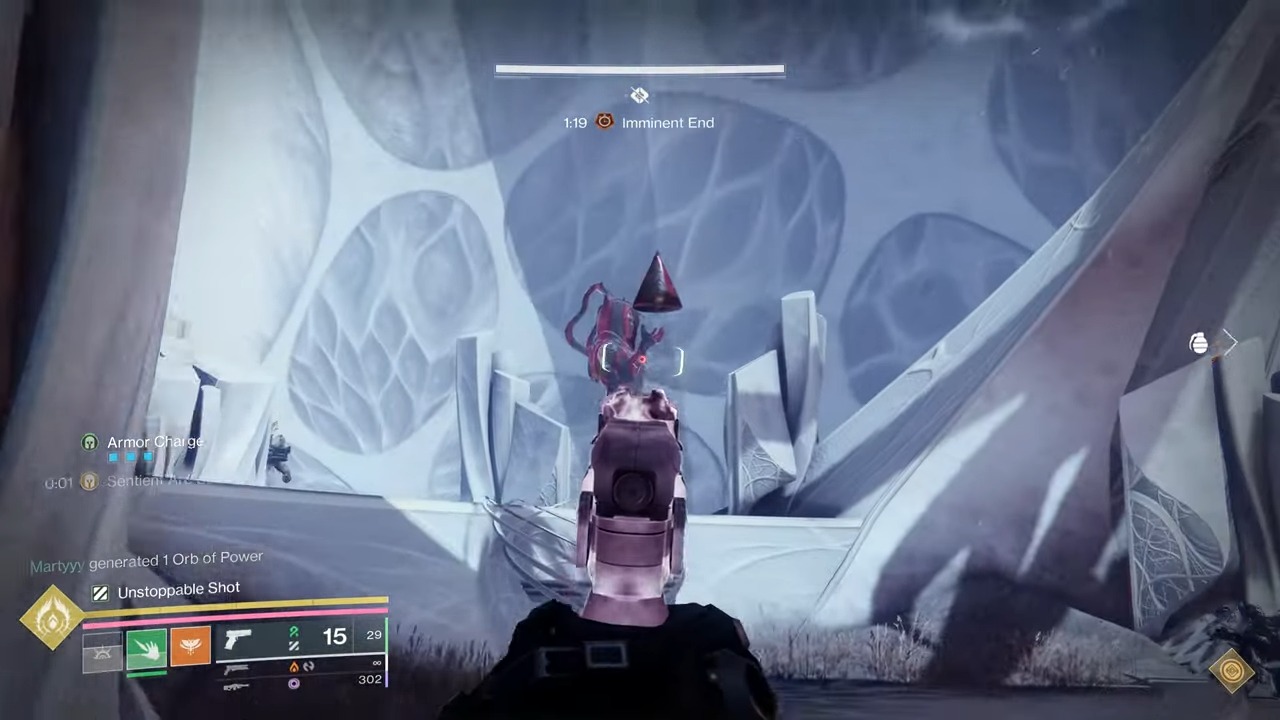
Once all six glyphs on the Witness’ body have been destroyed, the DPS phase begins. The Witness will lift a platform up to its chest and reveal a glowing weak spot on its torso. The DPS phase is exactly the same as it is in the Excision mission, so you may already know what to do.

The Witness will repeatedly attack your fireteam with its arms during the DPS phase, so be ready to dodge. It’ll swipe large sections of the platform and basically instantly kill you if it touches you, so be careful. You’ll also need to time your jumps to avoid some of these attacks since there won’t always be a safe space to stand. Just rinse and repeat until the Witness is defeated to complete the encounter and finish the raid!
How to Get the Euphony Exotic in Destiny 2 Salvation’s Edge
Euphony is the Raid Exotic for Salvation’s Edge. It’s a Strand Linear Fusion Rifle with a perk that causes Threadlings to spawn at your target’s feet as they take sustained damage. It’s great for DPS phases, and both Strand and Prismatic Guardians can easily fit it into their builds.
Like all Raid Exotics, Euphony has a random chance of dropping from the final boss of Salvation’s Edge. It comes down to good RNG whether you get it or not. Good luck!
If you miss out on Euphony, there are still plenty of other weapons and items to earn from the Salvation’s Edge Raid. The Pale Heart of the Traveler is also home to plenty of other Exotic weapons and sweet gear that you can’t get anywhere else, so don’t forget to keep farming between weekly runs of Salvation’s Edge.


Published: Jun 10, 2024 05:03 pm