When you’re on a mission to bring order to chaos, you need the right gear to do the job. Sometimes this means going loud, weapons-free, but often it requires finesse and equipment tailored to the mission. Here are the best loadouts for Ready or Not, flexible for any occasion!
Best Loadouts, munitions, and equipment in Ready or Not
The best loadouts in Ready or Not will not be universally usable between missions, but many work as multipurpose builds with only minor tweaks needed. Some differences are subtle, like armor plate types, while others like the Lockpick Gun have hyper-specific instances where they’re vital.
Related: How to get S rank in Ready or Not
I will maintain that whatever loadout you choose, your primary weapon should ideally be the VKS assault rifle or the Beanbag shotgun if you want the best scores. Going non-lethal makes the difference when acing a mission or even in many ways simply succeeding.
Blitz Breach
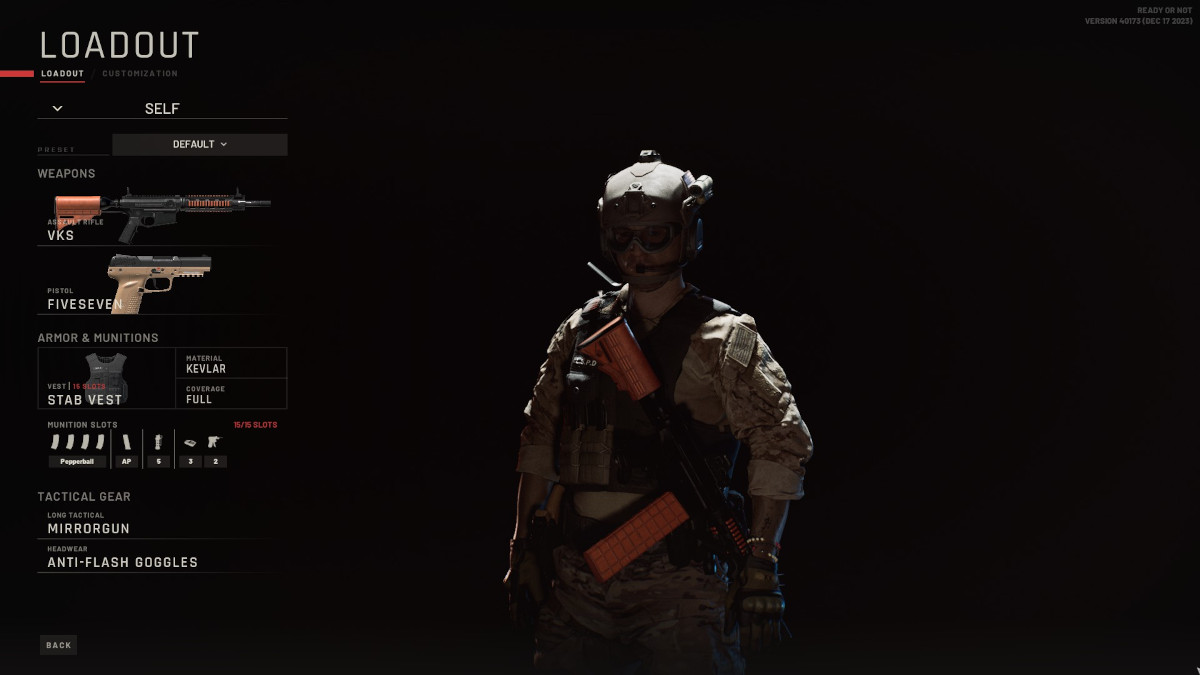
This build is the fastest of the loadouts I’ll feature for Ready or Not. This is ideal for missions early on like Twisted Nerve where you need to quickly clear rooms, toss down flash grenades, and constantly stay on your toes against hostiles actively searching for you.
- Armor: Stab Vest
- Material: Kevlar
- Coverage: Full
- Munitions: 1x AP Pistol Mag
- Equipment: 5x Flashbang, 3x Wedge, 2x Lockpick Gun
- Long Tactical: Mirrorgun
- Headwear: Anti-Flash Goggles
The Stab Vest with Kevlar allows you to move quickly in any scenario, with no false starts. This is great for when you are trying to pacify or intimidate your opponents but aren’t kitted out for a gunfight.
The pistol ammo is for emergencies only, as I advocate going non-lethal as much as possible unless you’re afraid for a hostage’s life. With your Anti-Flash Goggles, a ton of Flashbang grenades are a great natural choice and they work on a variety of indoor-focused maps like 23 Megabytes a Second, Twisted Nerve, Rust Belt, and more.
Other assurances like the Mirrorgun and the Lockpick Gun help you scope out and quickly storm a room without alerting hostiles. Finally, the Wedges are vital when you’re stacking your team up on a key spot, and are concerned about getting a surprise attack behind another door in the room.
Going Loud
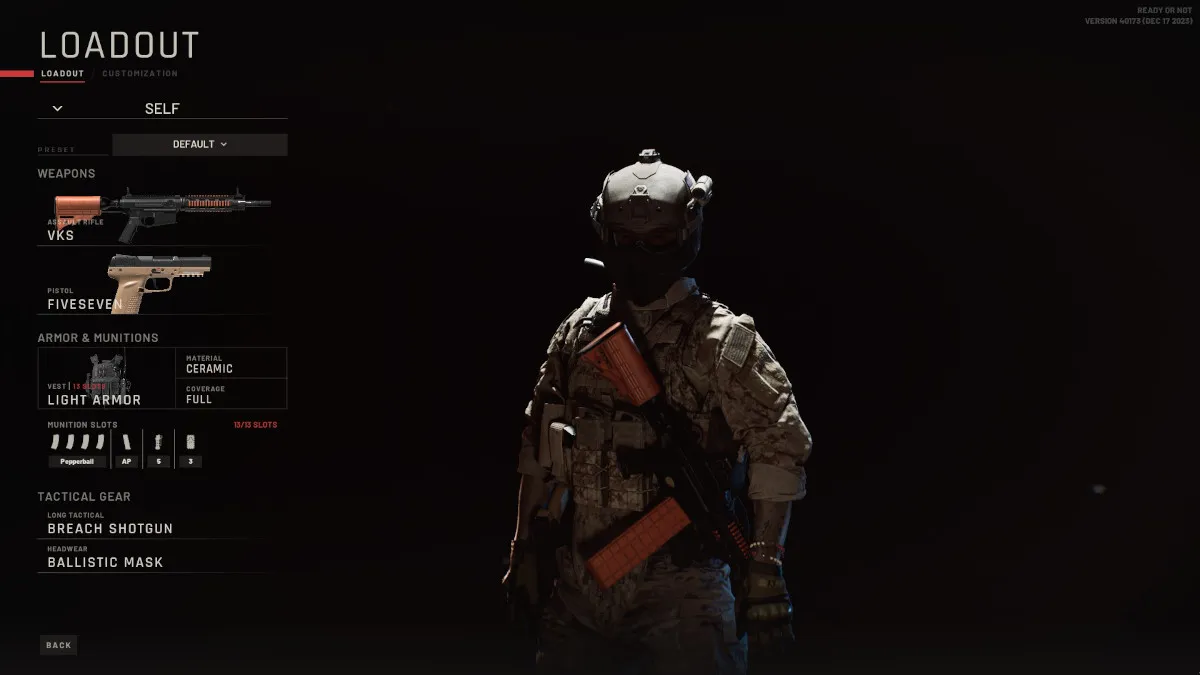
I couldn’t think of a flashier name for this one, but this loadout prioritizes protection without sacrificing speed.
- Armor: Light Armor
- Material: Ceramic
- Coverage: Full
- Munitions: 1x AP Pistol Mag
- Equipment: 3x Flashbang, 2x Stinger, 3x C2
- Long Tactical: Breach Shotgun
- Headwear: Ballistic Mask
This one moves slightly slower, but with Ceramic plates, you can shrug off more oncoming fire in brief engagements. You can shift around your ammo depending on whether you want a lethal variant on this build, but 1 AP Pistol Mag is my default, HP rounds are often just too damaging to a good run.
Flashbangs feature here heavily as well, although you can swap out some for Stingers if you wish. However, C2 is an excellent tool for enemies hugging doors if you can hear them breathing at the threshold, allowing you to stun them and even get an achievement if caught in this blast!
The Breach Shotgun is handy for breaking down any door, but make sure you’re ordering your team to clear the room with you once you’ve broken the door. Finally, the Ballistic Mask protects against some small arms fire in a pinch.
Going Dark
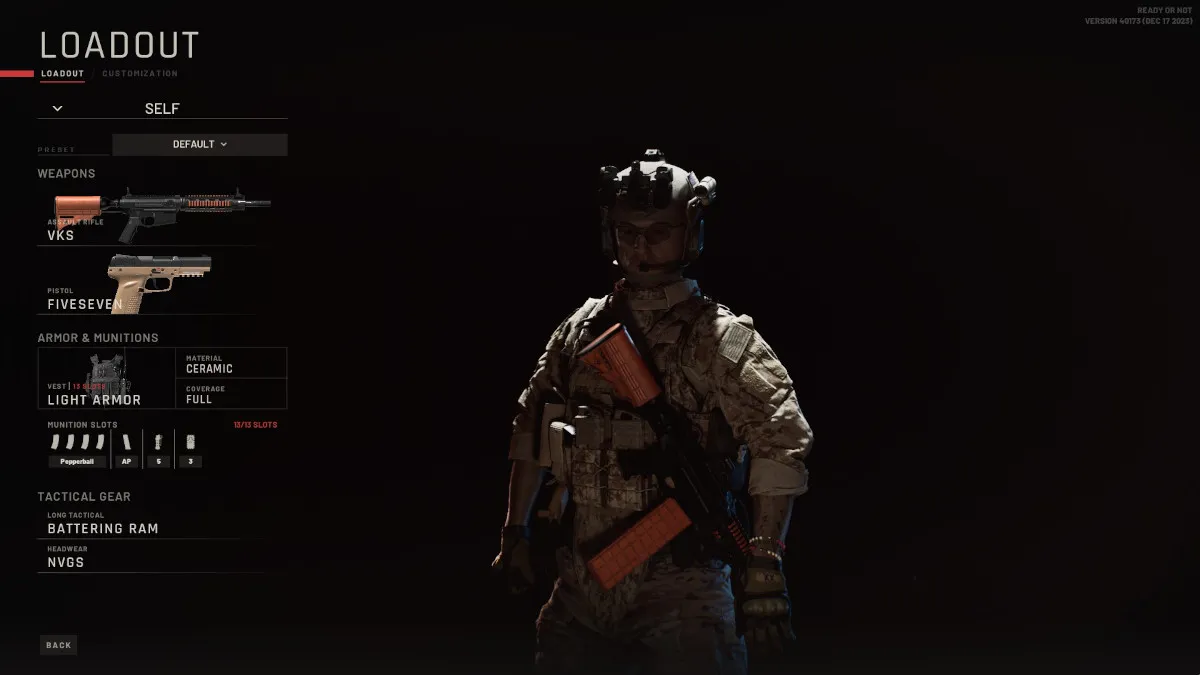
A similar build begets a similar name in this slightly tweaked version of the previous build. It trades protection for visibility and will prove its value for exploring dimly lit rooms, tunnels, and nighttime maps more easily.
- Armor: Light Armor
- Material: Ceramic
- Coverage: Full
- Munitions: 1x AP Pistol Mag
- Equipment: 5x Flashbang, 3x C2
- Long Tactical: Battering Ram
- Headwear: NVGs
I’ve been able to make pretty strong pushes in missions with this and either the Beanbag Shotgun, the VKS, or the MCX if going lethal. The NVGs make the difference in high-intensity missions even as early as Twisted Nerve where you start to see tunnels factor in, or even just outdoor portions in the dark.
The Battering Ram, if you can coordinate your team, allows for an instant dynamic entry, bashing and opening practically any door you encounter. Being able to see these threats and catch them unaware in the dark, and stun them into submission, is a great asset to have.
Crowd Control
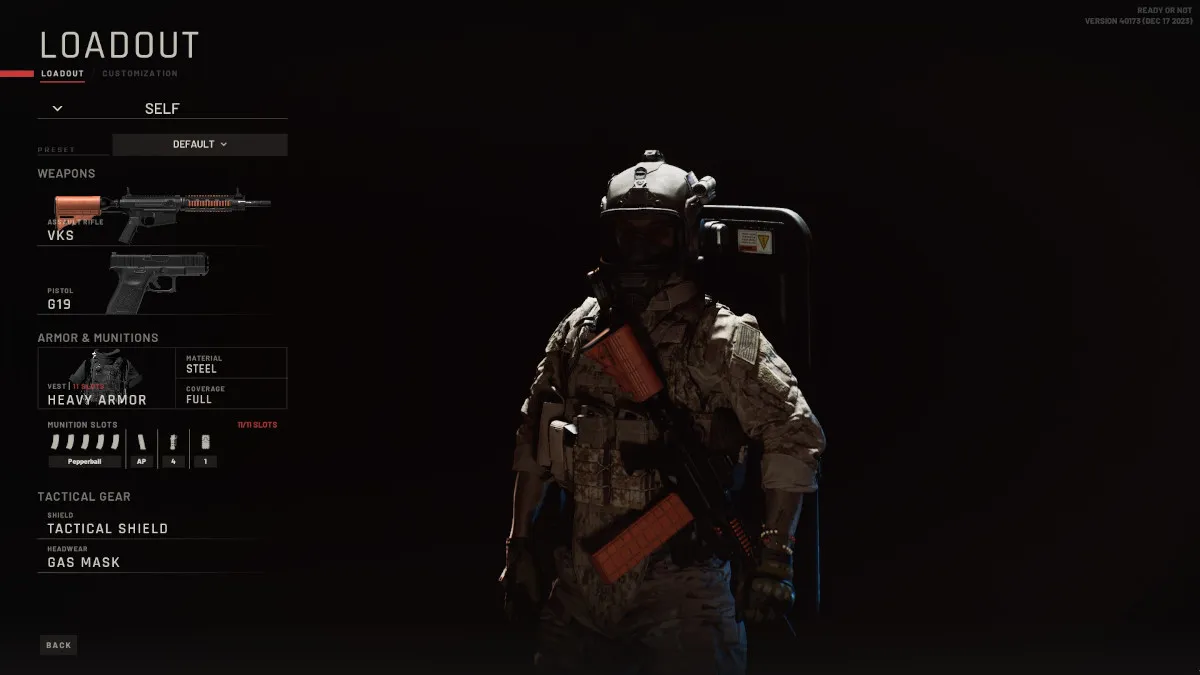
This is one of the best Ready or Not loadouts, the closest to an equalizer as you can get for extremely stressful maps like Greased Palms. It allows you to shrug off oncoming fire while taking milder spall damage on covered areas of your body. It is, however, slow, so keep that in mind with the following details:
- Armor: Heavy Armor
- Material: Steel
- Coverage: Full
- Munitions: 1x AP Pistol Mag
- Equipment: 2x Flashbang, 2x CS Gas
- Long Tactical: Tactical Shield
- Headwear: Gas Mask
Heavy Armor is best when you double down on it, so Steel is the way to go as long as you don’t invite too much fire. This is where the Tactical Shield factors in, offering protection when you’re in an active shooter scenario.
Much like with all the other builds, the 1 AP Pistol Mag is for the worst-case scenario when your primary weapon is too slow to reload. Flashbangs and CS Gas are key here in containing situations, with Flashbangs being ideal for smaller rooms and hallways, and CS Gas being best for dispersing crowded hostiles.
Finally, the Gas Mask allows you to pass through the cloud of smoke you create with the gas grenades, sending enemies to the walls and behind cover for you to arrest them individually.
Close Quarters Containment
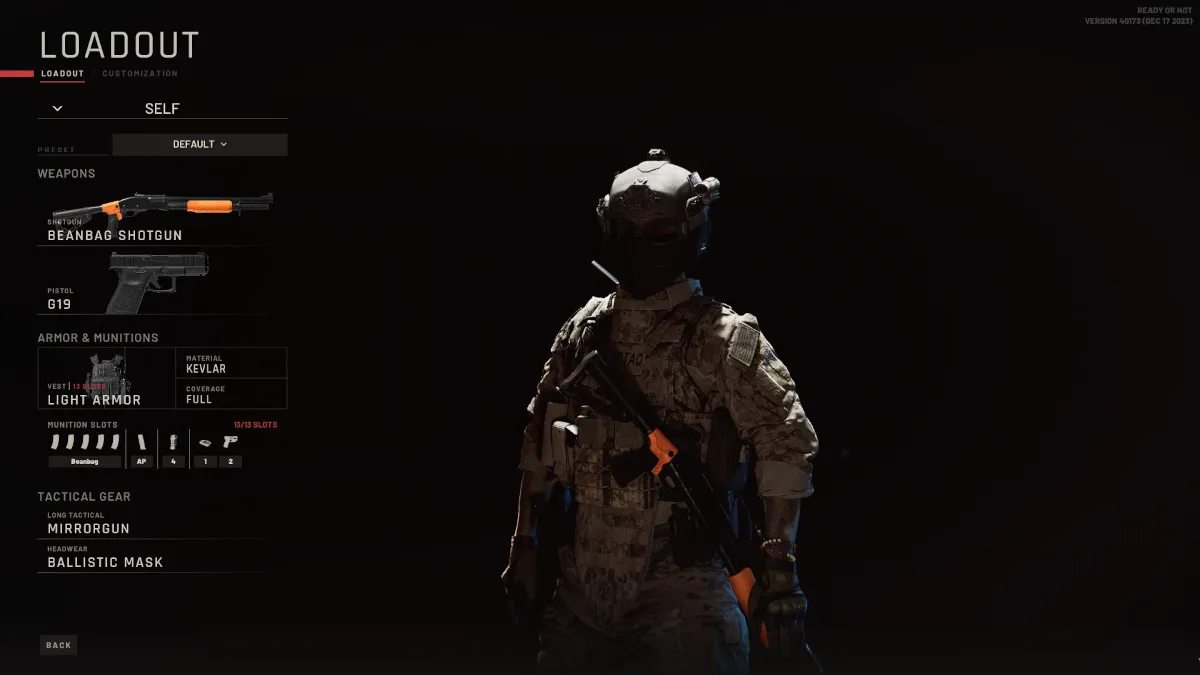
This final build is another tweak on the Light Armor builds, with a greater focus on quickly assessing and storming rooms with your team. I like to use this build with the Beanbag Shotgun as it gets quicker non-lethal potential than the Pepperball guns, but with the downside of potentially being fatal if you overdo it.
- Armor: Light Armor
- Material: Kevlar
- Coverage: Full
- Munitions: 1x AP Pistol Mag
- Equipment: 2x Flashbang, 2x Stinger, 1x Wedge, 2x Taser
- Long Tactical: Mirrorgun
- Headwear: Ballistic Mask
This build is flexible but is about containing threats, blinding trigger-happy hostiles with civilians nearby, and subduing targets when no innocents are near. It’s great, but you’ll want the small speed boost of Kevlar in this case. Pack plenty of primary ammo, and consider swapping in for another Flashbang if you need it!
My favorite weapons in Ready or Not
You may have noticed I didn’t go over the weapons specifically in most cases. That’s partially because you can tailor that part to how each weapon handles for you, but I’ll give a rundown of the best weapons I’ve come across in the game:
- Non-Lethal: VKS
- Assault Rifle: G36C
- Submachine Gun: P90
- Shotgun: Supernova
I would suggest the Beanbag shotgun as an honorable mention, but as far as non-lethal options go, the VKS is perfect. Pepperballs allow something similar to a ricochet effect to bullets, where you can fire at the walls and floors of nearby enemies and stun them. This has been a lifesaver, and you can peek into doors to take shots like this after spotting them with a Mirrorgun.
The G36C is reasonably great with strong accuracy in close-to-long range, room for attachments, and strong maneuverability. Meanwhile, the P90’s been a mainstay in real-world counterterrorism and police loadouts, with fantastic ammo capacity and handling, albeit an unconventional mag cartridge. Finally, if you’re going loud, the Supernova can be fired without any finesse and will kill any threat dead from surprisingly far away, it’s pretty broken for lethal-focused players.
Generally, the best loadouts you can choose in Ready or Not offer subtle differences, but with the right tools for the job, you’ll survive more often with your team. Instead of a one-size-fits-all build, you should have a few ideas like this on standby for when you get stuck in the game!