While obtaining a new sage vow in The Legend of Zelda: Tears of the Kingdom is certainly rewarding, you may wish that the associated sage avatar you can summon dished out just a bit more damage to enemies. That’s where the Sage’s Wills come in. By praying to a Goddess Statue with four Sage’s Wills on hand, you can augment the attack power of one of the sage avatars. Naturally, this additional power can really help out in fights, but actually finding the Sage’s Wills in Tears of the Kingdom’s world takes work. Keep on reading if you need some help uncovering every Sage’s Will in the game.
Where you can find Sage’s Wills
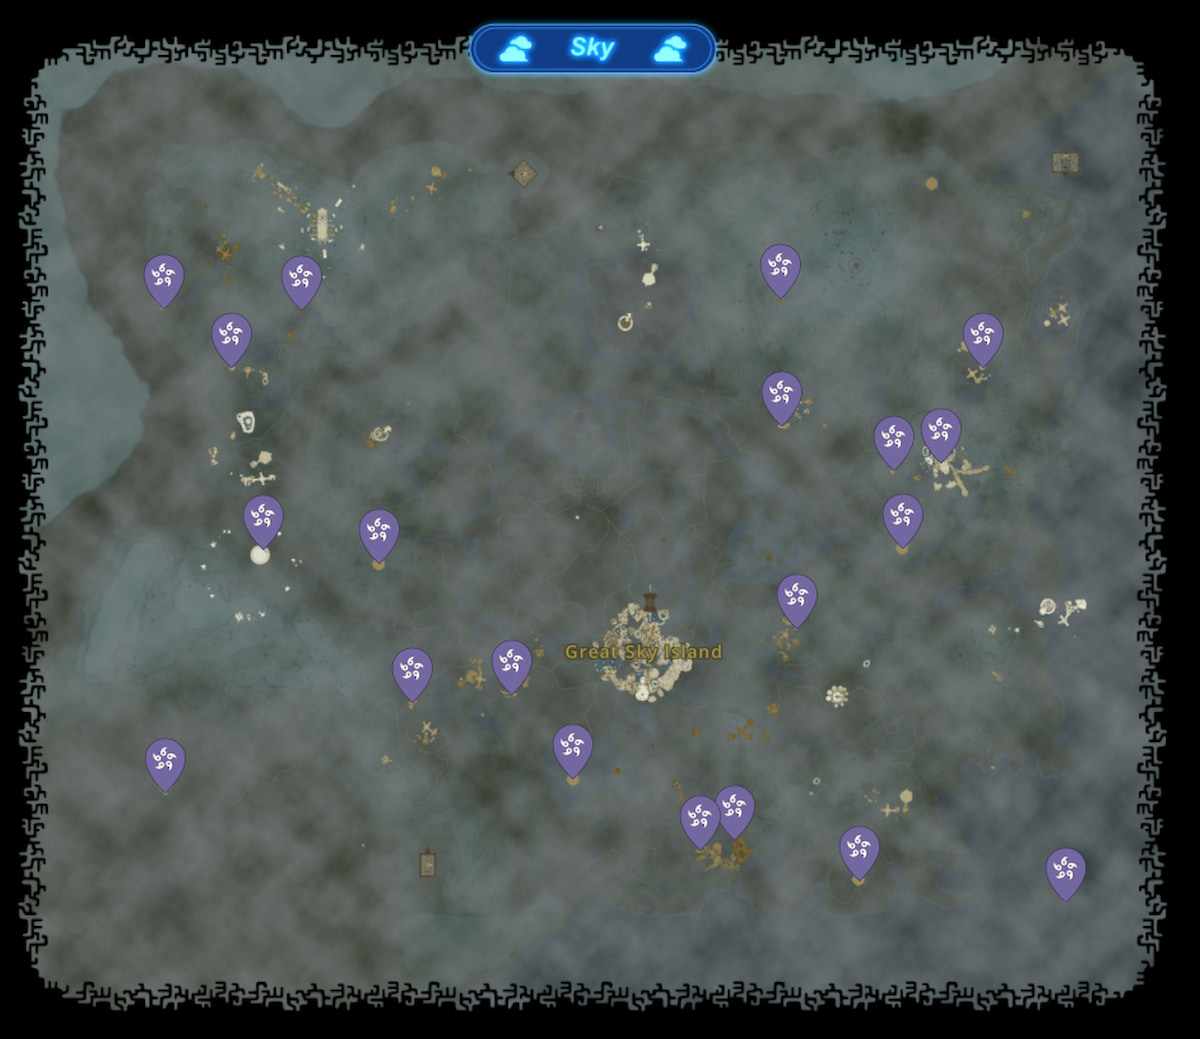
In total, Tears of the Kingdom hides 20 Sage’s Wills, four for each of the game’s five sages. Every single Sage’s Will sits in a chest hidden somewhere amongst the sky islands, so you can rule out the surface and the Depths when searching for these items. You can look at a complete map of the sky depicting every Sage’s Will location right down below.
Screenshot via PC Invasion
As for specific locations, read further for more information on each and every one.
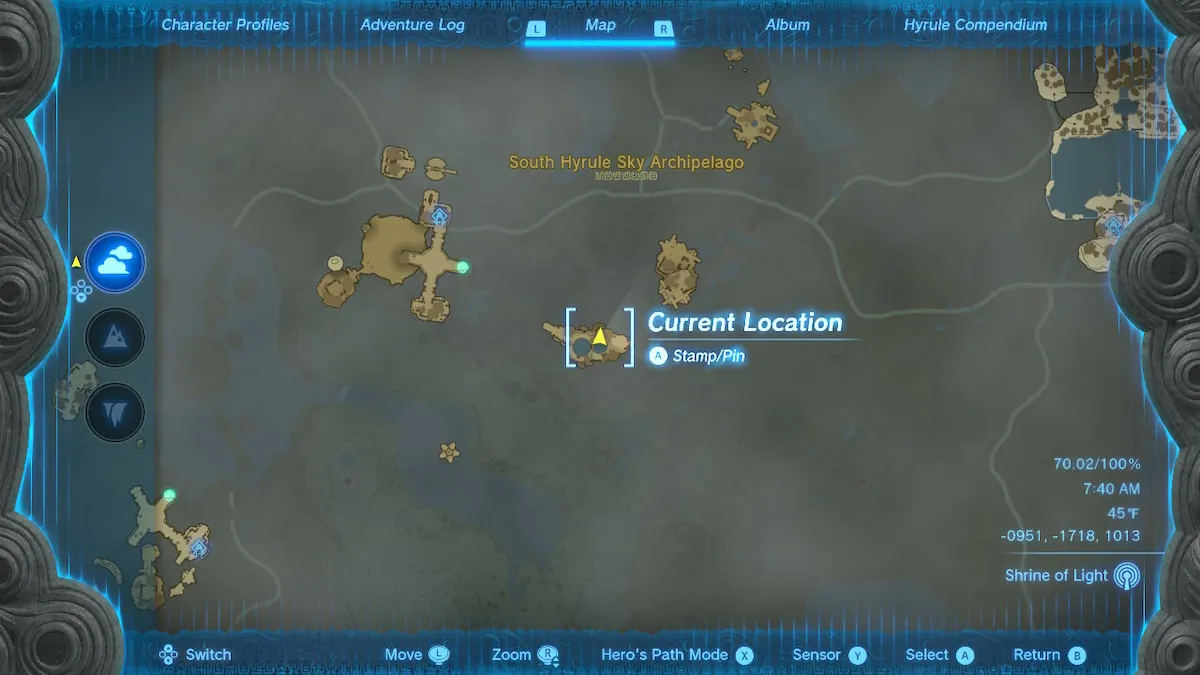
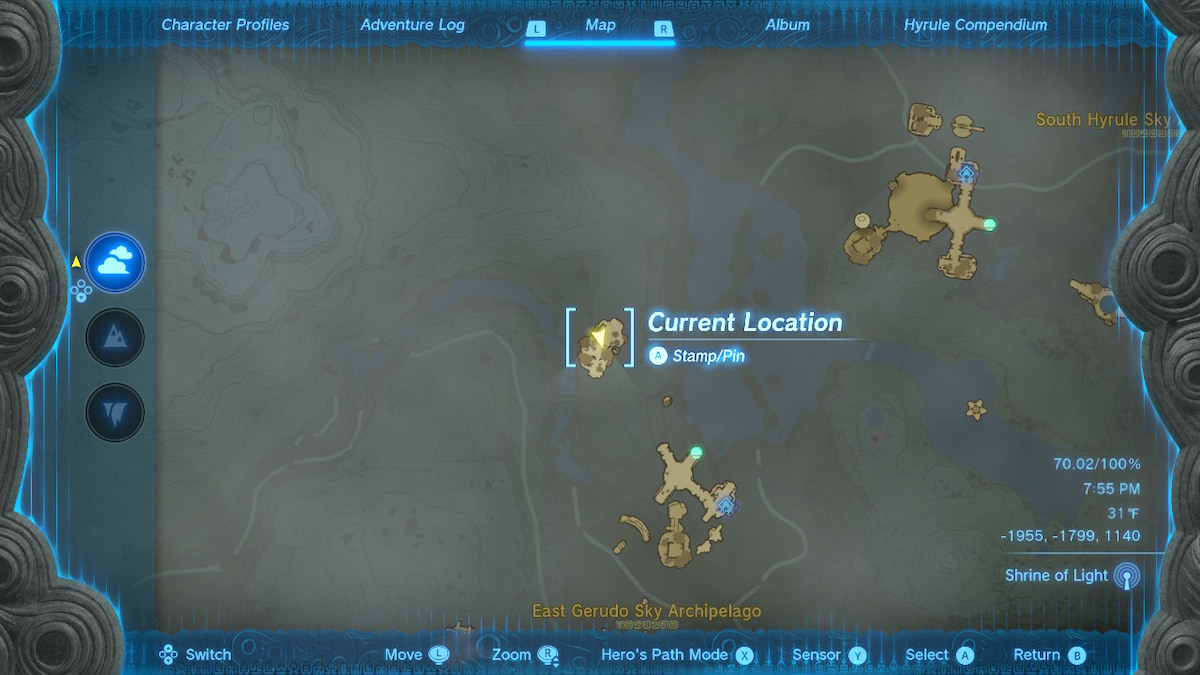
Sage’s Will #1: South Hyrule Sky Archipelago
Screenshot via PC Invasion
Above the Great Plateau exists a sky island featuring two pools of water you can reach by first launching up from the Hyrule Field Skyview Tower. Once airborne, you can glide to one of the islands below the one with the pools and attach a rocket to one of the floating platforms occupied by a Construct to launch yourself to it.
When searching around the perimeter of the pools, you will notice stone slabs you can move up and down with Ultrahand. When lifting the slab up, the water level of its respective pool will lower, but as soon as you let go, the slab will drop down, raising the water level back up. You need to go to the lower pool and keep the slab bordering it suspended so the water level will stay lowered, allowing you to open the chest containing the Sage’s Will at the bottom of the pool.
The intended solution involves placing a nearby log vertically along the protrusion on the gate where the stone slab is. By raising the slab and attaching it to the log, you will keep it suspended, but setting the log so it stays vertically can prove tricky. What I did instead was raise the stone slab for an extended period of time, drop it, and then reverse its movement using Recall. This lowers the water level for long enough so that you can rush in and open the chest before the water level raises up again.
Sage’s Will #2: Faron Sky Archipelago

Screenshot via PC Invasion
The easiest way to reach this remote circular island involves gliding from the Great Sky Island, on top of the area where the Room of Awakening is located. You will need a good bit of stamina to get there, but it’s much less of a hassle compared to other methods.
Upon arrival, you will encounter a patrolling Flux Construct III with a chest containing the Sage’s Will attached to one of its blocks. Although you can defeat the Flux Construct if you wish, you can also opt to simply detach the chest, open it, and then leave. Every time a Sage’s Will is guarded by a Flux Construct, you can approach it in this way.
Sage’s Will #3: North Necluda Sky Archipelago

Screenshot via PC Invasion
Easily reachable from the Sahasra Slope Skyview Tower, this Sage’s Will resides on the small blue circular island containing multiple caches of Luminous Stone ore. You can either glide straight to it or launch yourself there using the piston on the nearby central island.
Sage’s Will #4: South Hebra Sky Archipelago
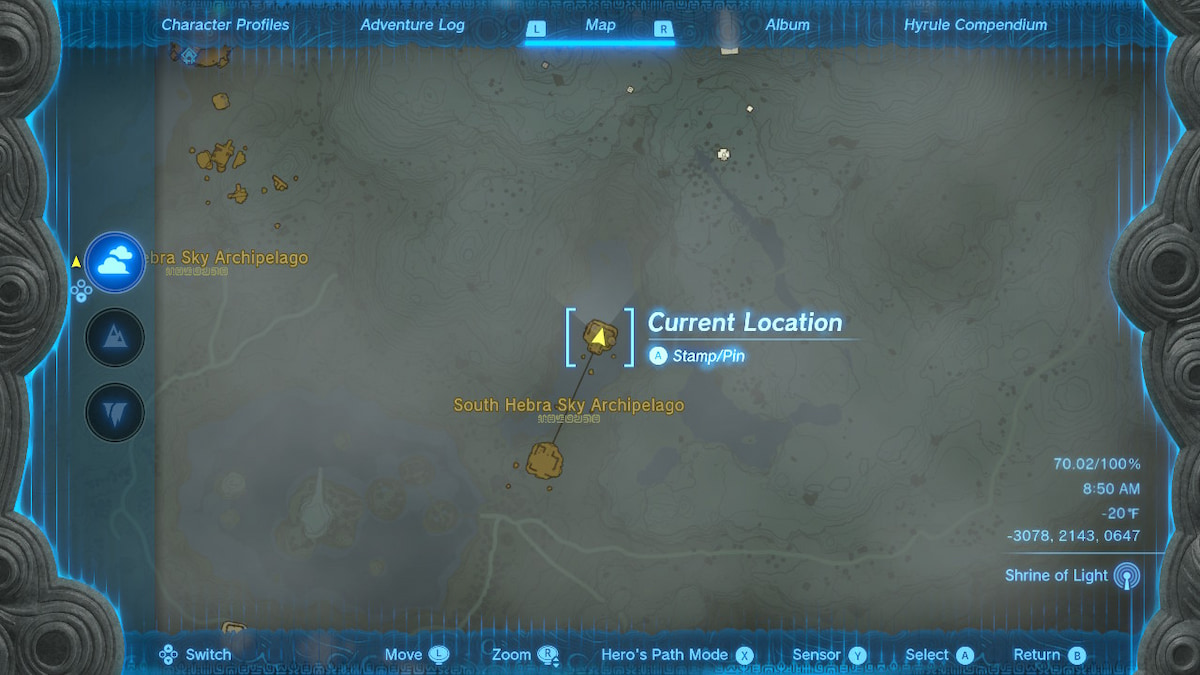
Screenshot via PC Invasion
From the Rospro Pass Skyview Tower, you can glide to two sky islands connected by a rail. The Sage’s Will is on the upper of the two islands, which you can access from the lower island by attaching a hook and a fan to a wooden plank and boosting yourself up the rail with it.
Sage’s Will #5: North Tabantha Sky Archipelago

Screenshot via PC Invasion
This one is on the uppermost of a trio of sky islands which are quite a ways from any nearby vantage points. Gliding straight from either the Lindor’s Brow or the Rospro Pass Skyview Tower are good options, although you’ll need a lot of extra stamina, and in the case of Rospro Pass, you also need Zora Armor to swim up the waterfall leading to the islands.
You can also use one of the floating platforms near the West Hebra Sky Archipelago island that houses the Ijo-o Shrine. The platform closest to the shrine has a hot-air balloon and a flame emitter, perfect for gaining some massive height. The balloon alone won’t be enough, however, so bringing rockets will help greatly in gaining extra height as well as closing the distance between you and your destination.
If you arrive on the lowermost island, you can get to the middle island by placing a mine cart on the connecting tracks and boosting it across with a nearby rocket. The tracks connecting to the island with the Sage’s Will on it is broken in the middle, however, so boosting off the tracks with a mine cart and then jumping off when it approaches the island is one potential strategy. Alternatively, you can boost a nearby glider off the tracks to more safely reach the island.
Sage’s Will #6: West Hebra Sky Archipelago
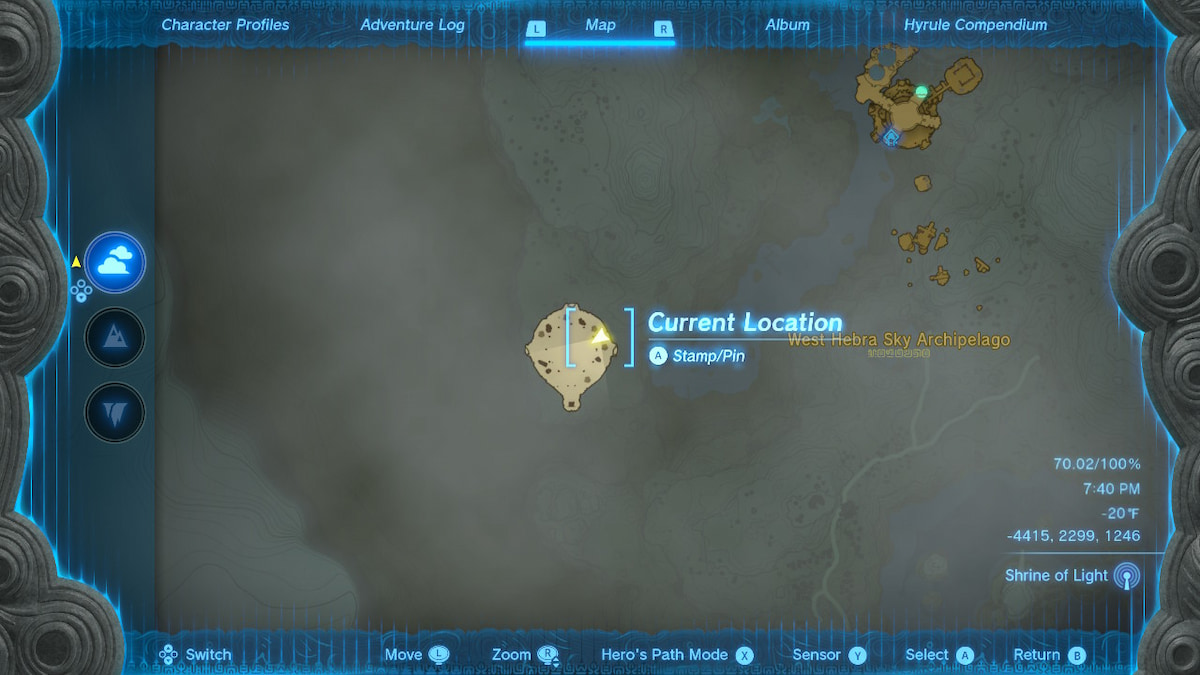
Screenshot via PC Invasion
You can utilize the same floating platform near the Ijo-o Shrine to reach the circular island containing this Sage’s Will as well. If you finished the Wind Temple, you can also glide to the island after bouncing off one of the smaller ships circling the temple. Once again, though, you need to have plenty of stamina in reserve to make it there.
As it turns out, getting to this sky island is the easy part. The Sage’s Will here is being guarded by the King Gleeok, a variant of the already tough Gleeok overworld boss that makes use of all the elements of the other three variants. This serves as easily the toughest of the Gleeok variants due to its high health, its variety of projectiles to watch out for, and its brutal final phase.
To make things worse, you can’t just take the Sage’s Will and leave like you can with the Flux Constructs. You have to take down the King Gleeok to unlock the chest, so you absolutely need to come well-prepared with high-level bows and melee weapons as well as sufficient protection against its incredibly damaging attacks.
Sage’s Will #7: Eldin Sky Archipelago

Screenshot via PC Invasion
A small sky island containing a Sage’s Will floats just above the Goron Springs near Goron City. If you head over to the Goron Springs, a handful of rocks will fall down from the sky. Standing on one of the rocks and raising it up using Recall will take you straight to this island, allowing you to nab the Sage’s Will with ease. Alternatively, you can launch up from the Eldin Canyon Skyview Tower and glide to the island from there.
Sage’s Will #8: South Eldin Sky Archipelago

Screenshot via PC Invasion
Right above the Eldin Canyon Skyview Tower exists a network of sky islands, with the Sage’s Will located within the multitiered island reachable via the mine cart tracks. You can see the chest on the island’s second tier, placed in a corner blocked off by vines you can burn or chop down with a sword.
Sage’s Will #9: Sokalla Sky Archipelago

Screenshot via PC Invasion
Reachable via the Ulri Mountain Skyview Tower, this Sage’s Will sits at the bottom of the massive orb floating near the central island with the piston. Enter the inside of the orb by falling through the hole on top, then rotate the mechanism to manipulate the orb’s outer shell. Set the mechanism so that the hole you entered through is positioned right on the side of the orb. This should create an opening to both leave and go under the floor you were standing on, allowing you to access the bottom of the orb where the chest resides.
Sage’s Will #10: Lanayru Sky Archipelago
Screenshot via PC Invasion
This Sage’s Will is found at the bottom of another, nearly identical orb, which you can easily access via the Upland Zorana Skyview Tower. Unlike the previous orb, this one has its shell rotating on its own thanks to the activated fan that spins the control mechanism right in the center. Head inside the orb once the entrance hole rotates up to the top. Then, wait until the hole reaches the side of the orb so you can run out and slip beneath the floor, granting you access to the chest at the bottom. If you don’t want to play the waiting game, you can detach the fan from the mechanism and rotate the outer shell manually.
Sage’s Will #11: Lanayru Sky Archipelago

Screenshot via PC Invasion
This Sage’s Will resides in another Flux Construct boss arena, which can be accessed from the Upland Zorana Skyview Tower without much effort. Aside from needing about two stamina wheels and having to watch out for Aerocudas on the glide there, this is one of the more straightforward floating boss islands to get to.
This time, a Flux Construct II guards the Sage’s Will chest, so you will have an easier time with this boss than the one in Faron’s sky should you choose to engage it. But of course, you can just go for the chest if you prefer.
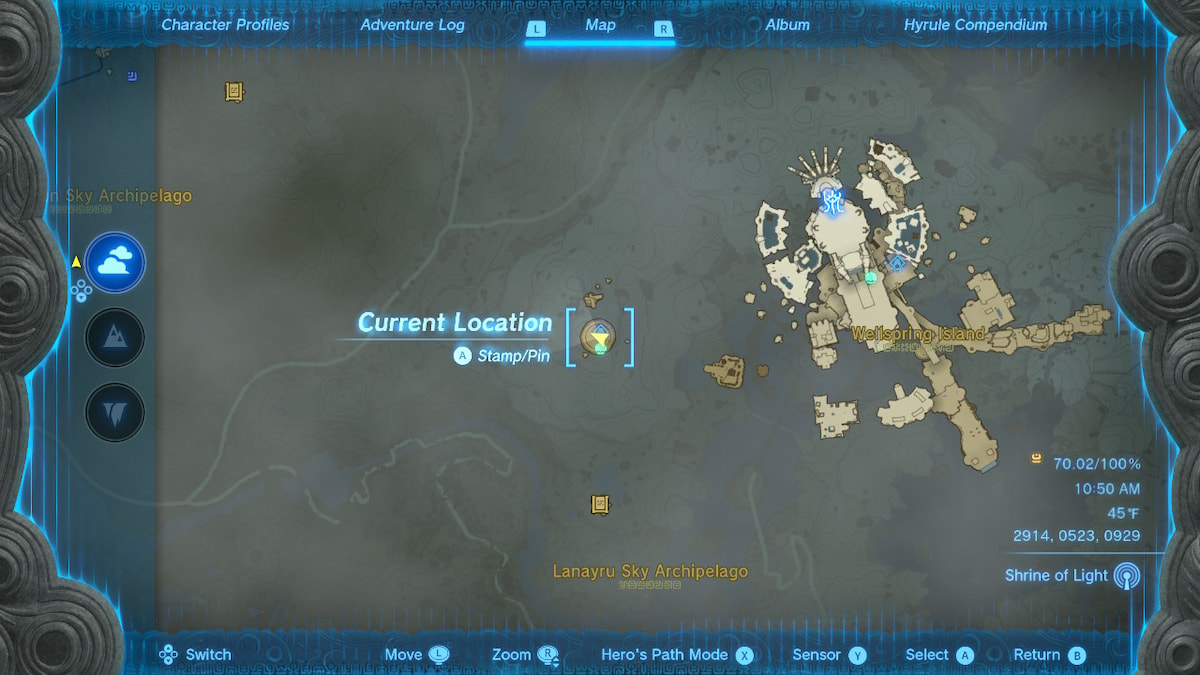
Sage’s Will #12: Wellspring Island
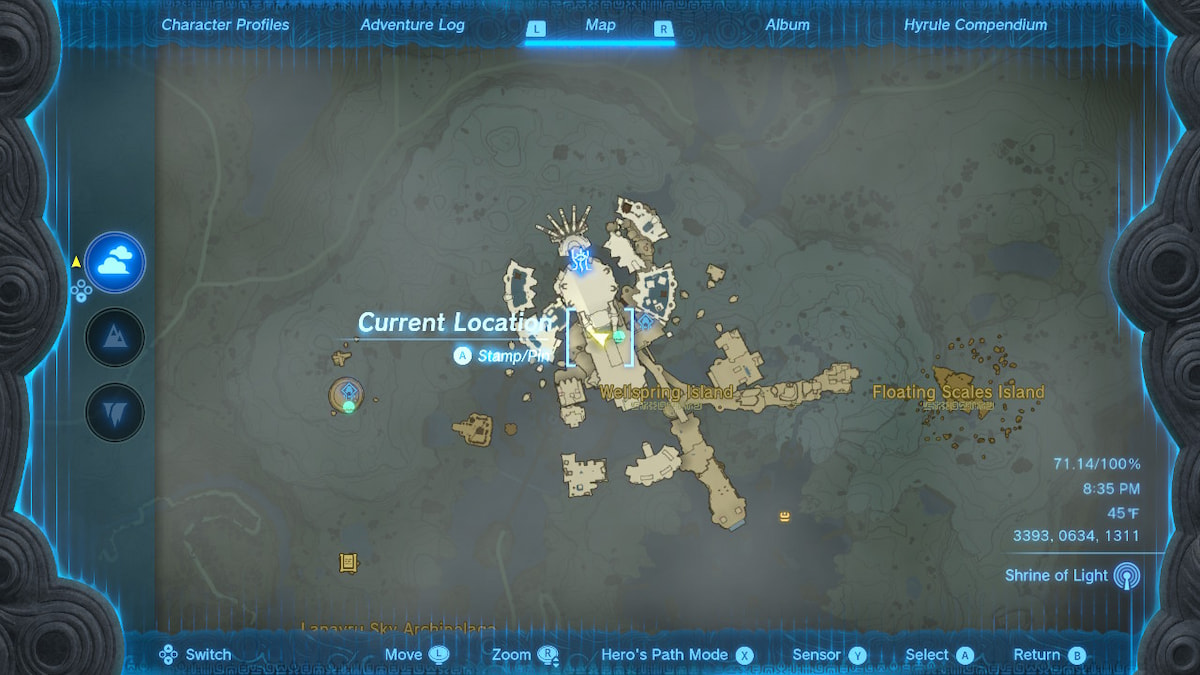
Screenshot via PC Invasion
Near the shrine and Zonai capsule dispenser on the way to the Water Temple, you can spot another Flux Construct II walking around with a chest. You can take the Sage’s Will from the chest straight away or battle the Flux Construct as per usual.
Sage’s Will #13: South Necluda Sky Archipelago

Screenshot via PC Invasion
Another easily accessible boss arena, this Sage’s Will location floats within gliding distance of the sky island network where the Kumamayn Shrine resides. The Rabella Wetlands Skyview Tower in East Necluda makes for the most efficient way to get to this sky island network. Once there, jump and glide to the island connecting to the nearby Flux Construct III arena. Then, using two stamina wheels, glide south to the floating arena, where you will find…another Flux Construct III. It’s Flux Construct country up in the Necluda skies it seems, so you should know what to do here.
Sage’s Will #14: South Necluda Sky Archipelago

Screenshot via PC Invasion
Yet another boss arena houses this Sage’s Will, except that this one is much harder to reach than the last few. The island is situated high above Eventide Island in the far southeast, and even from the aforementioned island network featuring the Kamumayn Shrine, there isn’t an obvious way to get there.
Somewhat counterintuitively, one of the best ways I found to access this boss arena lies further away, in the South Lanayru Sky Archipelago. Accessible via the Mount Lanayru Skyview Tower, the network of sky islands here has several fan-propelled flying platforms you can control. If you have a lot of Energy Wells or Zonai charges in reserve, this flying platform can take you all the way to the boss arena. You may need some extra stamina to glide the rest of the way if your battery runs out, but it overall makes for a relatively cost-efficient method for getting there.
Additionally, if you obtained the Autobuild skill from the Great Abandoned Central Mine in the Depths, you can automatically generate a wing glider with fans, a steering stick, and a rocket or a cart attached to fly toward the arena from the Kamumayn Shrine island network. You will need some zonaite to construct it, but it will result in a less time-consuming trip.
Upon arrival, you’ll have to deal with another King Gleeok to earn the Sage’s Will. Once again, this fight will likely overwhelm you if you go in unprepared, so do what you can to power yourself up before heading over there.
Sage’s Will #15: Dragonhead Island

Screenshot via PC Invasion
In the Faron skies, above the waterfalls near the Lakeside Stable and Joju-u-u Shrine, exists the Dragonhead Island, a mysterious location set in the middle of a thunderhead. If you arrive there early on, the thunderhead will make it incredibly difficult to see anything ahead of you. You can clear up this thunderhead as part of the late-game quest where you find the last sage in the game, Mineru. Although you can actually recruit Mineru at nearly any point in the game, the associated quest that lets you clear the thunderhead only becomes available after you unlock the other four sages and defeat the boss at Hyrule Castle.
You don’t necessarily need to clear the thunderhead to find the Sage’s Will at Dragonhead Island, though, as was the case in my playthrough. But either way, the easiest method for accessing Dragonhead Island has you going to the aforementioned waterfalls visible from the Lakeside Stable and using Recall on one of the rocks that fall there to ride up to the island. Once there, simply explore the island’s surface to eventually find a chest in the open with the Sage’s Will inside.
Sage’s Will #16: Thunderhead Isles

Screenshot via PC Invasion
As the name indicates, the location of this next Sage’s Will resides in the same thunderhead as Dragonhead Island. But not only are the Thunderhead Isles higher up than Dragonhead Island, but they are much, much harder to navigate if you don’t clear the thunderhead first. So it’s highly recommended that you do so before attempting to find the Sage’s Will here.
A quick glide from the Popla Foothills Skyview Tower is all you need to reach the Thunderhead Isles. You’ll want to head to the middle of the isles, which has a structure with a piston on top located near a Zonai capsule dispenser. Get on the structure and move the mechanism in the middle to rotate the piston so it points toward the tall floating island immediately visible on the left side. You can launch yourself from the piston to this island, but the piston only activates when lightning strikes the nearby dragon statue. This will happen on its own after a while, but you can also opt to use Riju’s lightning ability to speed things up.
Once you land on the island, break one of the cracked rocks blocking the structure in the middle to head inside. You will come across a chest containing the Sage’s Will guarded by a Like Like.
Sage’s Will #17: East Gerudo Sky Archipelago
Screenshot via PC Invasion
The Gerudo Canyon Skyview Tower grants you access to the network of sky islands that contains both the Rakashog Shrine and the next Sage’s Will. Specifically, the Sage’s Will hides away in the northernmost of these sky islands, which the piston on the central island can fling you towards. This island looks exactly like the multi-tiered one found in the South Eldin Sky Archipelago, and it locks the Sage’s Will chest behind a gate at the very bottom.
You can only open this gate by activating the light switch up above it, so you need a mirror to reflect light onto it. Fortunately, the island’s second tier houses some mirrors and a few other doodads that can help you solve this puzzle. You don’t actually need anything other than a mirror, though, so just bring one down to the gate.
You have to hold the mirror somewhere within the sunlight to reflect light off of it, but shadows block that sunlight out for most of the day. This forces you to wait for specific times of the day so that enough sunlight will shine down for you to complete the puzzle. I found that setting up a campfire and waiting until nighttime, or 5 p.m. to be exact, proved to be the best solution here.
Sage’s Will #18: Starview Island
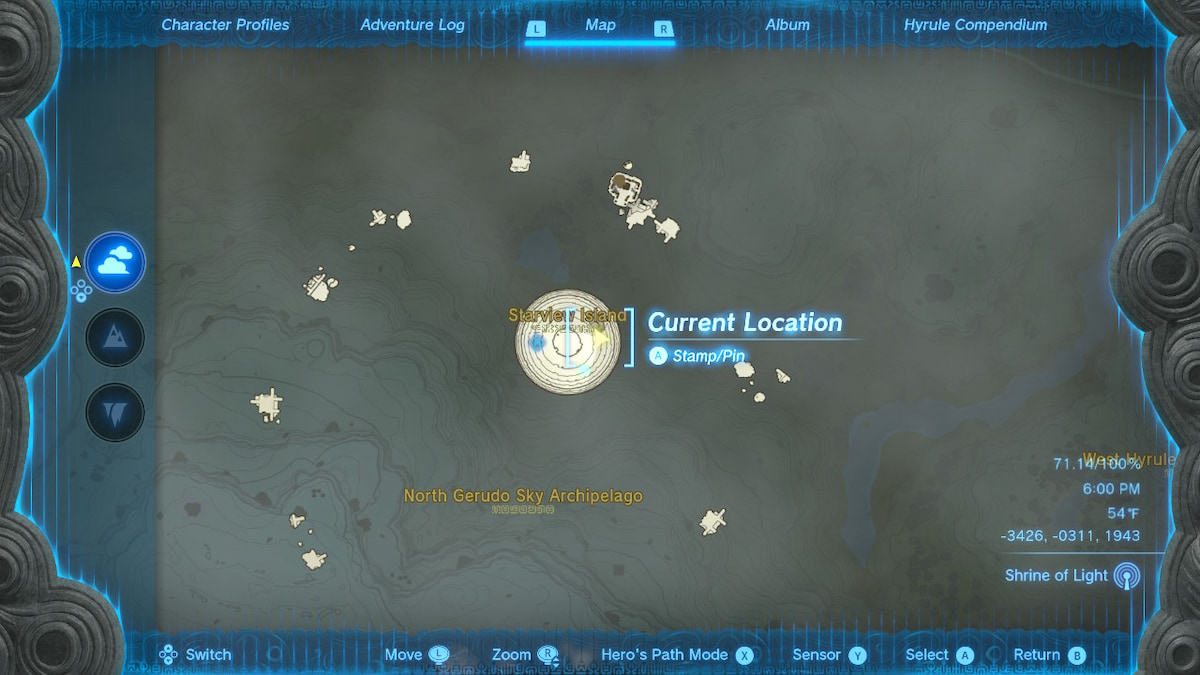
Screenshot via PC Invasion
On the outside, Starview Island seems just like the other floating orbs you had to visit for some of the other Sage’s Wills. It floats in the North Gerudo Sky Archipelago above the Gerudo Highlands, making the Gerudo Highlands Skyview Tower the natural choice for accessing it. First, though, you have to engage in some low-gravity platforming, leaping across islands and launching floating platforms up high with rockets to reach the orb.
Upon entering the orb through the usual orb up top, though, you’ll find a completely different interior from that of the other floating orbs. It contains a mirror puzzle in which you can activate two light switches: one that will reveal the Mayasiar Shrine and another that unlocks a gate with the Sage’s Will chest behind it. Spin the mechanism on the central platform to rotate the lights on the perimeter so that one of them aims at the mirror on the far side. This will reflect the light to the mirror up at the ceiling and then to another mirror on a high-up platform.
Go to that platform and rotate the mirror to point the light toward another mirror on a lower platform, and then do the same for that mirror. Then, instead of pointing the next mirror at the one on the central platform, rotate the mirror further so that the light hits the switch on the platform where the Sage’s Will is. After that, the prize is yours to keep.
Sage’s Will #19: West Hyrule Sky Archipelago
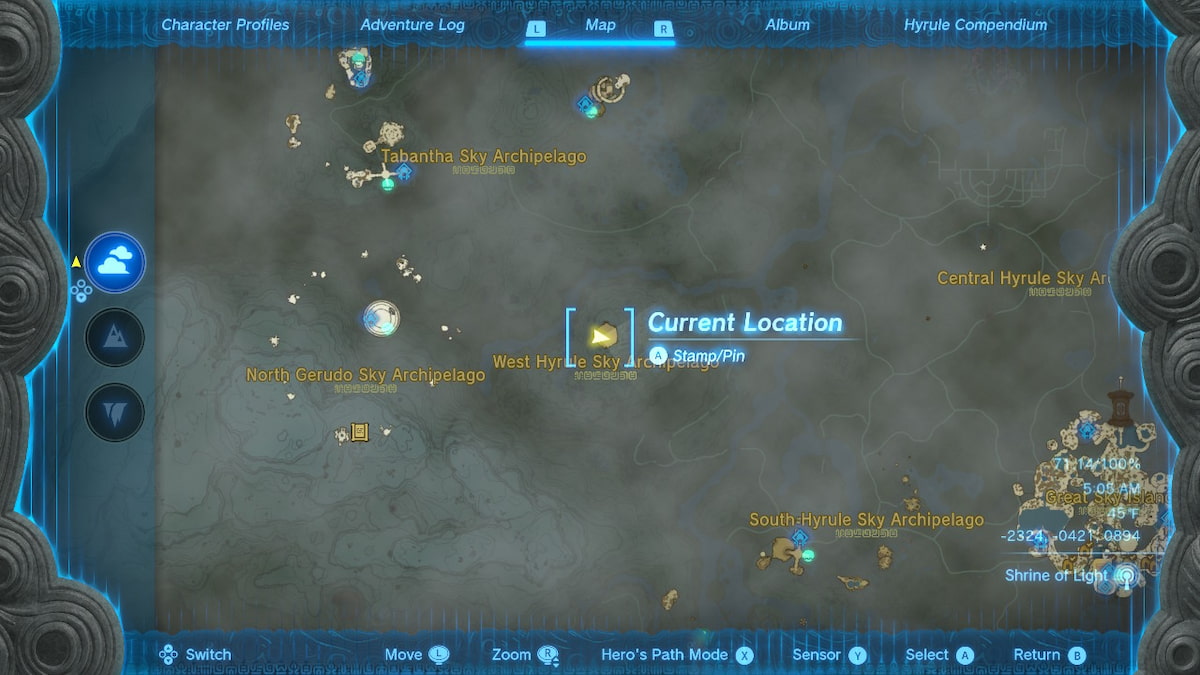
Screenshot via PC Invasion
On top of Starview Island, you can glide effortlessly down to the boss arena featuring this next Sage’s Will. And once again, arriving there will bring you face-to-block with yet another Flux Construct III. As usual, the same rules for the other Flux Construct fights apply here.
Sage’s Will #20: Gerudo Sky
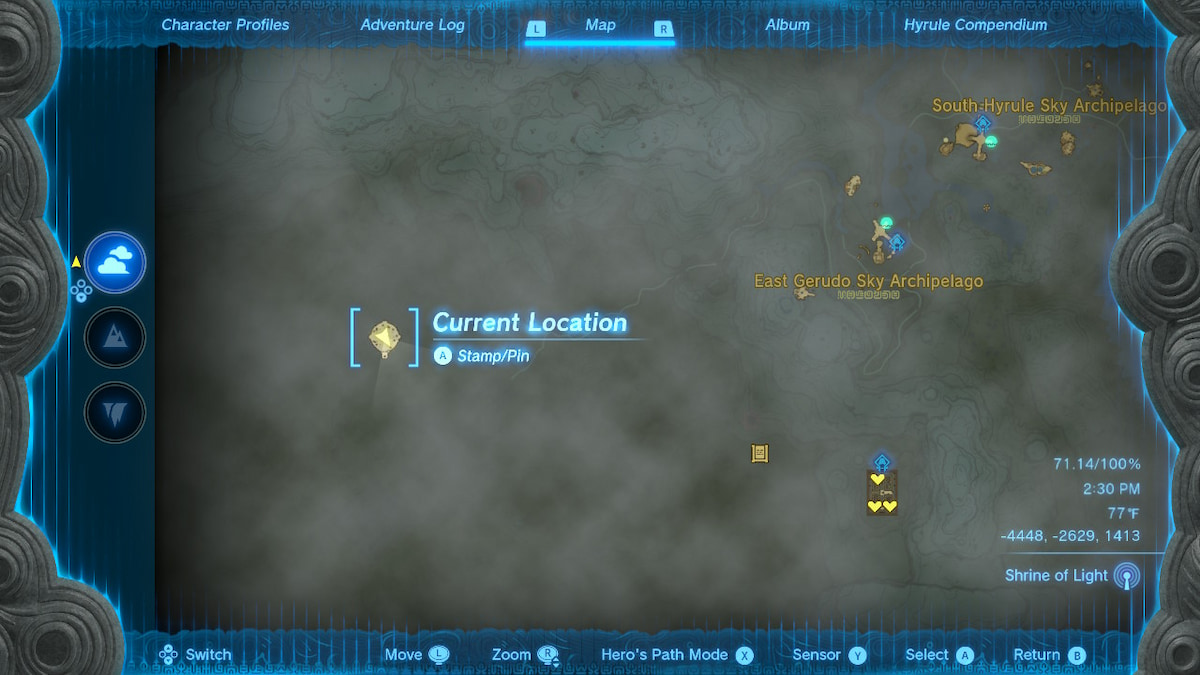
Screenshot via PC Invasion
The boss arena housing this Sage’s Will is at the far southwest of the map, and unfortunately, the closest sky islands are incredibly far away from it. You’ll have to think outside the box to find a way there, and you’ll be hard-pressed to do it without plenty of battery power and a whole lot of stamina.
There exists a number of possible methods for getting to this arena much like anything else in Tears of the Kingdom. The solution I ended up opting for had me standing at the top of Starview Island and making a fan-powered glider with Autobuild. Then, with a rocket attached, I could get a significant head start on my trip to the boss arena. After the glider ran out of juice, I would leap off and glide for the remainder of the trip, boosting myself with Tulin’s sage ability whenever it became available. It took a little over three stamina wheels, but the strategy ultimately worked for me.
Another King Gleeok awaits in this boss arena, so you won’t come away with the Sage’s Will easily. But if you have beaten the other two by this point, you should have an idea of how to prepare for this last one. Assuming you have collected all the other Sage’s Wills before getting here, this should serve as a more than worthy final challenge for this little side diversion in Tears of the Kingdom.