Ultimate ability: Death Totem
Revenant’s Ultimate has a few ins and outs, but it’s one of the best aggressive abilities to use in Apex Legends. This is because Death Totem allows teams to make risk-free aggressive plays that may otherwise result in a wipe. Just expect to spend a few matches adapting your strategies before you’re using it effectively, as you might end up sabotaging yourself with it if you don’t pay attention.
It’s best to think of this ability as a timed extra life that Revenant and other players can all tap into. Activating a Death Totem places it on the ground in front of Revenant. The totem can then be activated once by each player to transform into shadows that have Death Protection. As shadows, players are bound to the totem and get 100 health along with 25 seconds to do whatever. This typically means rushing enemies, as death only results in an instant respawn with half health at the totem. However, if players do not die after the 25 second timer, they revert to normal form at their current location.
Kill or be killed
The best way to use Death Protection is during multi-team firefights where your team can enter the fray and exploit the chaos with minimal risk. You can also use it effectively against single teams as well if you are able to avoid getting overly pressured. You typically can’t go wrong with beginning a fight in Death Protection, as it allows you to assess a situation without risk.
However, trading blows with enemies and taking a little damage is also fine due to how the mechanics for this Ultimate ability work. Death Protection only applies to player health, which means you can enter it without shields and still have full health. This makes Revenant’s Ultimate an excellent way to give your team an instant second wind when the enemies may need time to heal. This wave strategy is particularly effective if you concentrate the second push on downing more enemies and finishing them to skew the odds for the third push. By then, it’s usually just a matter of cleaning up.
You can also use Death Protection to perform rotations where you may be worried about taking excessive damage. It’s a way to test the waters of who’s watching you, and you can sometimes get the best spot on the map as a result of just going for it. Another strategy to consider is when you have your enemies’ backs up against the edge of the ring and your team is in position for the next circle. Deploying a totem in a safe location as the ring closes and pushing into an enemy team can get them caught outside of the ring where they will take damage and potentially die.
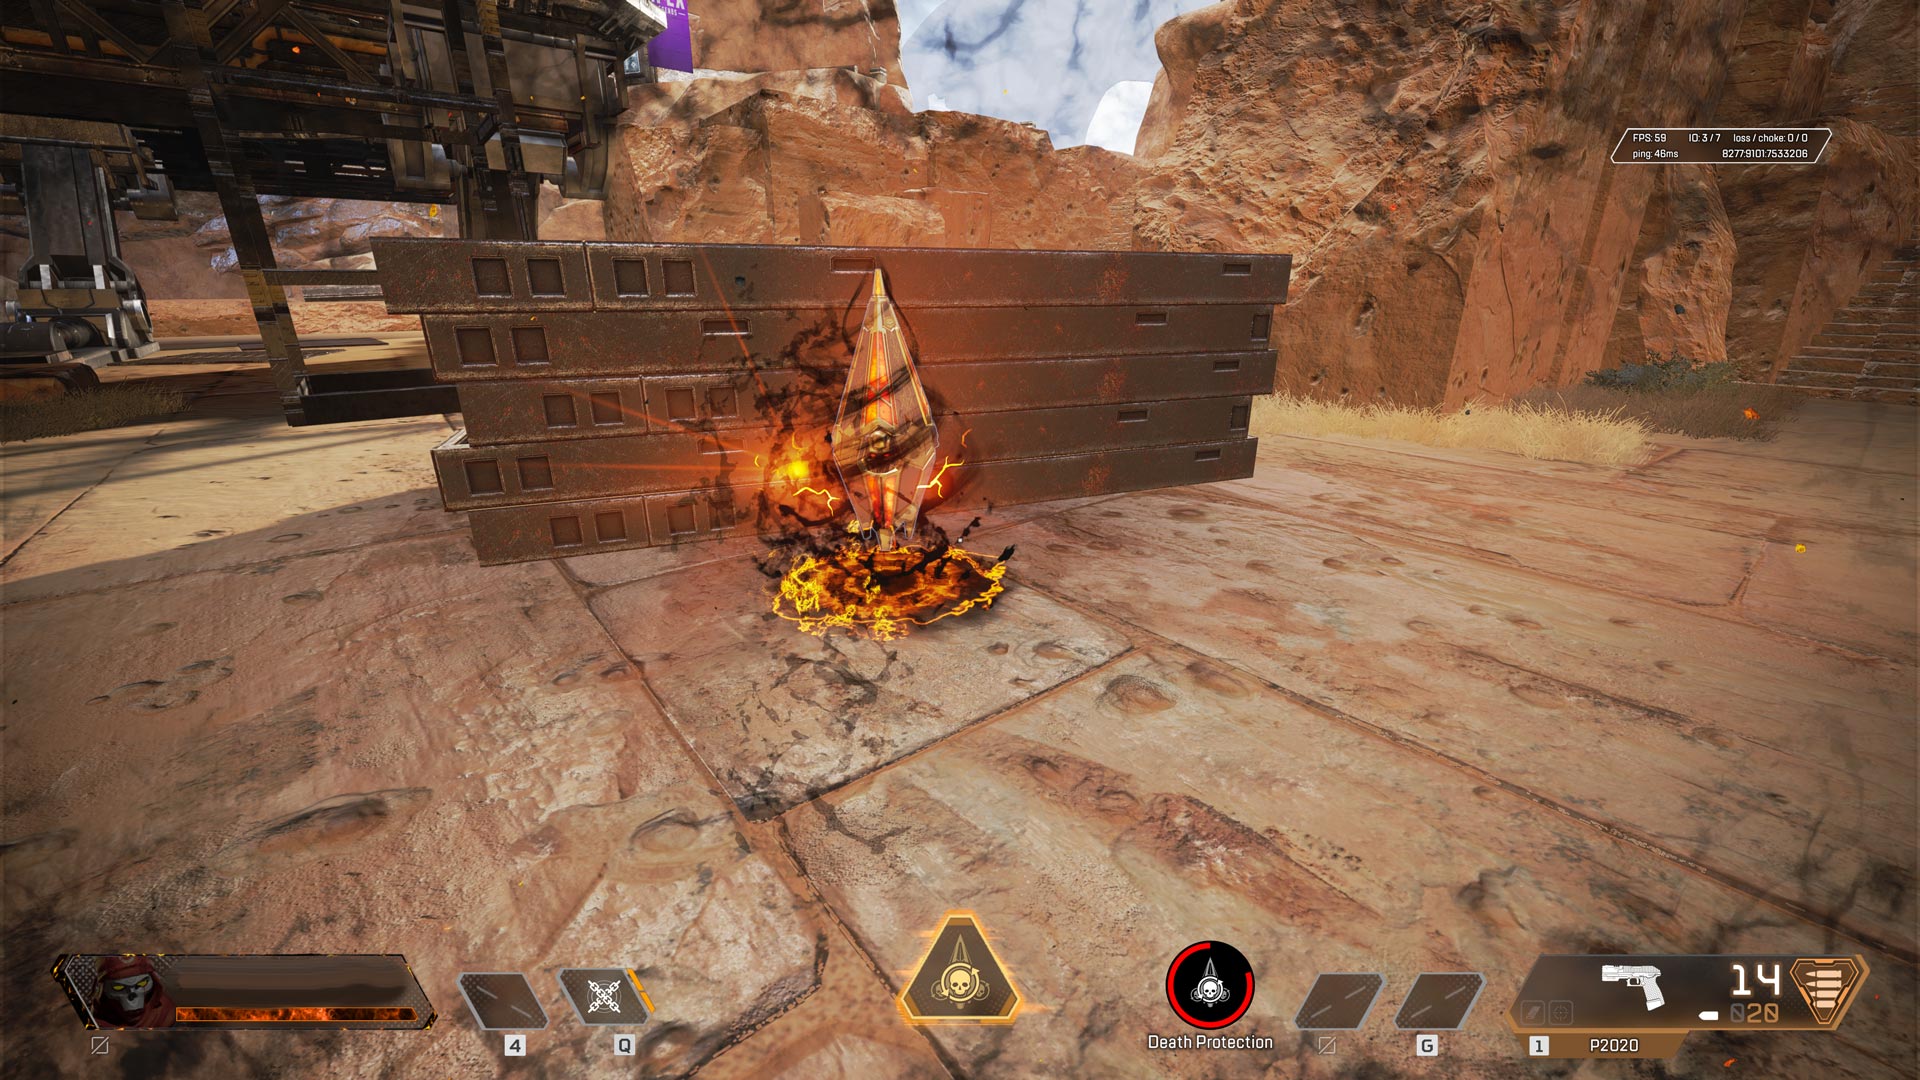
There are plenty of visual indicators that show Death Protection is active, but you need to focus on that timer wheel on the bottom center of the screen.
Don’t let it hinder you
While Death Totem is a very powerful tool, it can also act as a double-edged sword. Players in Death Protection will need to watch their countdown timer closely, and in most cases, ensure they die. Most shadow rushes result in at least one player being returned to the totem. As such, this can be problematic for players that exit shadow form within close proximity of enemy teams. The best way to prevent this is to always keep a Thermite grenade on you if you need to kill yourself very quickly. Alternately, stand out in the open to incentivize enemies to kill you and unwittingly assist your return.
There are some other considerations to be mindful of when using a Death Totem. As Revenant, it’s important to place the totem at a hidden, but convenient location for your team to recover from. You don’t want to be too far away where you can’t continue a push if you need to finish off a team. You also don’t want to be too close if your team is the one that needs to heal and reassess the situation. Enemy teams at near full strength will likely search for you after killing the shadow forms, and they can see which direction your shadow dissolves toward, giving away the totem position. This makes high ground or well fortified positions good locations for totems.
Also, totems can be destroyed by enemies. This is another reason why you should try and place these in protected, concealed areas when you can. It’s also important to know that enemies can enter shadow form through your totem as well, which is why you must keep these hidden. To further drive the point home of keeping these hidden, consider how disastrous it could be if a Caustic placed gas traps around your totem for your team to return to at half health.

Additional notes
Shadow form health is always determined by how much health you have upon activating Death Protection. For this reason, you should always restore health before activating the totem. Furthermore, you can’t use any healing items while in shadow form, so you need to maximize the limited health available to you.
Totems can also last for a while if players are continually using it. The totem spawns with a default countdown timer of 30 seconds, but each activation causes the timer to reset.
Finally, don’t forget to act like a monster while you basically are one in shadow form. Players that perform finishers on downed enemies will have their shields automatically restored upon exiting Death Protection, which is a nice little reason to flourish. You can use this perk mid-fight, especially if using the wave push strategy and want to get your shields back to finish off the remaining enemies swiftly.
- Intro
- Passive: Stalker
- Tactical: Silence
- Ultimate: Death Totem
- Squad recommendations and meta ranking