Yesterday, I mentioned how Black Armory was not what Destiny 2 players expected. Destiny 2‘s introductory content for this DLC, Volundr Forge, was at a higher Power Level (PL) than expected. Although I was able to clear the encounter yesterday, I had a feeling that many players would have trouble with it. It seems Bungie has listened to community feedback and they have lowered the Power Level requirements by five for each round.
- Round 1 will have enemies at 610 PL.
- Round 2 has enemies at 615 PL.
- Lastly, the third and final round with a boss fight is at 625 PL.
Everything’s more manageable with a minimum amount of grind. While I noted the steps to clear the activity, it might also be worthwhile to add more details. I’ve also added info on what you can expect once you’ve obtained the second Black Armory weapon from Ada-1. Also, thanks to some top players, we now know how to unlock the first part of the Mysterious Box exotic quest.
You can check out the steps to acquire the Hammerhead machine gun frame in our previous article. Once you’ve completed this part, you’ll gain access to the Volundr Forge in the EDZ.
Volundr Forge – Stay In The Caves
The “Cave Strategy” or “Cave Strat” is the most effective method of clearing out enemies in Volundr Forge. You can see this in the video above from Destiny 2 pro player Mtashed. All your squad needs to do is to stay at the caverns to the right side of the forge and let enemies funnel in. Given that a majority of players are undergeared, it’s best to stick together; communicate and coordinate to take out stronger foes such as Colossi and Centurions.
Remember, you have two minutes to clear each round and you gain more time by killing glowing enemies. Whenever glowing enemies are killed, they’ll drop an orb which you need to throw at the forge itself to charge it (20 charges in total). Do note that the orbs themselves can sometimes bounce off.
- Round 1 will have glowing Psions and Gladiators.
- Round 2 will have glowing Legionnaires and Colossi.
Weapon Loadouts
Your ideal loadout requires a shotgun, preferably the irreplaceable Ikelos SG, and the Whisper of the Worm for the boss fight. If you still need to get a Whisper of the Worm, you can check out our guide here.
Subclass Choices
Warlocks – At least one Warlock in your team should have Attunement of Grace for Well of Radiance. If you have more than one Warlock, have the second one use an add-clearing super instead (Stormcaller – Attunement of the Elements + Crown of Tempests works wonders).
Hunters – Blade Barrage (with Shards of Galanor) and Arc Staff (with Raiden Flux) are great for add-clearing. However, if you only have one Hunter, then Nightstalker with Orpheus Rigs is your best bet. Tethering lots of mobs and making orbs mean an easy path to victory.
Titans – Any subclass would do for Titans, especially ones that can kill as many enemies as possible. Don’t bother with a Melting Point since we’re going to snipe the boss from afar anyway, and you’re likely to get stomped to death if you get too close. The Sentinel’s Code of the Commander super might also help during the boss fight.
In any case, keep shooting, keep killing. Stick with your team and you’ll get past both rounds without issues for the most part. If a teammate dies too far away, don’t bother reviving them; let them respawn. Once you get to Round 3, the boss fight, run over to the entrance of the Volundr Forge area.
Volundr Forge – Boss Fight
The boss is surrounded by tiny drones that generate a shield around him. Simply shoot these from afar to break the shield. Once done, let the Warlock pop the Well of Radiance and start sniping with your Whisper of the Worm. Don’t forget to aim for a couple of seconds longer to get Box Breathing activated.
Eventually, the boss will re-summon the shield drones. Either shoot them down quickly from a distance or have someone pop their super to take them all out. The Well of Radiance will also run out eventually so just try to keep sniping or doing as much damage as possible.
Once the boss is dead, congratulations, you’ve got your Hammerhead machine gun! That’s just the first step though, as now the rest of Black Armory‘s grind opens up. But first, let’s get that completion tally for the Mysterious Box, shall we?
Mysterious Box – Fishhook Key
To obtain the Fishhook Key, you’ll need to spot two shield drones that spawn in specific areas of Volundr Forge once it starts. There’s one by the cliffs on the left side and another floating at the ceiling of the cave area. You can see their locations from that video above from Esoterickk.
Whether you clear the activity or not, there will be an extra chest that spawns just behind the Forge itself. Inside is a Black Armory key which you can use to complete one part of the Mysterious Box. As for the rest, we’ll find out more about them in the future.
Ada-1 Bounties
Once you return to Ada-1 in the Tower Annex, she’ll have bounties available for you to claim. There are multiple ways to earn Black Armory powerful drops (+6 to +8 Power Level) from her alone. Here are her bounties/rewards:
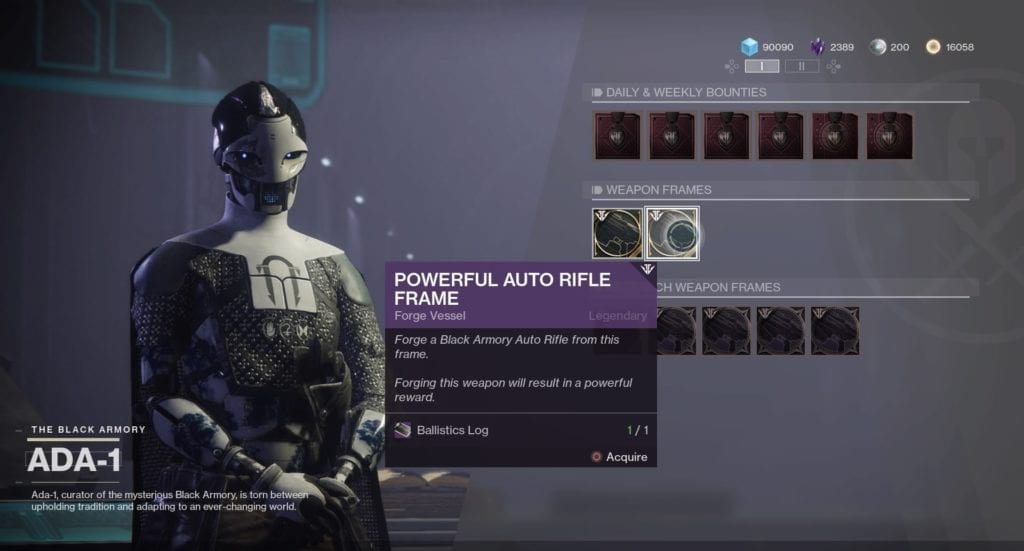
- Weapon Frame (Machine Gun, Auto Rifle) – These follow slightly similar steps as the ones you did prior to entering Volundr Forge. The rewards you get in the end will be powerful gear. I’ll explain more in detail below.
- Weekly Powerful Engram – Complete two weapon frames for the week. Basically, you’ll just need to reforge the weapon frames above and you’ll end up with another powerful engram as well.
- Ada-1 also offers “Augmented Weapons” from bounties. These are not powerful drops. They’re simply legendaries with an extra selectable perk. You can grab these if you want using Modulus Reports obtained from daily bounties. Once you’ve completed the task outlined for this pursuit, you’ll need to complete a Forge activity as well.
- Ada-1 also sells mod components and Black Armory mods in her second tab.
Back to weapon frames — in order to get these, you’ll need Ballistics Report from weekly bounty completions. There are two at the moment:
- Weekly Bounty #1 – Complete two Forge activities.
- Weekly Bounty #2 – Complete seven daily quests. Since Ada-1 has four daily quests per reset, you’ll want to come back the next day to get this done. Her daily bounties are fairly easy such as requiring kills with a specific weapon type or killing a Forge Saboteur.
The Ringing Nail – Bounties And Beyond

Let’s say you’ve completed another two Forge activities and earned yourself a Ballistics Report, then exchanged that for the Auto Rifle weapon frame. This rewards you with The Ringing Nail auto rifle (powerful drop), as you can see above.
The quest step is slightly similar to the one we did for the Hammerhead prior to entering the Volundr Forge, except this time, the focus is on Cabal and auto rifles. Here are the steps:
- Kill a Forge Saboteur (in the EDZ – Outskirts or Gulch). Obtain Photonic Essences from Cabal.
- Get auto rifle Cabal kills and auto rifle multikills – Just pick a Lost Sector with lots of Cabal and clear them out.
- Get auto rifle precision kills – It’s the same process as above.
- Obtain Radiant Seeds from powerful enemies – For this one, I chose to head to the Leviathan’s Underbelly in the Engine Room.
- Of course, once you’re done just head over back to Ada-1 and then to Volundr Forge. Clear it once more and you’ll have your Ringing Nail auto rifle.
One last thing, you can also pick up a duplicate weapon frame using Modulus Reports. I have not tested yet whether these duplicates are powerful drops.
All in all, you’re looking at four powerful weapon drops from Ada-1. They are:
- The Hammerhead machine gun
- Another machine gun from the weapon frame
- The Ringing Nail auto rifle from the weapon frame.
- A random armor from the weekly milestone once you’ve completed both weapon frames.
A good rule of thumb is to do all Forsaken milestones first on your character. Not only will this ensure more survivability in the Volundr Forge, but it also means these Black Armory weapons drop for you at your highest possible Power Level. From there, switch over your weapons to your alt and repeat the process — Forsaken milestones first, Black Armory stuff later.
Hopefully, the Forsaken powerful gear boosts your armor pieces since the Volundr Forge primarily provides weapons. Likewise, we hope you’ll also be raid-ready this coming Friday. If not, there’s still the Gofannon Forge to look forward to, where it looks like we’ll be clashing with Fallen.